¶ Introduction
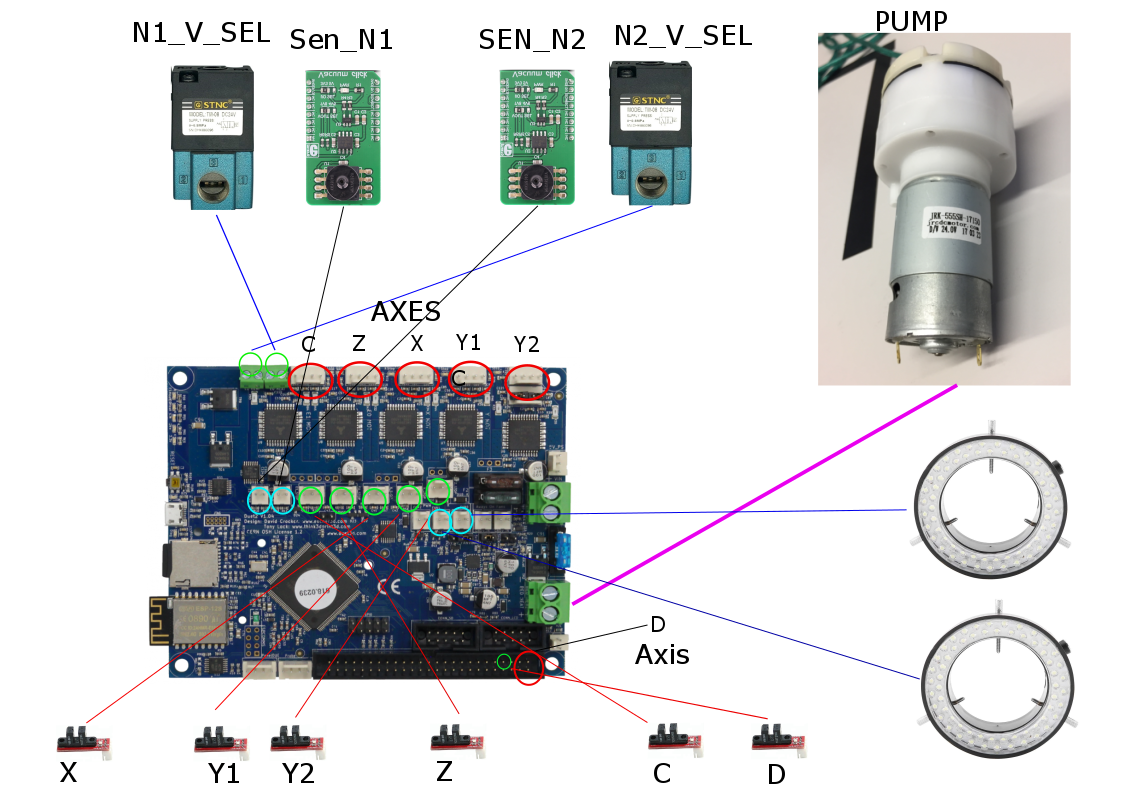
RepRapFirmware support OpenPnP, for the control of pick-and-place machines. Below is a user-submitted example of an OpenPnP setup.
There is also a Duet configuration example in the official OpenPnP documentation; see the OpenPnP wiki here for details.
¶ Configuring RepRapFirmware
Need to configure the following components.
- Setting axes
- Setting actuators
- Setting sensors
¶ Setting axes
The X axis to control the movement of the PnP head right and left. Right is positive.
The Y axis to control the movement of the PnP head forward and back. Forward is positive.
The Z axis to control raising and lowering of the PnP nozzle up and down. Up is positive.
The C and D (for dual nozzle) axes rotates clockwise and counter-clockwise. Counter-clockwise is positive.
RepRapFirmware supports X, Y and Z axes as standard and allows you to create up to 7 additional axes depending on the firmware version and which Duet you are using. Axes are created and associated with stepper motors using the M584 command in config.g. You may use any of the following letters to refer to the new axes: U V W A B C D (letter D is not supported in older firmware versions)
; Axis and motor configuration
M569 P0 S1                        ; X physical drive 0 goes forwards
M569 P1 S1                        ; Y right physical drive 1 goes forwards
M569 P2 S1                        ; Y left physical drive 2 goes forwards
M569 P3 S0                        ; Z physical drive 3 goes backwards
M569 P4 S1                        ; C physical drive 4 goes forwards
M569 P5 S1                        ; D physical drive 5 goes forwards

M584 X0 Y1:2 Z3 C4 D5                    ; set visibles drive
M350 X16 Y16:16 Z16 C16 D16I1                   ; configure microstepping with interpolation
M906 X800 Y800:800 Z800 C500 D500 I50           ; set motor currents (mA) and motor idle factor in per cent
M84 S40                             ; Set idle timeout
M92 X80.00 Y80.00:80 Z80 C8.888 D8.888             ; set steps per mm
M566 X200.0 Y200.0 Z200.0 C2000.0 D2000.0          ; set maximum instantaneous speed changes (mm/min)
M203 X22000.00 Y22000.00:22000.00 Z22000 C22000 D22000 ; set maximum speeds (mm/min)
M201 X1500.00 Y1500.00:1500.00 Z1500 C1500 D15000      ; set accelerations (mm/s^2)

; Endstops
M574 X1 S1 P"xstop"             ; configure active-low endstop for low end on X via pin xstop
M574 Y1 S1 P"ystop+zstop"       ; configure active-low endstop for low end on doble Y via pin ystop
M574 Z2 S1 P"e0stop"            ; configure active-low endstop for low end on Z via pin zstop
M574 C1 S1 P"!^e1stop"          ; configure active-low endstop for low end on E0 via pin zstop
M574 D1 S1 P"!^exp.heater3"     ; configure active-low endstop for low end on E0 via pin zstop
Homing
Start with the Z axis for safety and then X, Y, C and D.
homeall.g
M98 P"homez.g"
M98 P"homex.g"
M98 P"homey.g"
M98 P"homec.g"
M98 P"homed.g"
homex.g
G91               ; relative positioning
G1 H1 X-405 F5000 ; move quickly to X axis endstop and stop there (first pass)
G1 H2 X5 F2000    ; go back a few mm
G1 H1 X-405 F360  ; move slowly to X axis endstop once more (second pass)
G92 X0
G90               ; absolute positioning
This configuration is for two motors on the Y axis and they need to be aligned, for this we synchronize them independently.
homeyl.g
G91                        ; relative positioning
G1 H1 Y-500 F5000          ; move quickly to Y axis endstop and stop there (first pass)
G1 H2 Y2  F2000            ; go back a few mm
M584 Y1                    ; Y-axis right side
M574 Y1 S1 P"ystop"        ; Y-axis right side endstop Active
G1 H1 Y-15 F360            ; move slowly to Y axis endstop once more (second pass)
M584 Y2                    ; Y-axis Left side
M574 Y2 S1 P"zstop"        ; Y-axis left side endstop Active
G1 H1 Y-15 F360            ; move slowly to Y axis endstop once more (second pass)
M584 Y1:2                  ; Combine Y-Axis
M574 Y1 S1 P"ystop+zstop"
G92 Y0
G1 H2 Y5  F2000            ; go back a few mm
G90                        ; absolute positioning
homec.g
G91               ; relative positioning
G1 H1 C-405 F10000 ; move quickly to C axis endstop and stop there (first pass)
G1 H2 C5 F2000    ; go back a few mm
G1 H1 C-405 F360  ; move slowly to C axis endstop once more (second pass)
G92 C0
G90               ; absolute positioning
homed.g
G91               ; relative positioning
G1 H1 D-405 F10000 ; move quickly to D axis endstop and stop there (first pass)
G1 H2 D5 F2000    ; go back a few mm
G1 H1 D-405 F360  ; move slowly to D axis endstop once more (second pass)
G92 C0
G90               ; absolute positioning
¶ Setting actuators
Actuators are generic devices that perform additional tasks.
- Nozzle valve control .
- Vacuum pump control.
- Camera lighting control.
; Mosfet outputs
M950 P0 C"bedheat"                ; Vacuum pump output
M950 C"fan0" C"nil"             ; disable fan 0 and free up the associated pin
M950 P1 C"fan0"                 ; Vacuum valve N1 output
M950 C"fan1" C"nil"             ; disable fan 1 and free up the associated pin
M950 P2 C"fan1"                 ; Vacuum valve N2 output
M950 P5 C"e0heat"                 ; Down camera lights output
M950 P6 C"e1heat"                 ; Up camera lights output
¶ Setting sensors
Some machines control the vacuum in the head to confirm the pick of a component, for this we use vacuum sensors like MPXV6115V.
; Sensors
M308 S1 P"e0temp" Y"linear-analog" A"V_Sen_H1" F1 B0 C4095
M308 S2 P"e1temp" Y"linear-analog" A"V_Sen_H2" F1 B0 C4095
¶ Wiring
¶ Configuring OpenPnP
[to be completed]
