¶ Introduction
Duet Web Control and RepRapFirmware from 1.19 implement a mechanism to simplify the loading and unloading of different filaments into a tool. The purpose of this is to allow for easier filament exchanges and to keep track of the material in use.
¶ Overview
Filaments are created in the 'Filaments' folder on the SD card. Each filament is created as a folder, and has three associated files in the folder for handling each filament; config.g, load.g and unload.g.
The currently assigned filament for each tool is automatically saved in a file called "/sys/filaments.csv", so the assigned/loaded filament is remembered even after a reset. Sending M703 after a tool is selected will cause the filaments.csv file to be read, and the respective filament config.g will be run, to configure the parameters for the filament that is currently loaded.
If you have a single tool, it is recommended that you put M703:
- Either in your config.g - if you have, for example, T0 in your config.g, put it after that.
- Or put M703 in the start G-code after the tool is selected.
If you have a multiple tool machine, put M703 in the tool change tpostN.g macro, so the filament settings are applied for each tool after it is selected.
Filament assignments can only be made for tools that have exactly one extruder drive assigned. This limitation ensures that the load and unload macros work with each extruder drive. However, mixing nozzles, tools that use two extruder drives in a push-pull arrangement, and Multiple Material Units (MMU) can all be supported. See the 'Tool configuration' section below.
¶ Creating new filaments
In Duet Web Control, there is a page called "Filaments". Switch to this page.
Filaments you have created will show as a list here. If you haven't configured any filaments yet, the list will show 'No Filaments'.

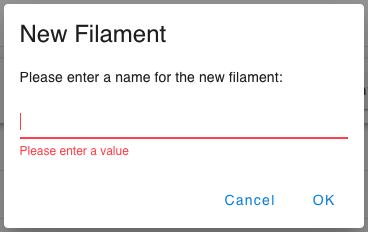
Create a filament by clicking on 'New Filament', and give it a name, followed by 'OK'.
Alternatively, you can also upload filament configurations that were previously downloaded as a .zip file, by clicking the 'Upload Filament Configs', then browse to and select the filament .zip file, to add them to your filament library.
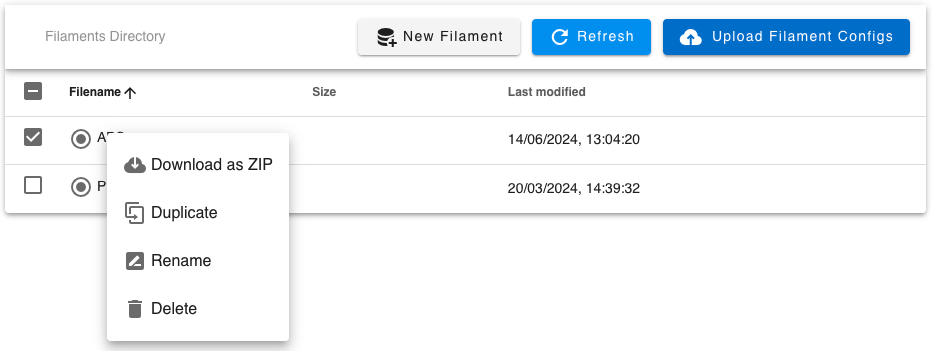
Right-clicking on a filament name will allow you to download, duplicate, rename or delete the filament. You can't rename or delete a filament that is in use.
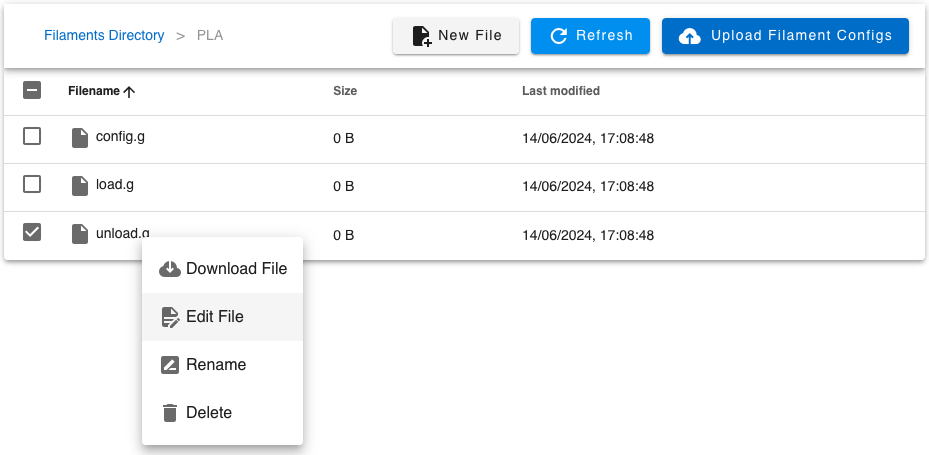
The 'Filament' entries are folders on the SD card, in the /filaments folder. Clicking on a filament will show the three files associated with each filament: config.g, load.g and unload.g. These can be edited to change the parameters and loading/unloading functionality, by right-clicking on them.
¶ Filament macros
¶ config.g
You can use the M703 gcode to load a filament-specific config.g to modify settings pertinent to your chosen filament.
After assigning a filament to a tool, this command may be used to run /filaments/<filament-name>/config.g to set parameters like temperatures, extrusion factor, retract distance, etc. If no filament is loaded, the code completes without a warning.
If the filaments feature is used, it is recommended to put this code into tpost*.g to ensure the right filament parameters are set. Supported in RepRapFirmware 2.02 and newer.
The filament config.g only needs to contain the commands you want to modify. It does NOT need to duplicate every setting from /sys/config.g
Example custom commands for /filaments/PETG/config.g
M207 S0.9 R0.0 F3000 T3000 Z0.0           ; firmware retraction settings for PETG
M307 H0 A214.3 C641.7 D1.3 S1.00 V24.0 B0 ; Bed PID tune for 120c
M307 H1 A491.0 C190.9 D2.8 S1.00 V23.9 B0 ; Hot end PID tune at 280c
M566 X1200 Y1200 Z60 E3000                ; jerk settings for PETG
M204 P1000 T4000                          ; Set printing and travel accelerations
These settings will then override those loaded at boot time in /sys/config.g
¶ load.g
The purpose of the filament mechanism is to simplify the process of loading and unloading macros. Hence the load macro is invoked for a given tool with one extruder when it is explicitly loaded. An example for a load macro (for ABS in this case) may look like this:
M291 P"Please wait while the nozzle is being heated up" R"Loading ABS" T5 ; Display message
G10 S200 ; Set current tool temperature to 200C
M116 ; Wait for the temperatures to be reached
M291 P"Feeding filament..." R"Loading ABS" T5 ; Display new message
M83 ; Extruder to relative mode
G1 E10 F600 ; Feed 10mm of filament at 600mm/min
G1 E470 F3000 ; Feed 470mm of filament at 3000mm/min
G1 E20 F300 ; Feed 20mm of filament at 300mm/min
G4 P1000 ; Wait one second
G1 E-10 F1800 ; Retract 10mm of filament at 1800mm/min
M400 ; Wait for moves to complete
M292 ; Hide the message
G10 S0 ; Turn off the heater again
You may adjust this template for your own needs. It can be modified by right-clicking on the entries as shown in the previous section.
¶ unload.g
Similar to the load macro there is another macro to perform necessary steps to eject the current filament. This macro is always invoked when a filament is being changed or unloaded. An example (once more for ABS) may look like this:
M291 P"Please wait while the nozzle is being heated up" R"Unloading ABS" T5 ; Display message
G10 S100 ; Heat up the current tool to 100C
M116 ; Wait for the temperatures to be reached
M291 P"Retracting filament..." R"Unloading ABS" T5 ; Display another message
G1 E-20 F300 ; Retract 20mm of filament at 300mm/min
G1 E-480 F3000 ; Retract 480mm of filament at 3000mm/min
M400 ; Wait for the moves to finish
M292 ; Hide the message again
M84 E0:1 ; Turn off extruder drives 1 and 2
¶ Using filaments
¶ Loading filaments
In principle filaments can be always loaded by clicking on Tools that have one extruder assigned. When you click on the tool caption, a popover shows show up asking you to either select the tool or to load a filament:
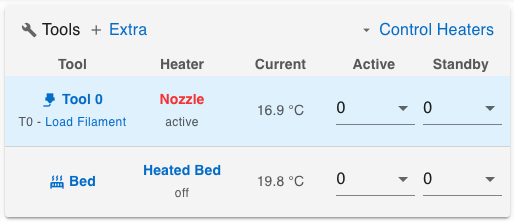
When you click on "Load Filament", you will get a list of all the filaments that are not in use. You can only load one filament at once. The current filament mechanism is intended to reflect your spools and the underlying mechanism will be likely enhanced to include some usage statistics as well.
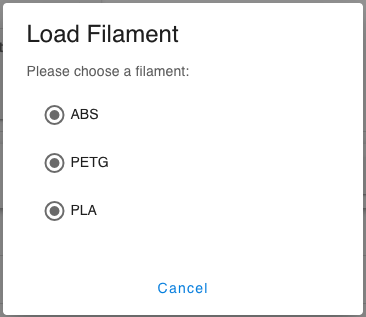
Once you click on an entry, the tool you clicked on first will be selected (unless it is already selected) and the load macro of the chosen filament will be run. Once that is complete, Duet Web Control will display the new filament in the tool row and the new filament assignment is saved to the Duet's SD card.
¶ Unloading filaments
Unloading filaments works very similar to the load process. Just click on the tool with a loaded filament and you should see another popover:
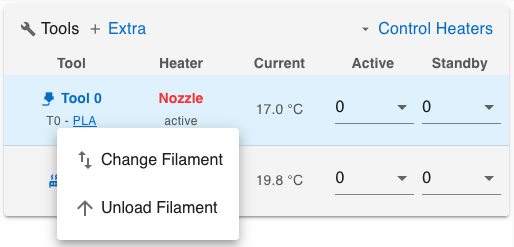
When you click on "Unload", the firmware will select the chosen tool (unless it is already selected) and invoke the unload macro. Once that is complete, the firmware will erase the filament assignment for the tool's extruder drive.
¶ Changing filaments
If a filament is already loaded and you only want to change it, there is another option in the popover for this purpose. In principle DuetWebControl will select the clicked tool (unless already selected), run the unload macro of the currently loaded filament and then the load macro for the chosen other filament. If you want to make use of this mechanism, it is advised to add extra blocking prompts using M291 to the load and/or unload macros.
¶ Tool configuration
If you have more than one extruder drive per tool, some special considerations have to be made to configure the tool for the Filament functionality to work. In a system where there is more than one extruder per tool, you can define which extruder to use as the 'tool' extruder in the tool definition with the M563 L parameter:
- Lnnn Drive to use for filament mapping. By default RRF will use the first and only extruder drive if this parameter is not specified
L0 is the first extruder drive (D0), L1 is the second (D1) etc. Eg if the tool uses M563 D0:1, and the filament extruder is drive 1, add L1 to the M563 command in config.g.
¶ Multiple Material Units
Set up tools for each MMU slot. Changing tools should be covered already, and changing filament once a tool has been selected is the same as on a single extruder machine. It shouldn't particularly matter if you select the extruder at the nozzle (assuming there is one) or the MMU extruder, as the 'filament' extruder.
¶ Mixing nozzles
Set up a combined tool for all filaments (eg T0) and a tool for each extruder (eg T1, T2 and T3). When changing filament, change to the tool that represents the filament to be changed, change filament normally, then switch back to T0.
¶ Push-pull extruders
Where a tool has an extruder at the nozzle, and another extruder to feed filament from the remote spool, the two extruders effectively work in tandem. Again, it doesn't matter too much which you set as the 'filament' extruder.
¶ GCodes
The filament mechanism utilizes three GCodes: