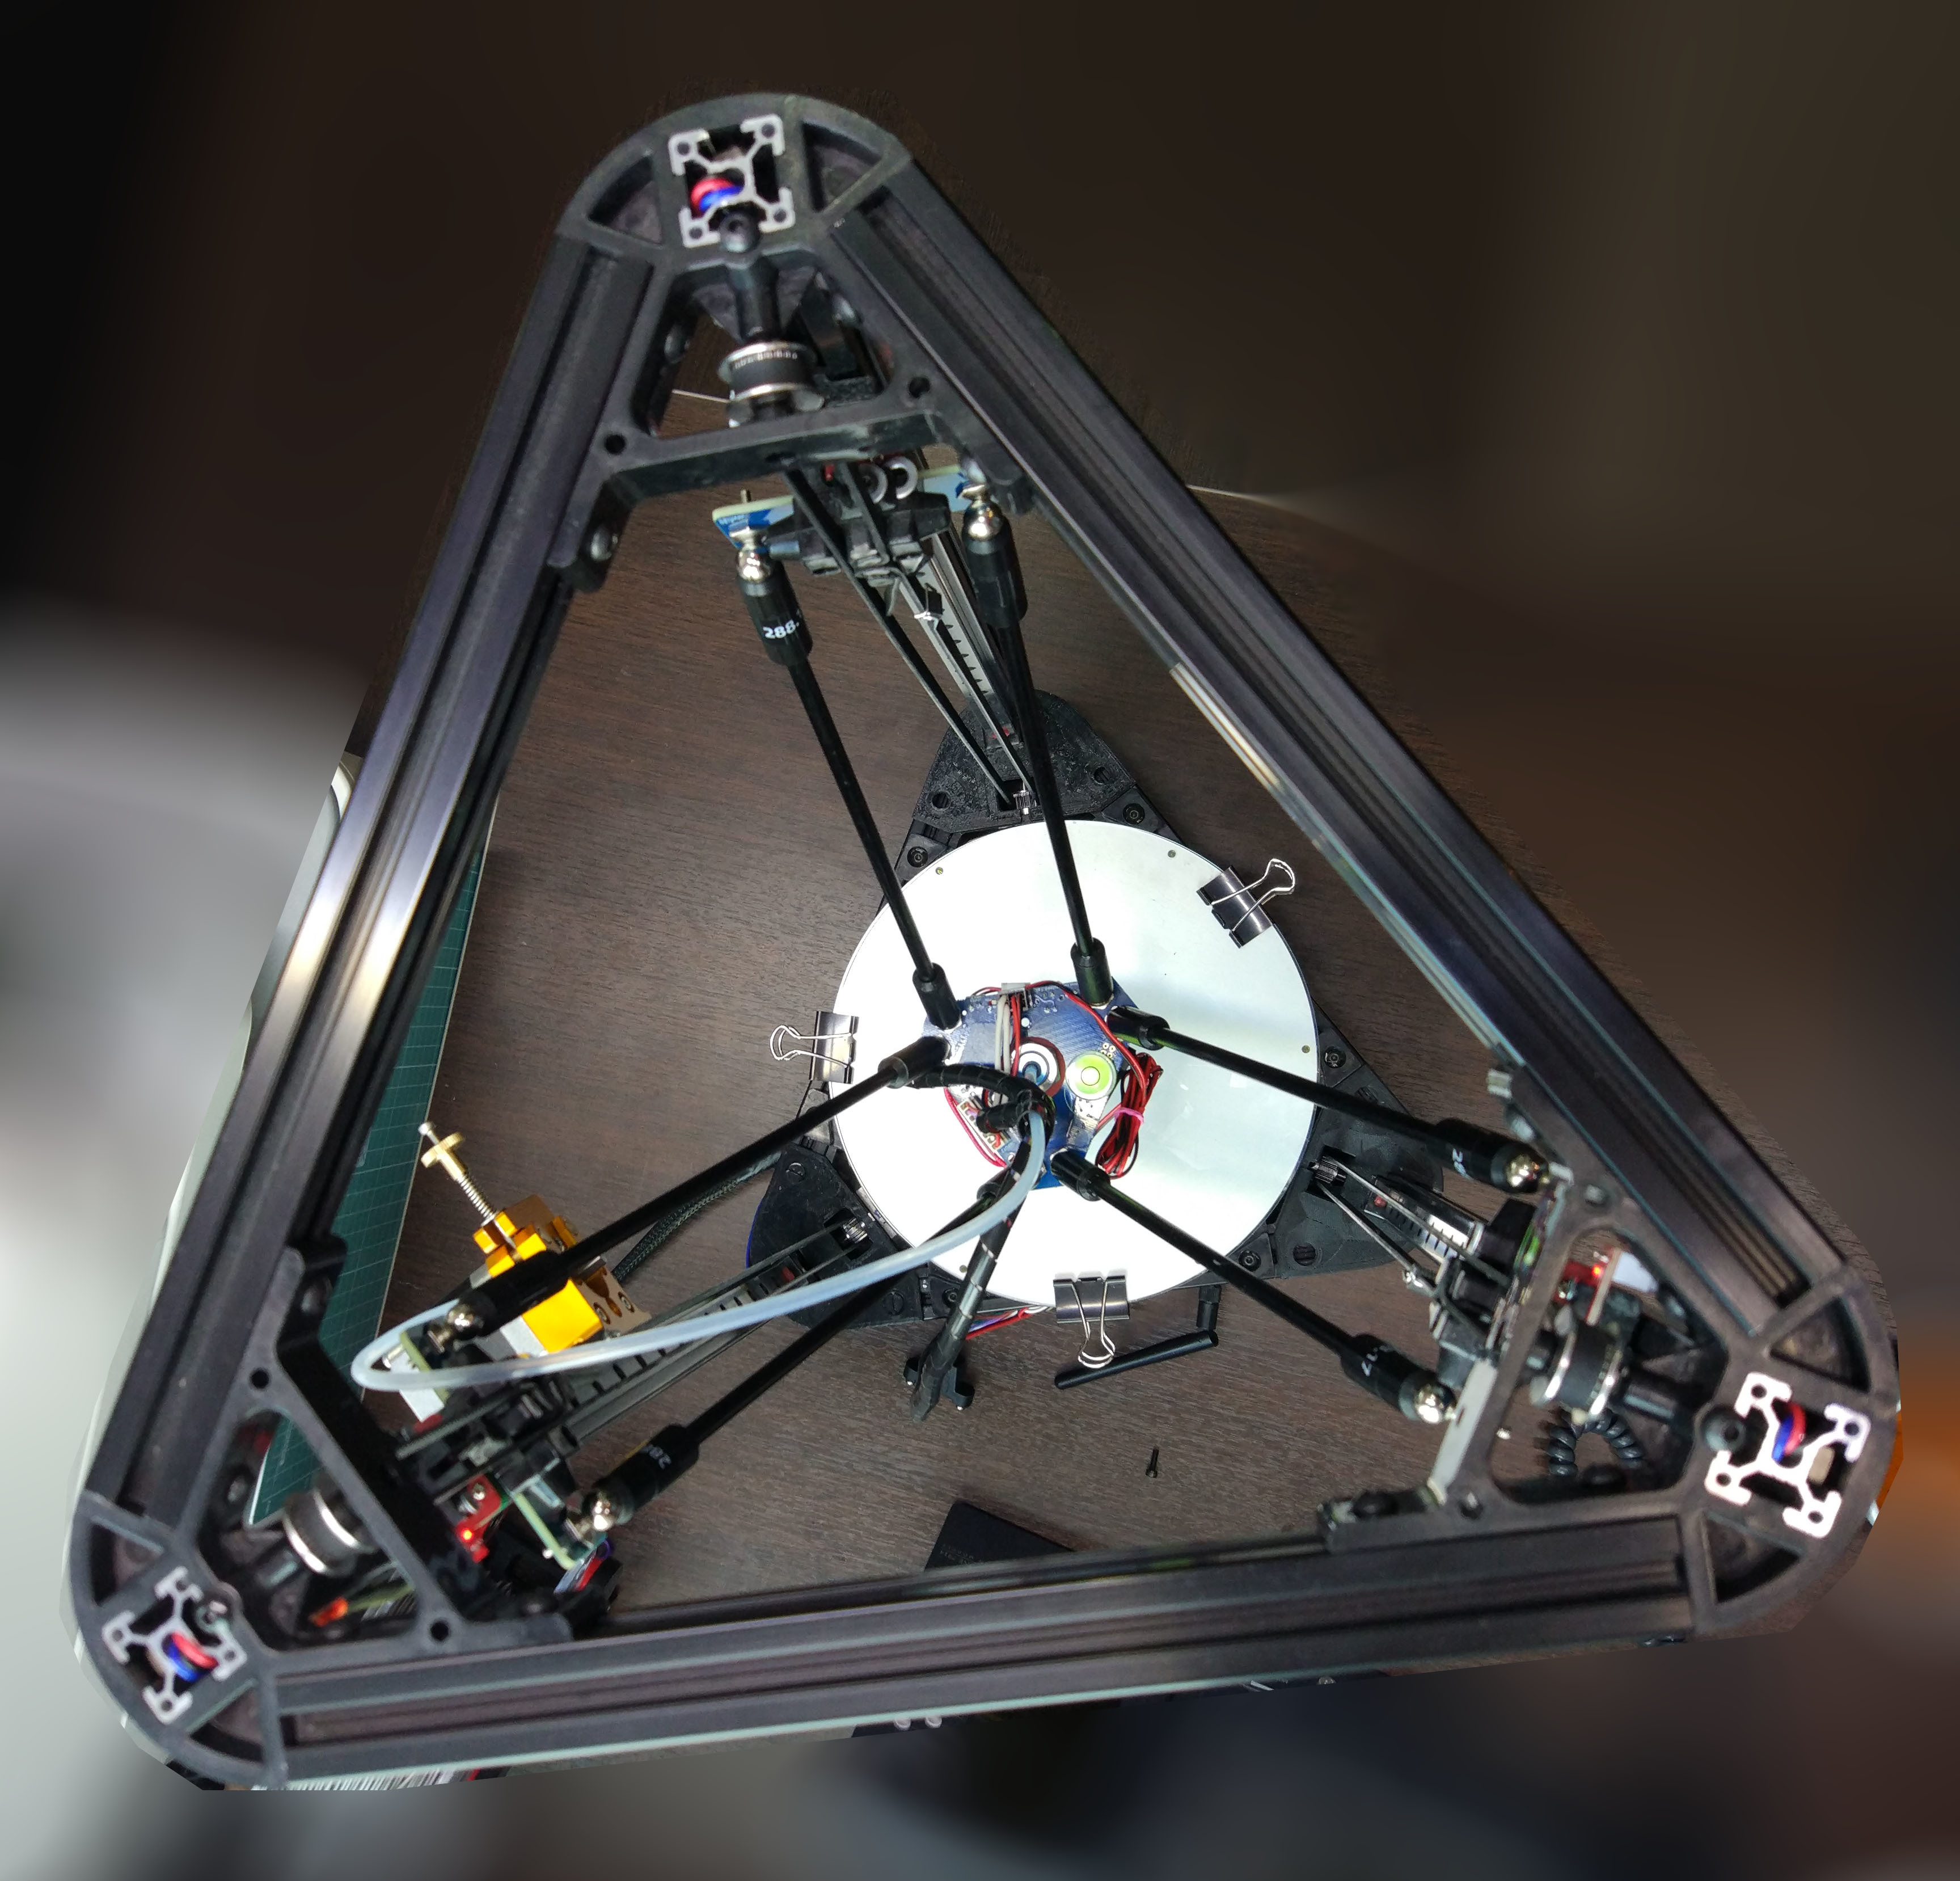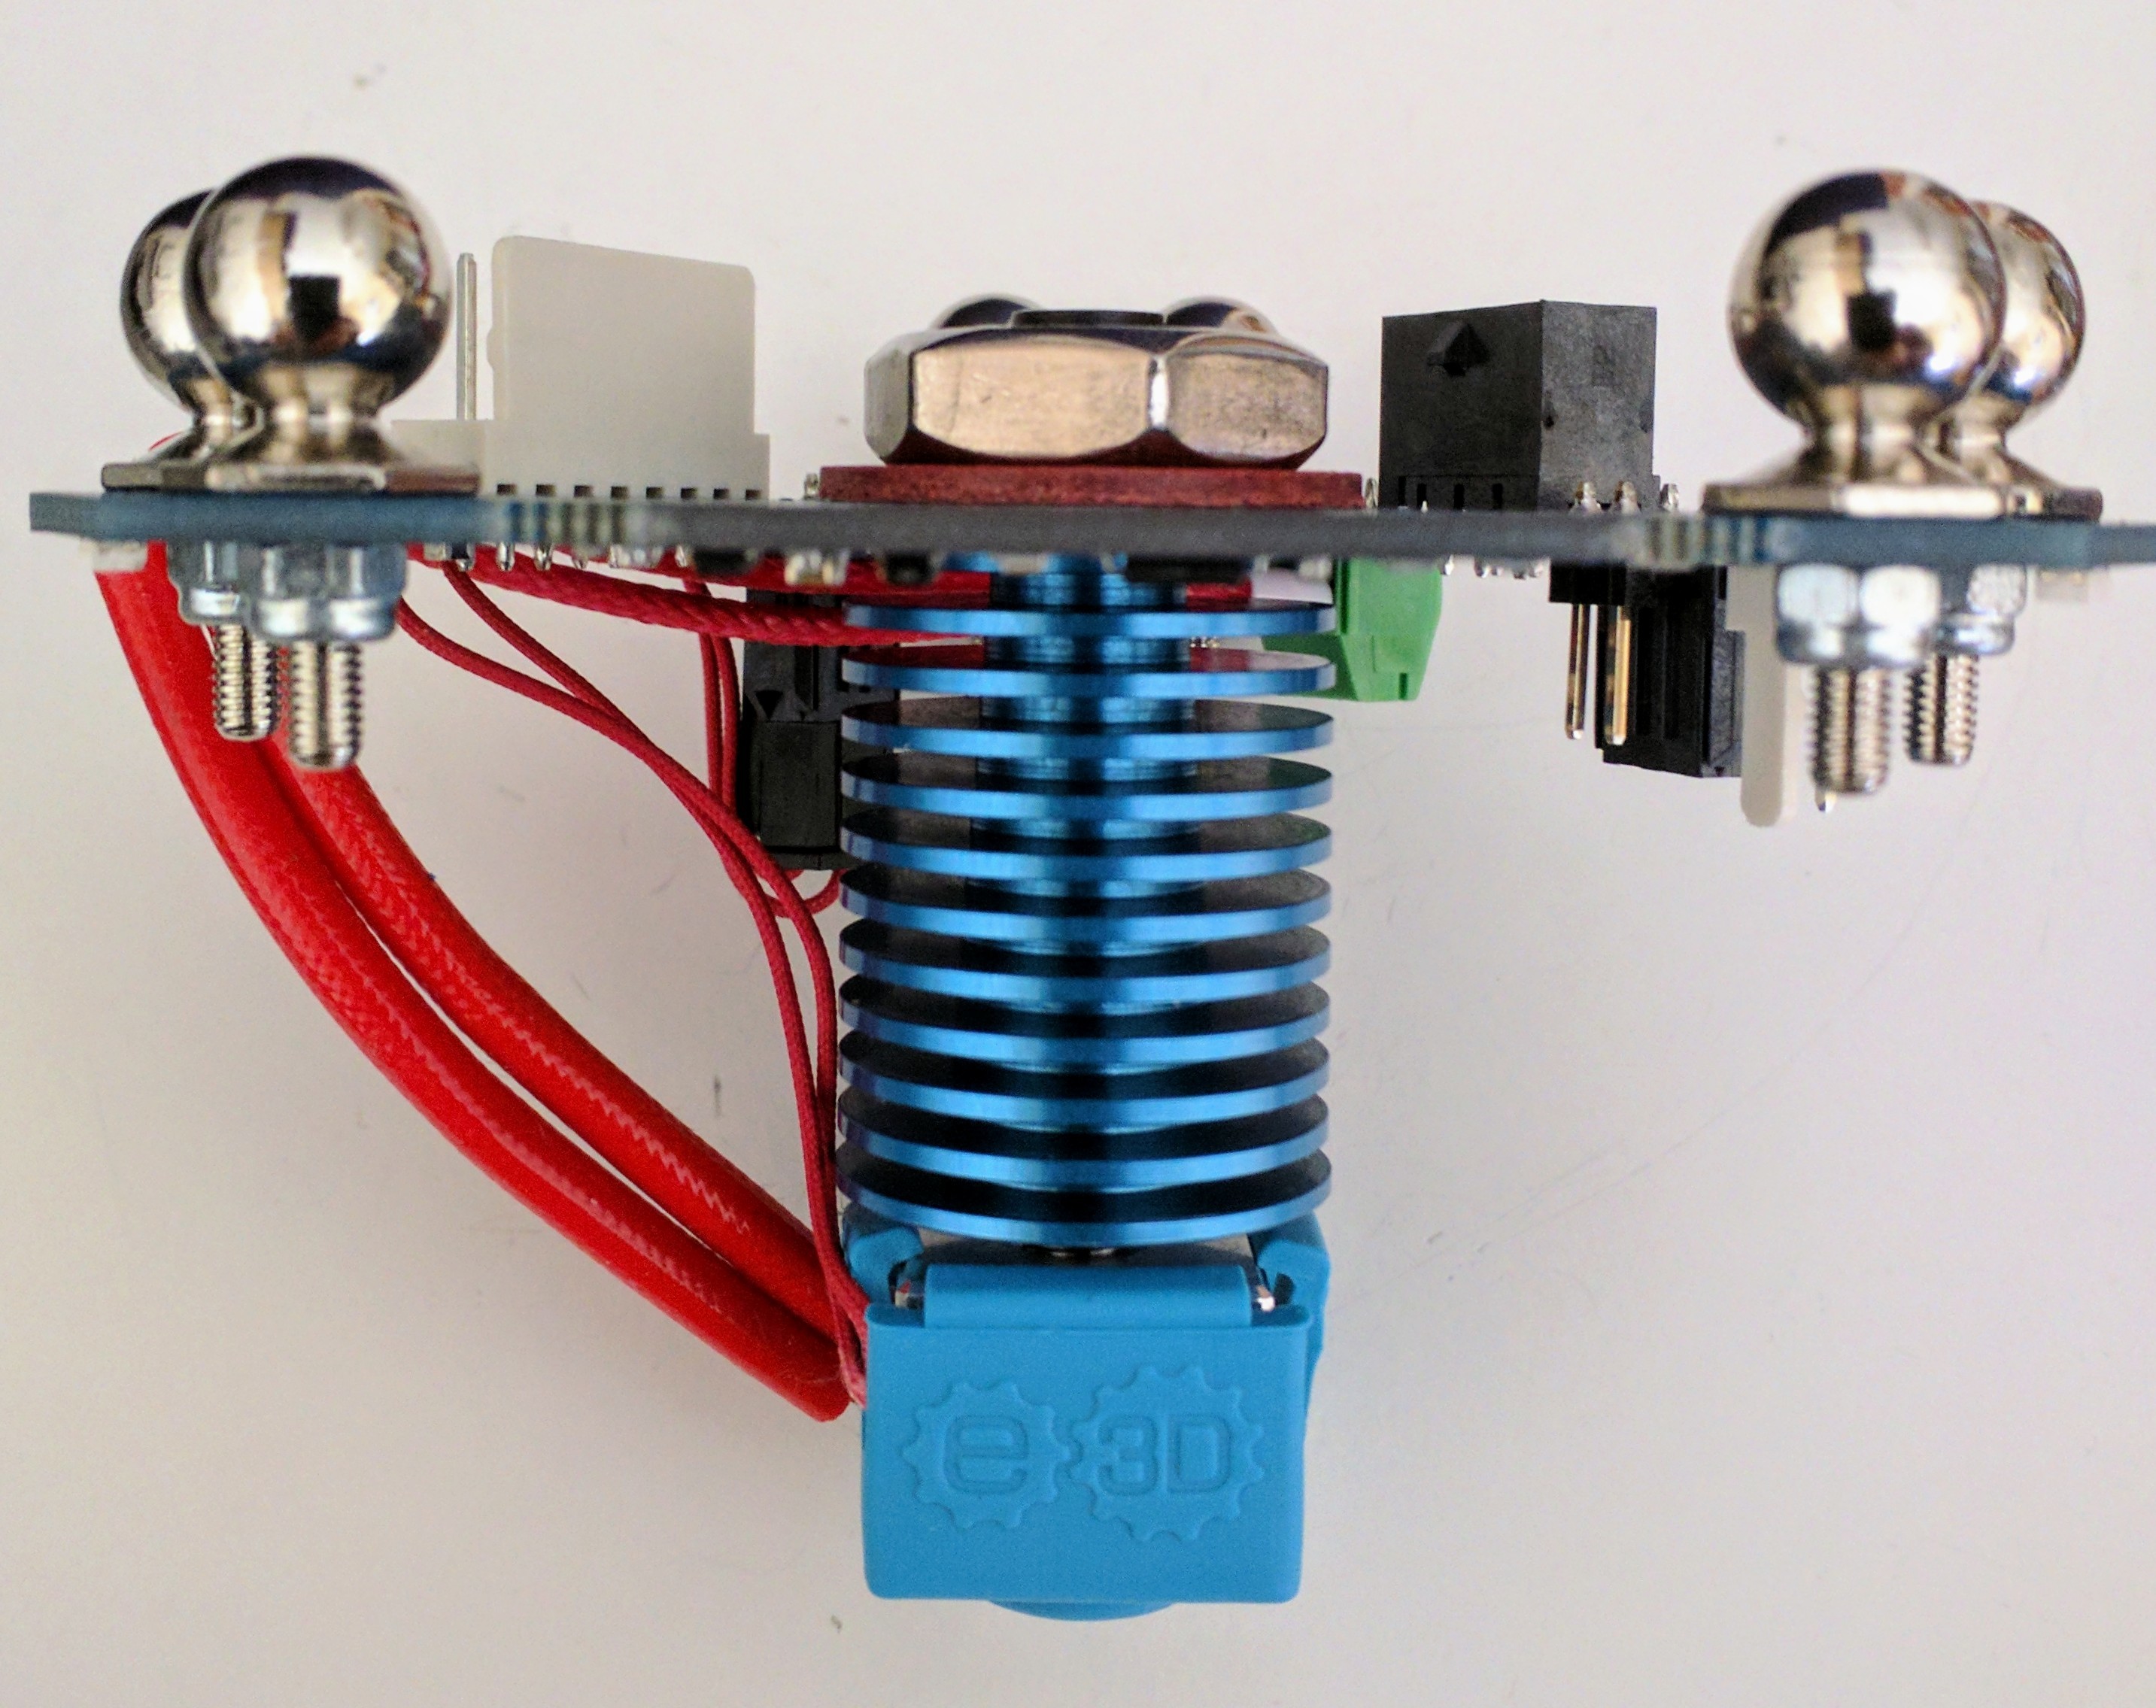
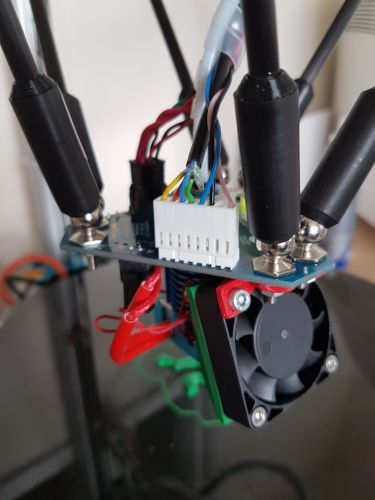
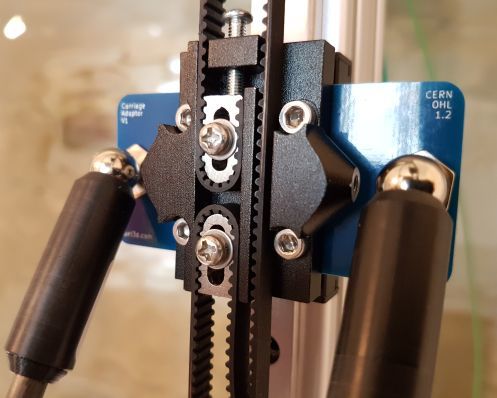
Note: the metal carriage and belt tensioner on the carriage adaptor plate is not part of the kit.
¶ Features
¶ Specification
- Built-in nozzle contact detection (Z probe)
- Three white LEDs to illuminate the bed whenever the hot end fan is powered
- Green LED to indicate Z probe triggering and successful programming
- Amber LED to indicate power to hot end heater
- Matching PCB Carriage Adapters ensure uniform spacing between bearings at top and bottom of the rods, for accurate nozzle motion
- Power and signal connectors on top for connection to the 3D printer control electronics, to make removal of the hot end easier
- Connectors on underside for hot end heater, hot end fan, print cooling fan and temperature sensor
- Support for thermistor, or 2-wire PT100 temperature sensor with 2- or 4-wire connection back to electronics (version for 4-wire PT100 sensor available to special order)
- Maximum ambient temperature: 85°C
¶ Compatibility
- Compatible with e3d Revo Micro with the screw top heatsink
- Compatible with E3Dv6 threaded heatsink (https://e3d-online.com/products/v6-threaded-heatsink)
- If you already own a E3D Lite6 hot end, you will need to order a heat break to upgrade to a full V6 hotend using the threaded heatsink
- Smart Effector and Carriage adapters suit magnetic ball studs with M3 tails
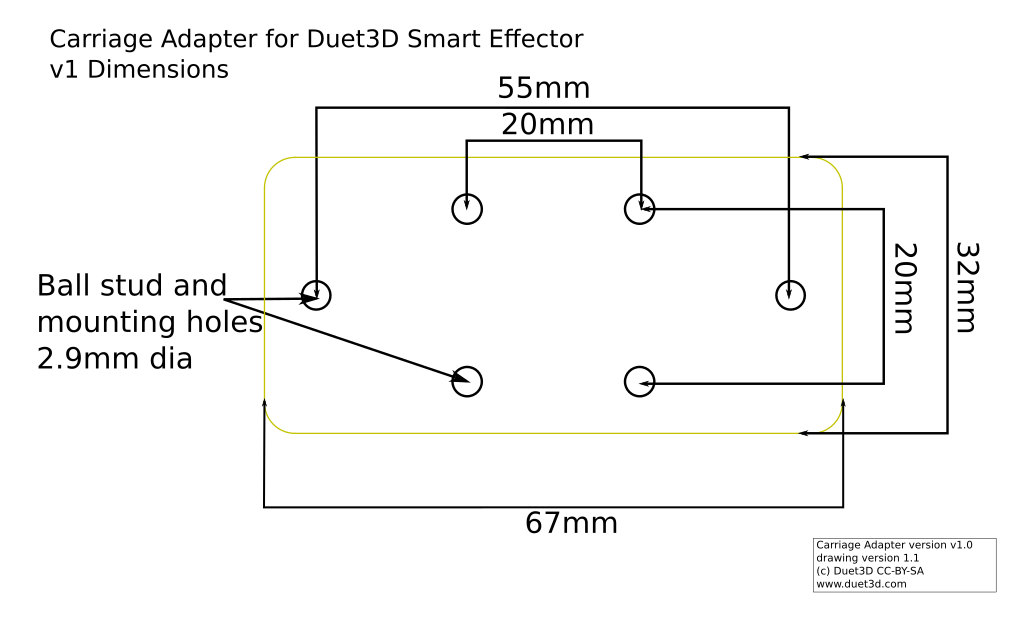
- Carriage Adapters suit carriages with 4 x M3 fixing holes in a 20mm square
- Compatible with 12V and 24V heaters, and 12V and 24V hot end fan power (jumper selectable, see note below)
- 3.3V or 5V supply needed for nozzle contact sensor
- Programmable nozzle contact sensitivity when used with Duet series electronics
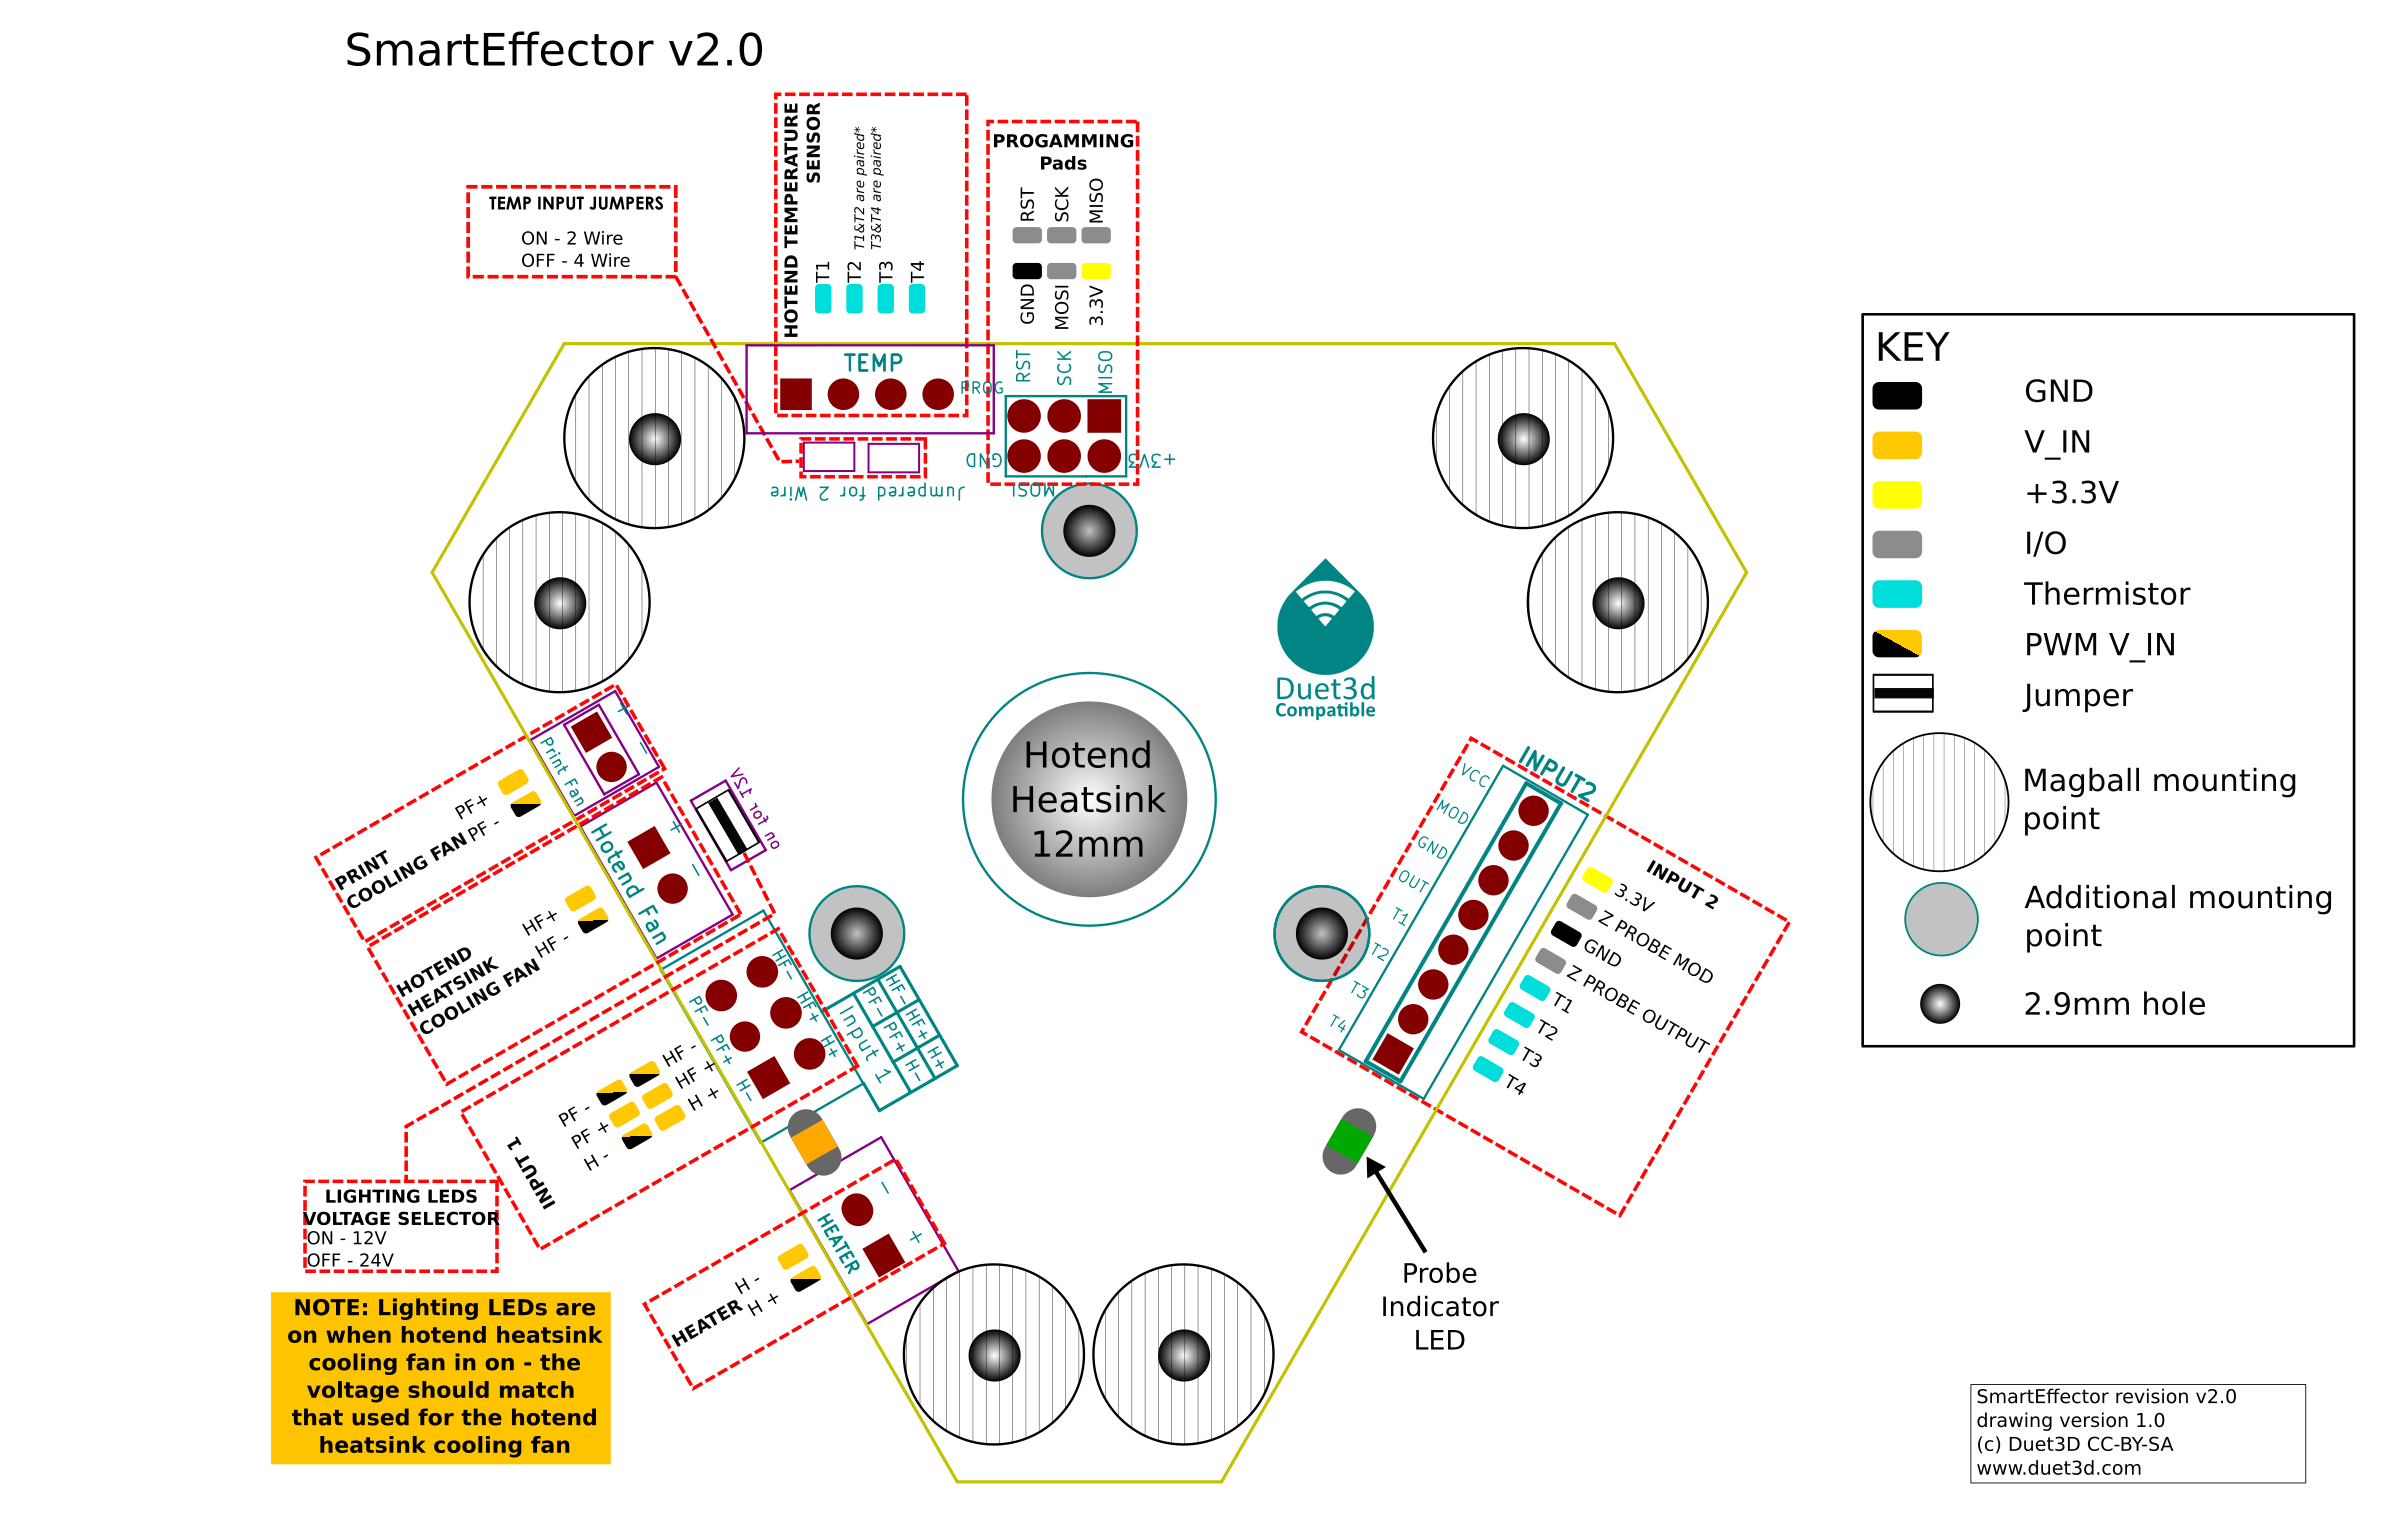
Note: The Smart Effector can be supplied with either 12V or 24V for the hotend heater, hotend cooling fan and print cooling fan. The print illumination LEDs run off the same circuit as the hotend cooling fan (so they come on when the hotend cooling fan is on). If you supply 12V for the hotend cooling fan you need to bridge the "on for 12V" jumper or else the LEDs will be dim.
¶ Open source
The firmware source files are published here: https://github.com/Duet3D/SmartEffectorFirmware
¶ Physical properties
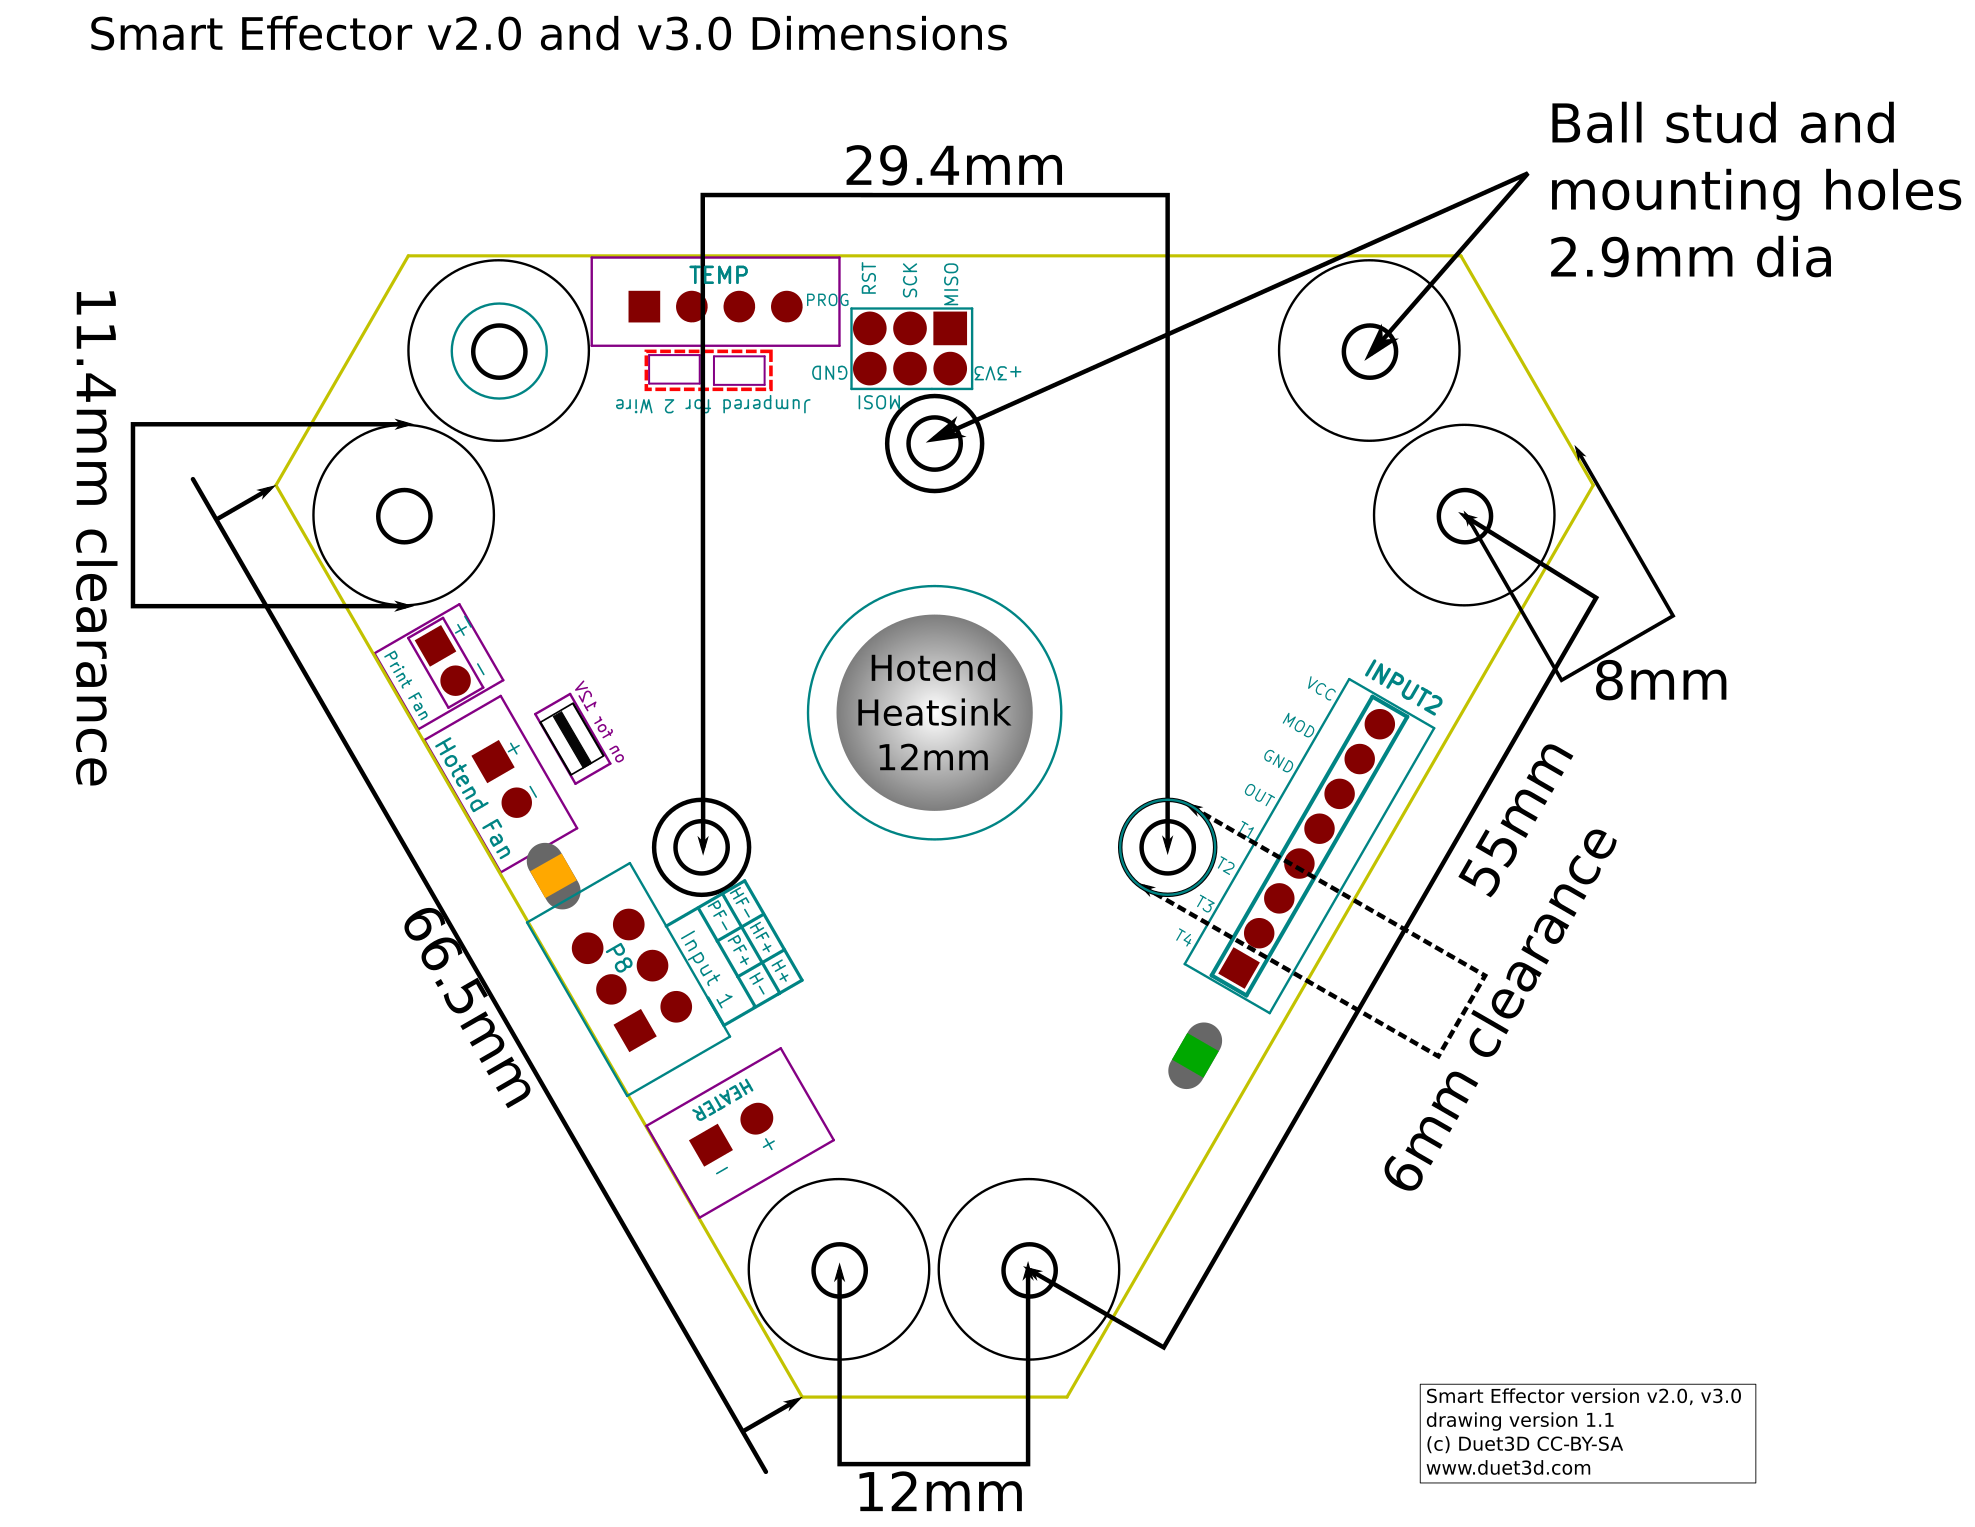
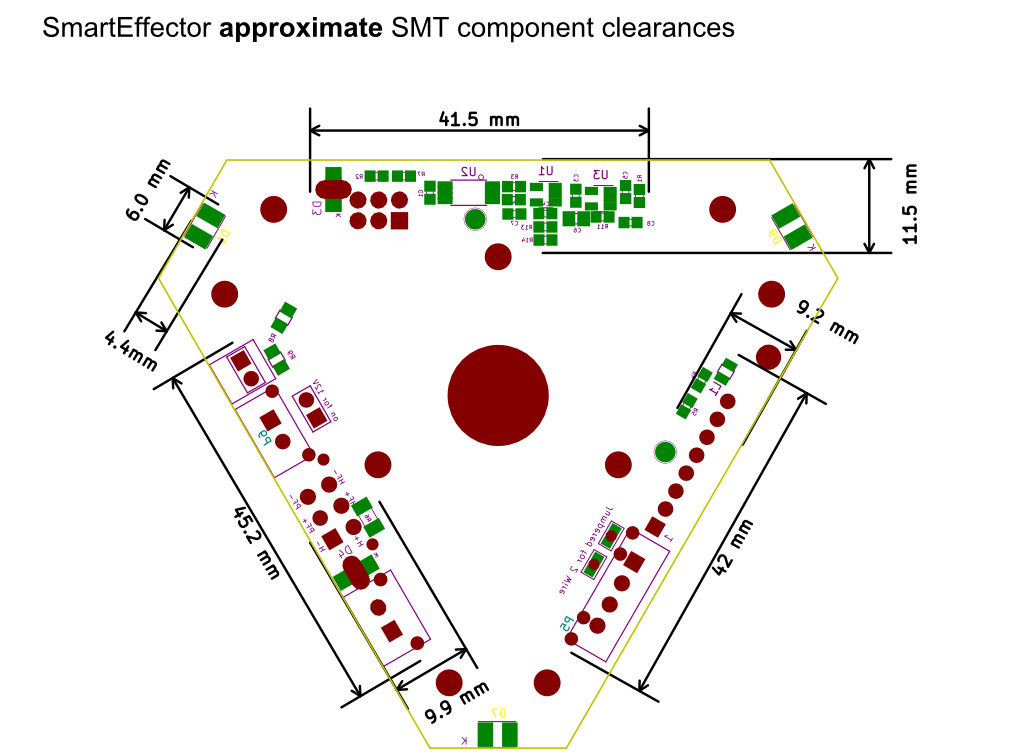
¶ Dimensions
The STEP files are available on github:
Note the v4.0 is very similar but the 8 way Molex KK is replaced with a 8 way JST PH. The 2 way Molex KK is replaced with a 2 way JST PH. these connectors are slightly smaller.
¶ Hardware
| Qty | Item | Remarks |
|---|---|---|
| 1 | Assembled and tested PCB Smart Effector | |
| 3 | PCB Carriage Adapter | |
| 2 | 6- way Molex Microfit 3 shell (black) | |
| 2 | 2-way Molex Microfit 3 shell (black) | |
| 1 | 8-way JST PH shell (white) | |
| 1 | 2-way JST PH shell (white) | |
| 16 | Crimp pins for Microfit shells | |
| 12 | Crimp pins for JST PH shells | |
| 2 | Small ferrules for terminating heater wires | not needed if your Smart Effector uses a 2-pin Microfit connector for the heater instead of a terminal block - They are supplied with a terminal block by default |
| 1 | 18mm or 20mm round spirit level | |
| 6 | Magnetic ball studs with M3 tails | Optional depending on which kit you purchase, Also available from https://www.magballarms.com/ |
| 6 | Delta printer arms with magnets in the end and socket to fit the ball studs. The ones with machined Delrin ends are best. | Optional depending on which kit you purchase, Different lengths available from https://www.magballarms.com/ |
| Qty | Item | Remarks |
|---|---|---|
| 1 | Assembled and tested PCB Smart Effector | |
| 3 | PCB Carriage Adapter | |
| 2 | 6- way Molex Microfit 3 shell (black) | |
| 2 | 2-way Molex Microfit 3 shell (black) | |
| 1 | 8-way Molex KK shell (white) | |
| 1 | 2-way Molex KK shell (white) | |
| 16 | Crimp pins for Microfit shells | |
| 12 | Crimp pins for KK shells | |
| 2 | Small ferrules for terminating heater wires | not needed if your Smart Effector uses a 2-pin Microfit connector for the heater instead of a terminal block - They are supplied with a terminal block by default |
| 1 | M12 half nut | pitch is either 1.5 or 1.0, see the note on the heatsink |
| 1 | M12 plastic or fibre washer | |
| 1 | 18mm or 20mm round spirit level | |
| 1 | E3Dv6 threaded heatsink | Note this was produced for Duet3D by e3d, originally with a 1.0 pitch, the more recent e3dv6 threaded heatsinks are 1.5mm pitch. |
| 6 | Magnetic ball studs with M3 tails | Optional depending on which kit you purchase, Also available from https://www.magballarms.com/ |
| 6 | Delta printer arms with magnets in the end and socket to fit the ball studs. The ones with machined Delrin ends are best. | Optional depending on which kit you purchase, Different lengths available from https://www.magballarms.com/ |
| Qty | Item | Supplier |
|---|---|---|
| 1 | Reve micro, e3dv6 with threaded heatsink or compatible hot end. | |
| 12 | M3 plain washers | eBay |
| 12 | M3 nuts (nyloc if you prefer) | eBay |
If you use our design for a print cooling fan attachment, then you will also need:
| Qty | Item | Supplier |
|---|---|---|
| 2 | M3 x 20mm cap head screws | eBay |
| 2 | M3 x 12mm cap head screws | eBay |
| 2 | M3 nuts | eBay |
| 2 | M3 threaded brass inserts | eBay |
| 1 | 40x10mm print cooling fan, 12V or 24V as applicable | eBay |
| 1 | Printed fan bracket | Print it yourself, see https://www.thingiverse.com/thing:2467663 |
| 1 | Printed fan duct | Print it yourself, see https://www.thingiverse.com/thing:2467663 |
| 1 | Printed fan duct - alternative circular version | Print it yourself, see https://www.thingiverse.com/thing:2808152 |
- 5.5mm spanner
- 10mm spanner
- Crimp tool e.g. HT-225D
- Wire strippers
- Wire cutters
- Small flat-blade screwdriver, to fit the heater terminal block screws
- Thread locking compound or super glue
¶ Physical connections
¶ Wiring
Note: when using a thermistor or 2 wire PT100 you should use the centre two pins
Note in v4.0 the 8 way and 2 way Molex KK are replaced with JST PH equivalents
¶ Description of connections
The power connector (Input 1) is a 2 x 3 pin black Molex Microfit 3 connector. The pins are labelled on the underside and should be connected as follows:
| Label | Pin function | Duet 2 suggested connection | Duet 3 suggested connection |
|---|---|---|---|
| H+ | Heater positive | E0 HEAT terminal block/pin, VIN pin | OUT_1, VFUSED pin |
| H- | Heater negative | E0 HEAT terminal block, E0- pin | OUT_1, out1- pin |
| HF+ | Hot end heatsink fan positive | V_FAN pin on your chosen hot end fan output (eg FAN1) | V_OUTLC pin on your chosen hot end fan output (eg OUT5) |
| PF+ | Print cooling fan positive | V_FAN pin on your chosen print fan output (typically FAN0) | V_OUTLC pin on your chosen print fan output (eg OUT4) |
| HF- | Hot end heatsink fan negative | FAN- pin on your chosen hot end fan output (typically FAN1) | out[n]- pin on your chosen hot end fan output (eg OUT5) |
| PF- | Print cooling fan negative | FAN- pin on your chosen print fan output (typically FAN0) | out[n]- pin on your chosen print fan output (eg OUT4) |
The HF+ and HF- pins also power the illumination LEDs.
The signal connector (Input 2) is an 8-way JST PH connector (v4.0) or 8-way Molex KK connector (v3.0,v2.0). The pins are labelled on the underside and should be connected as follows:
| Label | Pin function | Duet 2 suggested connection | Duet 3 suggested connection |
|---|---|---|---|
| 1 | PT100 current feed | If using a 4-wire PT100 connection, connect to pin 1 of the terminal block on the PT100 daughter board. Otherwise leave unconnected. | |
| 2 | PT100 voltage sense, or thermistor | Pin 2 of PT100 terminal block if using a PT100 daughter board | |
| E0_TEMP if using a thermistor/PT1000 | TEMP_1 if using a thermistor/PT1000 | ||
| 3 | PT100 voltage sense, or thermistor | Pin 3 of PT100 terminal block if using a PT100 daughter board | |
| E0_TEMP (other pin) if using a thermistor/PT1000 | TEMP_1 (other pin) if using a thermistor/PT1000 | ||
| 4 | PT100 current feed | If using a 4-wire PT100 connection, connect to pin 4 of the terminal block on the PT100 daughter board. Otherwise leave unconnected. | |
| 5 | Output from nozzle contact sensor | Z-probe connector IN pin | IOx connector IN pin |
| 6 | Ground | Z-probe connector GND pin | IOx connector GND pin |
| 7 | Control input | Z-probe connector MOD pin | IOx connector OUT pin |
| 8 | 3.3V or 5V power | Z-probe connector 3.3V pin | IOx connector +3.3V pin |
The 4 connections for the Z probe are in the same order as the Z probe connector on the Duet 2, but not in the same order as on an IOx connector on Duet 3. The PT100 connections are in the same order as on the PT100 daughter board.
| Label | Connector type | Connect to what |
|---|---|---|
| TEMP | 2- or 4-pin black Microfit 3 | Thermistor or PT100 sensor |
| HEATER | 2-way terminal block or 2-pin black Microfit 3 | Hot end heater cartridge |
| Hotend fan | 2-pin black Microfit 3 (Molex KK on prototypes) | E3D heatsink fan (red to +, black to -) |
| Print fan | 2-pin JST PH (v4.0), 2-pin Molex KK (v3.0, v2.0) | Print cooling fan. |
| on for 12V | 2-pin header | Place a jumper over this if using 12V hot end fan power. Leave off for 24V. |
| Heatsink thermistor (prototypes only) | 2-pin black Microfit 3 | Leave unconnected |
| P2 | 2x3 pads | Do not connect (these are used to program the microcontroller) |
You can use a 4-wire PT100 connection from the Smart Effector back to the Duet even if you are using a 2-pin PT100 sensor with a 2-pin connector.
¶ Assembly
¶ Warnings
- The heatsink must be accurately centred in the Smart Effector. Production versions of the E3D heatsink have a shoulder to make it self-centering. If you have a prototype heatsink, use either the plastic split washer or the spacer, so that the PCB traces on the underside are clear of the heatsink.
- On revision 2.0 and earlier take care not to damage the fine traces on the PCB during assembly! If you use the 3 extra mounting holes to attach anything to the Smart Effector, there must be no metal or abrasive parts next to the PCB on either side. So use nylon washers under any screw heads or nuts.
- Once you have inserted the crimp pins into the black Molex shells, they are impossible to remove without an expensive tool. So make quite sure that the crimp connection is secure, and make sure you have it in the correct hole before pushing it home. We supply 1 spare 6-way shell and some spare crimp pins.
- Ensure the cables going to both connectors on the Smart Effector have adequate strain relief to prevent wire fatigue when the effector moves. For example, one method would be to mount a pillar in the hole next to the connector and zip tie the cable to it, or for greater rigidity if using printed parts, a bridge that attaches to the 2 holes near the connectors, and tie both cables to it.
¶ Smart Effector and hot end
- Identify the PCB revision or your Smart Effector. It is printed on the top surface, and will either be 1.3, 2.0 or 3.0. Some of the following assembly steps differ between revisions.
- Attach the ball studs to the Smart Effector using M3 washers and nuts (you can use plain or nyloc nuts, your choice). The balls must be on the top side, which is the side with the 6-way and 8-way connectors. If you will be using our print cooling fan duct design, leave off the two ball studs in the corner where the fan will be attached (see photos below). Tighten with 10mm and 5.5mm spanners. Position the 5.5mm spanner on the nut carefully, to avoid damaging the surface-mount LEDs on the underside of the board adjacent to the nuts.
- If you will be using a 12V supply for the hot end fan, fit the jumper supplied across the pins labelled "on for 12V". Leave the jumper off for 24V.
- If the thermistor or PT100 sensor does not already have a short cable terminating in a black 2-pin Molex Microfit plug, cut the cable to 60mm to 80mm length and fit the plug.
- If your hot end fan does not already have a short cable terminating in a black 2-pin Molex Microfit plug, cut the cable to 60mm to 80mm length and fit the plug.
- Assemble the E3D hot end heatsink, heat break, heater block, nozzle, heater cartridge and temperature sensor; or replace the heatsink on your existing one. Don't clip the hot end fan assembly on to the heatsink yet. Remember to put a collet in the top of the heatsink if it doesn't already have one fitted. Please follow e3d's instructions here for this.
- Put the top of the heatsink through the hole in the bottom of the Smart Effector, all the way until the Smart Effector is against the the top heatsink fin (which is smaller than the other heatsink fins). Make sure that the heatsink is centred in the Smart Effector. You can optionally print a spacer, 16mm outside diameter x 12mm inside diameter by up to about 4mm long to fit between the heatsink and the Smart Effector, to allow more room below the Smart Effector.
- Put the fibre washer above the PCB over the heatsink thread, then secure the Smart Effector to the heatsink using the nut. Do not tighten it yet. (Note with heatsinks supplied with a plastic nut the fibre washer may not be supplied and is not needed.
- If you are using our print cooling fan design, rotate the hot end so that the protruding end of the heater block faces towards the edge of the Smart Effector that carries the two white 2-pin Molex KK connectors (see photo later). This is to leave room for the print cooling fan, which will be attached to the opposite corner.
- Clip the hot end fan assembly on to the heatsink. The overhang must be at the nozzle end of the heatsink.
- Rotate the plastic hot end fan mount about the heatsink to be in the correct orientation. The orientation depends on the the PCB revision of the Smart Effector - see the images below.
- Trim the heater cartridge heater leads to the required length, strip the ends, and crimp the ferrules on. Then attach the wires to the screw terminals.
- Plug the thermistor or PT100 sensor into the 2-pin socket labelled TEMP.
- Plug the hot end fan into the socket labelled Hotend Fan.
- Check the routing of all cables. The fan and heater cables should be kept away from the sensitive electronics next to the temperature sensor connector. They must also be kept away from the spills on the back of the 8-way connector, to prevent the spills abrading the insulation and causing a short circuit.
- Tighten the nut against the heater block. Do not over-tighten or you risk snapping the heat break. A small amount of thread locking compound or superglue on the threads will prevent the nut from vibrating loose over time.
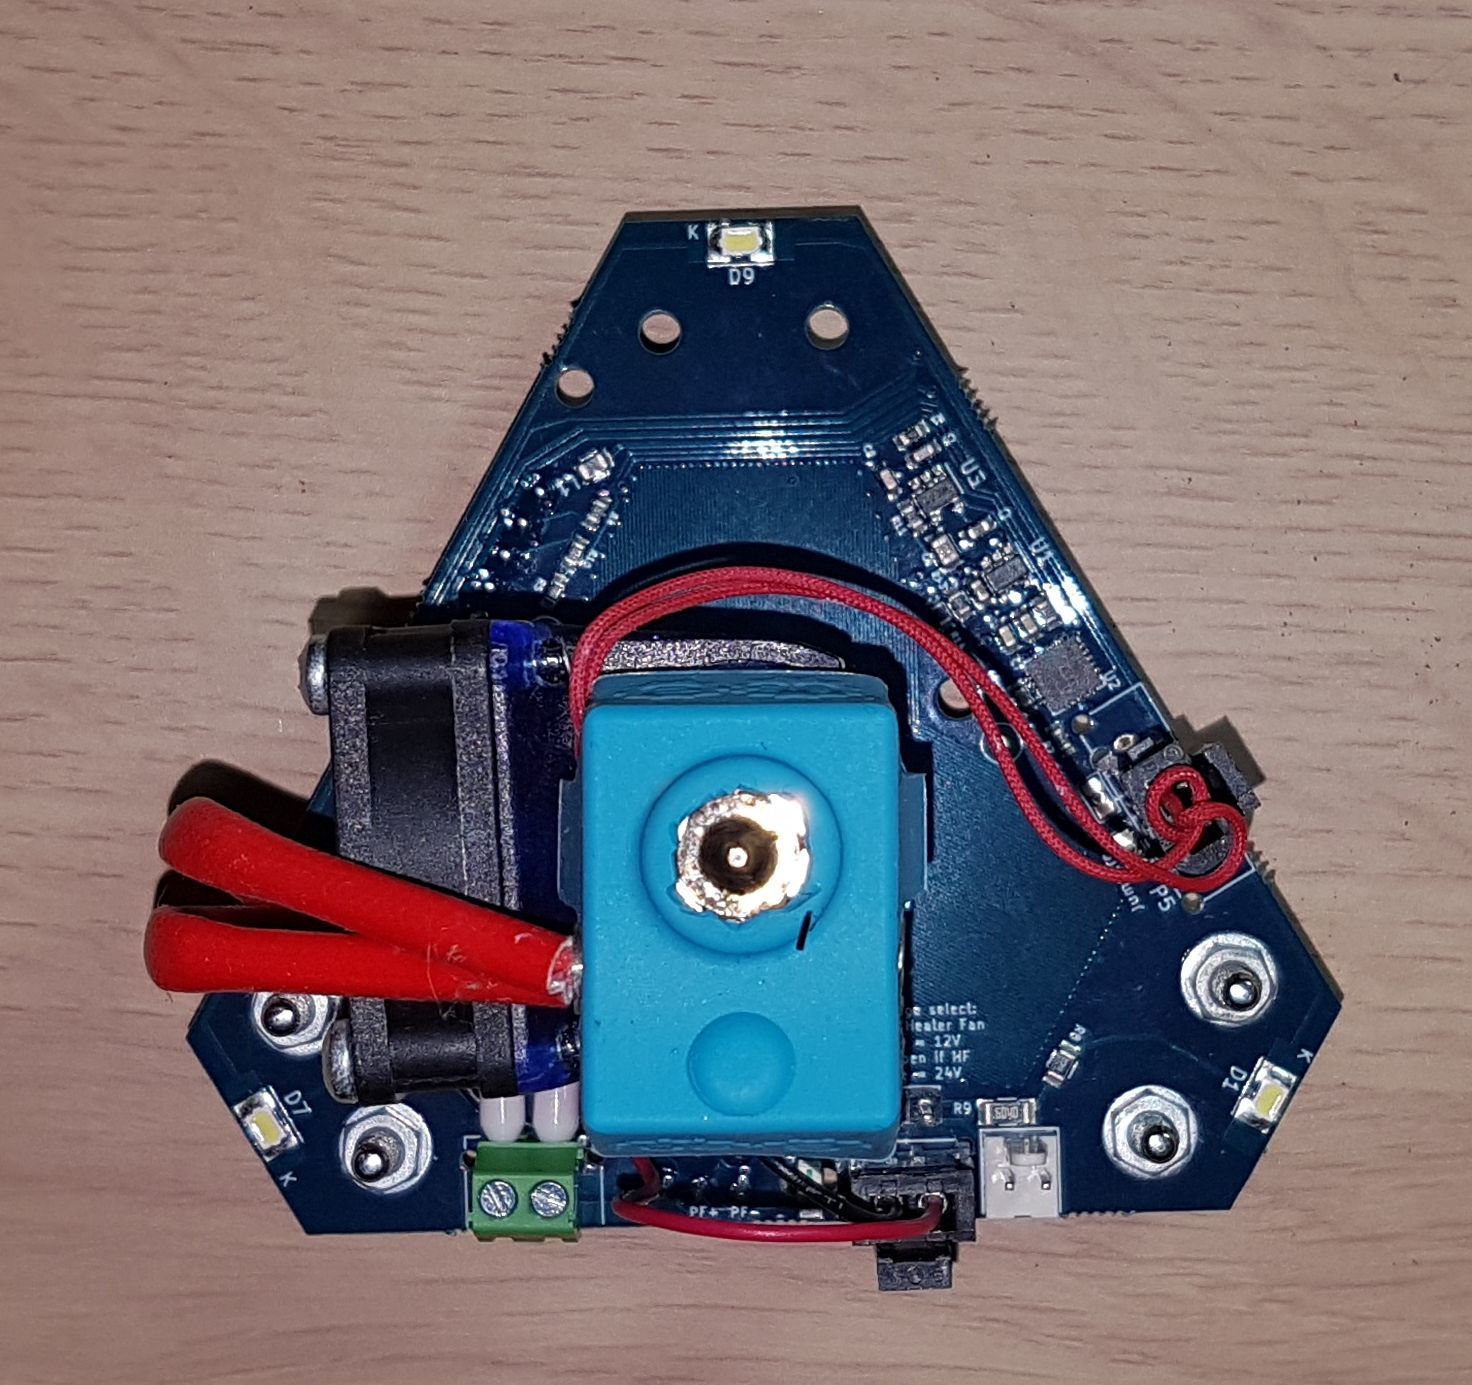
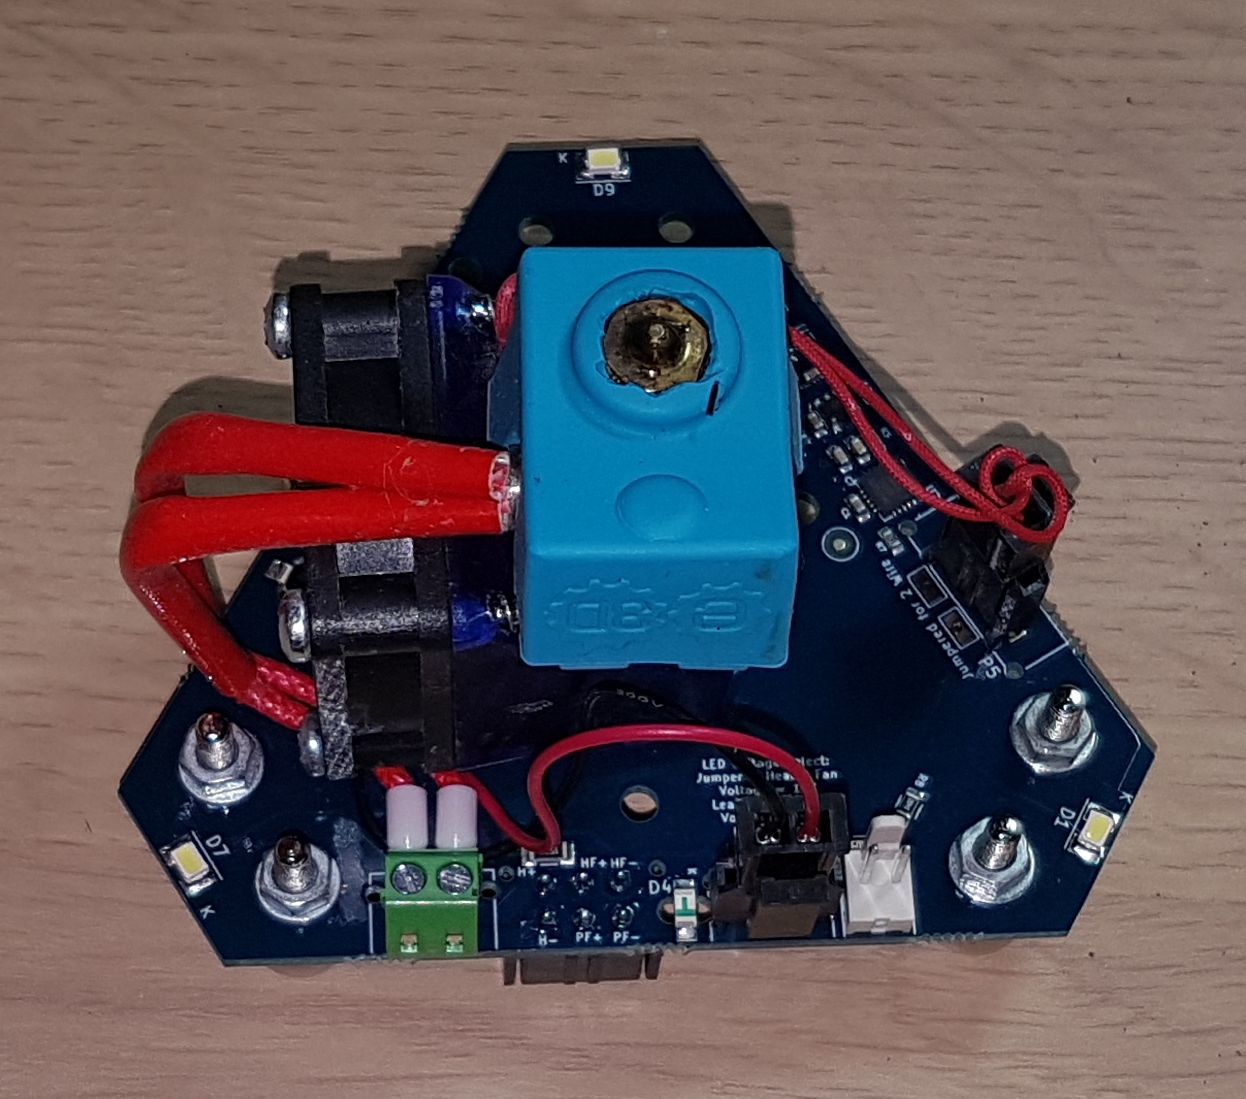
At this stage your effector should look like this, viewed from the underside. Note that the hot end heatsink fan is on the left hand side for PCB revision 4.0, 3.0 and 2.0:
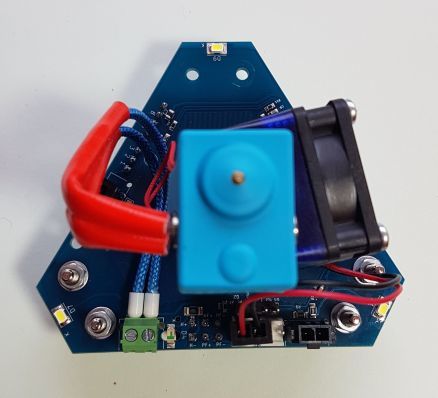
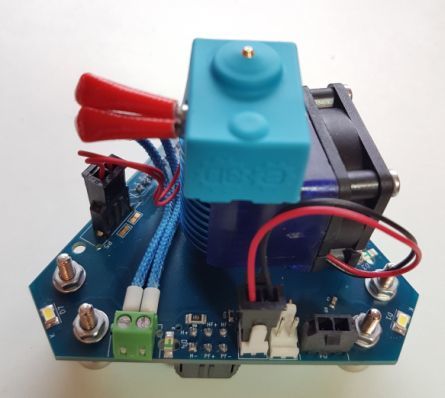
Note that the hot end heatsink fan is on the right hand side for PCB revision 1.3.
¶ Print cooling fan assembly
- Push the brass inserts into the fan duct, using a warm soldering iron to help them if necessary
- Cut the fan wires to length and terminate them in a 2-pin Molex KK shell, observing correct polarity (see photo)
- Put the side of the fan with the label on it against the fan duct, rotated so that the wires are in an appropriate position, and secure it using two M3x10mm screws into the brass inserts
- Place the fan bracket over the other two holes on the front of the fan, then secure it using two M3x20mm screws and Nyloc nuts
Your print cooling fan assembly should look like this. The fan duct was printed green and the fan bracket was printed red.
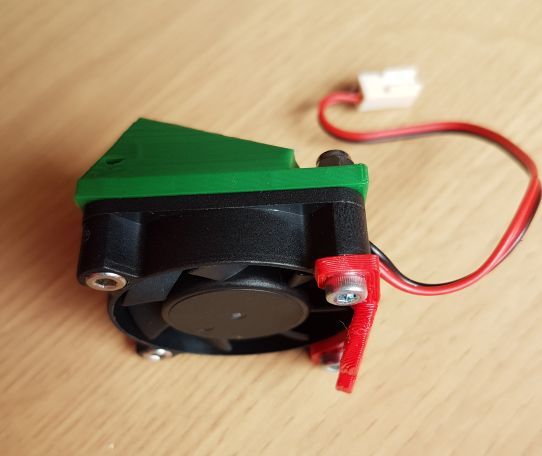
¶ Effector final assembly
- Secure the fan bracket to the underside of the Smart Effector using the two remaining ball studs and M3 nuts. Make sure that the fan duct is not right up against the hot end heater block.
- If desired, secure the round spirit level to the top surface with superglue or double sided adhesive tape.
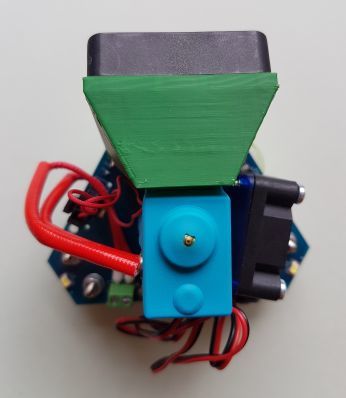
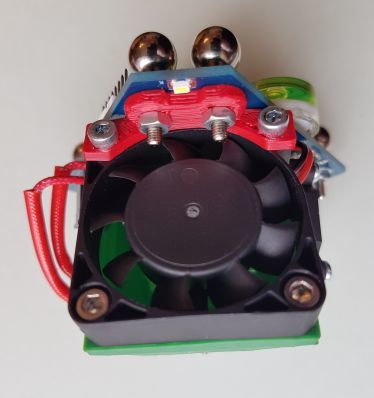
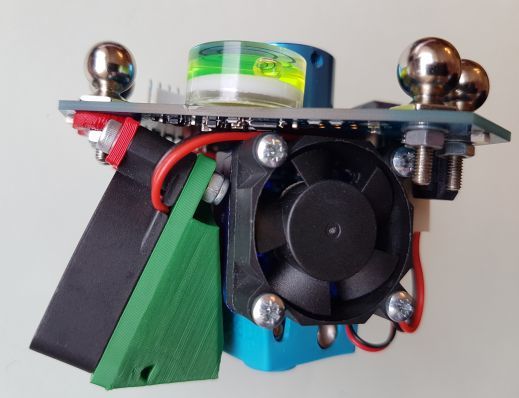
Here are some images showing the placement of the print cooling fan on a revision 1.3 Smart Effector. The fan duct was printed green and the fan bracket was printed red. If you have the revision 2.0 Smart Effector, the hot end heatsink fan will be on the other side.
¶ Carriage Adapters
Fit 2 ball studs to the outer holes in each Carriage Adapter. Then fit the Carriage Adapters between your carriages and the linear sliders or wheeled trucks.
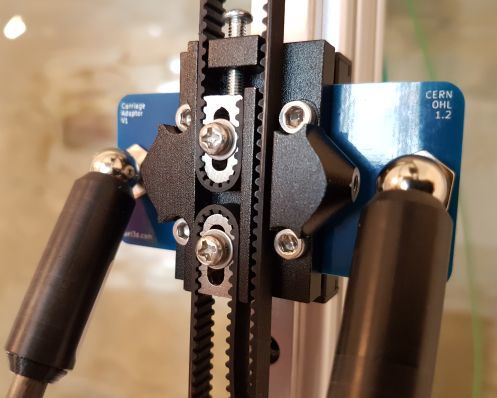
¶ Putting all together
In final assembly arms should be parallel to each other. So, each pair of arms coming out from Carriage Adapter should land on the LONG side of the effector. Otherwise it will be unstable.
Fit the arms so that N and S magnetic poles alternate around the effector. This maximises the strength of the magnetic joints, and makes it less likely that the magnets will interfere with the fans.
¶ Configuring firmware
¶ Commissioning
The following instructions assume you are using the Smart Effector with Duet electronics.
- Double-check that you have made the right connections
- In your config.g file set Z probe type 8, feed rate 1200mm/min and recovery time 0.4 seconds in your M558 command (
M558 P8 R0.4 F1200+ whatever other parameters you want) - Note that RRF3 requires the pin names defined in M558 as well, so add
C"io3.in+io3.out"for Duet 3 (change 'io3' as appropriate) orC"zprobe.in+zprobe.mod"for Duet 2 to the M558 command above. - When in doubt, generate an example config with the RepRapFirmware online configuration tool for your firmware version.
- In your config.g file select probe threshold 100, trigger height -0.1, and zero XY offsets in your G31 command (
G31 P100 X0 Y0 Z-0.1). You can tune the trigger height later to get a more accurate Z=0 position for that perfect first layer. - Power up your printer electronics using 5V or USB power only. Three seconds after power up, the green LED located on the top of Smart Effector (next to unpopulated programming header) should flash twice. See troubleshooting below for information on other LED flashing error codes.
- Give the hot end nozzle a gentle but sharp tap upwards (if the nozzle is cold, you can use your finger for this). The green LED should flash each time you tap it, indicating that the nozzle contact sensor has triggered and a pulse has been sent to the electronics.
- Apply 12V or 24V power to your electronics. If your hot end fan is wired permanently to 12V or 24V then the three illumination LEDs should light up and the hot end fan should run. If you are using thermostatic control of the hot end fan, command your hot end to a temperature just high enough for the thermostatic fan control you are using to kick in, and make sure that the fan and illumination turn on when the threshold temperature is reached.
- Check that the Z probe reading in Duet Web Control or in Panel Due or returned when you send G31 without parameters is zero.
- Home the printer, then send command G30 to start a single probing move. Tap the nozzle upwards; the green LED should flash and the probing move should stop. If it doesn't stop, turn off power to the printer before the nozzle crashes into the bed.
- If that is working, home the printer again and run auto calibration. Caution: your effector to nozzle distance will probably be different from whatever it was before you installed the Smart Effector PCB. So measure the homed height again and put that figure into the H parameter in your M665 command. Also set the M558 H parameter to a larger value temporarily (e.g. 30) to start probing from a greater height, until you have completed calibration.
¶ Programming the sensitivity
In order to program the sensitivity, when configuring RepRapFirmware 3.x for the Smart Effector you need to declare the programming pin as well as the output pin.
- If using Duet 3 then in the M558 command use C"io3.in+io3.out" if using connector IO3, or similarly for a different IO port.
- If using Duet 2 WiFi/Ethernet or Duet 2 Maestro with RepRapFirmware 3.x then in the M558 command declare the pins as C"zprobe.in+zprobe.mod".
The force needed to trigger the sensor is programmable on a scale of 0 to 255. The default is 50. You can adjust the sensitivity according to your needs:
- Lower numbers need less nozzle contact force to trigger the sensor. However, there is a greater risk that vibration from the stepper motors will cause false triggering.
- Electrical or magnetic interference from the heatsink fan and/or hot end fan may cause false triggering.
- False triggering when the Smart Effector is moving between probe points doesn't matter if you use the recommended 0.4 seconds recovery time.
- Higher numbers make the sensor more resistant to false triggering, at the expense of needing a greater nozzle contact force.
To program the sensor, send command M672 S105:aaa:bbb replacing aaa by the desired sensitivity and bbb by 255 - aaa. The green LED will flash 4 times if the command is accepted. When you subsequently power up the Smart Effector, the green LED will flash three times instead of twice to indicate that a custom sensitivity is being used.
To revert to factory settings, send command M672 S131:131. The green LED will flash 5 times if the command is accepted. When you subsequently power up the Smart Effector, the green LED will flash twice to indicate that default settings are being used.
Some additional programmimg functions are available as follows. M672 S65:65 reverts the effector to factory settings. In this mode, the permitted variation in resistance between the two bridge arms is reduced. M672 S99:99 responds with two or three flashes of the LED according to whether default or custom sensitivity has been set. On version 4 and later hardware, two additional functions are available for checking the noise level. M672 S47:47 measures the maximum reading over several seconds and reports it as a number of LED flashes. This value should normally be below 20 if the effector is not moving and is not subject to any vibration or varying magnetic fields. M672 S56:56 is similar but compares the maximum reading with a permitted maximum and reports with a short flash for Pass and a long flash for Fail.
¶ Compatibility with other electronics and firmware
The Smart Effector has been optimised for use with Duet 2 electronics running RepRapFirmware. We are unable to guarantee its operation with other electronics and/or firmware. If you wish to try it with other electronics, the following may help, and we will welcome your feedback.
¶ Connections
You can treat the Smart Effector as a traditional 3-wire Z probe by leaving pin 7 (Control input) of the 8-pin connector unconnected. It will accept 3.3V or 5V power.
Pin 5 (the Output pin) has a 1K series resistor to help protect the Smart Effector electronics against mis-wiring. This will not cause any problems if the Z probe input on your electronics has no pullup resistor or a high value pullup resistor (e.g. 10K or more). However, Smoothieboards have a low value pullup resistor on the Z probe input pin, which is likely to result in failure of the board to detect the low state of the pin. So you should connect the Smart Effector output to a different pin, and declare this in the Smoothieware configuration file.
¶ Sensitivity
Recent versions of Marlin (v2.0.2 and later) and Klipper allow the programming of the Smart Effector's sensitivity. See the Marlin Gcode dictionary or Klipper documentation for details.
If you use the Smart Effector with any other firmware, you will have to use the default sensitivity. This sensitivity works well using the standard E3D hot end fan and Duet 2 electronics, which provide very smooth motion due to the use of x256 microstepping. If your electronics and firmware do not use high microstepping, then the vibration during a Z probing move may cause spurious triggering at the default sensitivity. If you use a different hot end fan, it may cause interference, requiring a reduction in sensitivity.
¶ Acceleration at the start of a probing move
Sudden acceleration at the start of a Z probing move may cause spurious triggering. RepRapFirmware reduces acceleration for Z probing moves. With other firmwares, you might need to reduce the Z acceleration either in the configuration file or using the M201 command.
¶ Z probe recovery time
A fast travel move before or between Z probing moves may cause the strain gauge sensor to trigger. To avoid this, you need to configure a delay between the end of a travel move and the start of a Z probing move. There are builds of most of the common firmwares that offer this facility.
¶ Troubleshooting - LED flash codes
The version 2 and later Smart Effectors perform an additional self-test at power up to check that the strain gauge output is within the expected range. This test may fail during the first few seconds after power up as the voltages settle, so it is repeated until it passes. Therefore, if your sensor flashes 6 or 7 times once or twice before it flashes twice, this is normal. However, if it continues to flash 6 or more times, the sensor is faulty:
- 1 flash - normal startup in test mode - for factory testing only
- 2 flashes - normal startup in user mode
- 3 flashes - normal startup in user mode with custom sensitivity set
- 6 flashes - strain gauge output out of tolerance (too low)
- 7 flashes - strain gauge output out of tolerance (too high)
- 9 flashes - 1.0V regulator output reading out of tolerance (verson 2) or Vcc too low (version 3 and later)
- 10 flashes = Vcc too high (version 3 and later)
Code 6 or 7 may occur once or twice during startup. If they persist then they normally indicate damage to the Smart Effector.
¶ Revision History
- Now uses built in traces in a custom PCB manufacturing process. Significantly finer traces allow for a higher noise margin.
- Changed the 8 pin connector on the top of the board to a JST PH which is more robust. The Molex KK 2 pin header on the bottom has also been changed to JST PH
- Switched from fine traces on the surface on the PCB to 6x SMT resistors as these proved more resilient and allowed for reduced sensitivity to noise.
- Rotated the Heater header 90 degrees to make it easier to connect the heater wires.
- Moved components and header to improve performance and make it easier to mount a heatsink cooling fan
