This page is part of multiple pages about robot configuration and usage. Please choose the robot tag to see an overview.
¶ Introduction
It's a bit confusing sometimes to create a robot configuration. The main reason is that every actuator has 6 degrees of freedom (6 DOF) and the description of this position is done by describing coordinate systems of every actuator. The traditional method to describe is to use 4 parameters, using Denavit-Hartenberg DH parameters. Robot kinematics and RobotViewer is enhanced to use all 6 DOF.
RobotViewer allows to start from scratch, from a template, from an existing robot.g or by a guided procedure.
The designed configuration are G-Code lines which can directly be used in config.g or included with macro command from config.g, importing robot.g. The G10 tool configuration line may need modification or removal if using a tool changer or multiple extruders. The designed G-Code lines can be stored in robot.g or copied by clipboard and inserted into the config.g file.
work in progress, please watch for changes the next days
¶ plugin overview
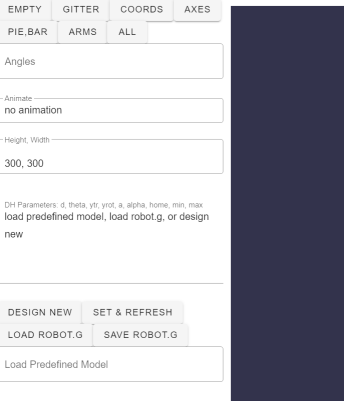
After plugin installation and starting the plugin, a new menu item ...(tbd where) will be displayed with the following view:

The items mean:
-
Empty, All: show no element or all elements
-
Gitter: 100 points gitters at botton and left plane
-
Coords: for every joint the coordinate system in the order RGB: red is x-Axis, green the Y ayis, blue the Z-Axis (following ros.org colors, which are often used). The rotation of the actuator is always around (for rotational axis) or in the direction (for prismatic, linear axis) of the Z-Axis.
-
Axes: symbolic representation of the joint
-
Pie, Bar: pie for rotational, bar for prismatic joints. Red are for negative, green for positive values. The values are from min, max angles or linear axes. Between red and green is 0 degree or 0 mm. Rotational green is always counterclockwise.
-
Arms: symbolie representation of the arms and the base element.
-
Angles: comma separated list of joint angles for rotational joints or mm position for prismatic joints. The model will be updated immediately
-
Animate: axis movements can be animtated and endpoints painted as cloud to show the workspace
-
Height, Width: main screen's dimensions can be changed
-
DH Paramters: Denavit-Hartenberg parameters, home, min and max angles or mm lenght
-
Design New: guided procedure to setup the joints
-
Set & Refresh: when DH parameters are changed manually, the model is not updated automatically, but after clicking on this button
-
load, save robot.g: loading or saving 0:/sys/robot.g, if DWC is used with active connection to a Duet.
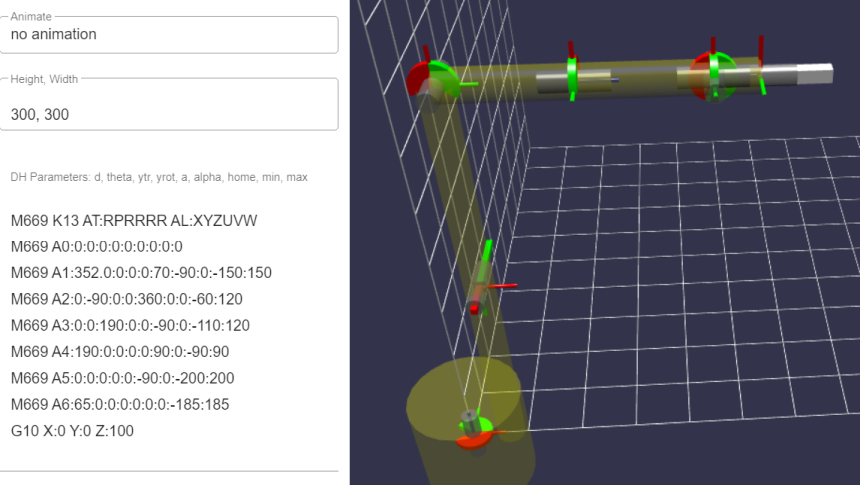
Example of a 6 axis robot:

At the left is the DH configuration. AT:RPRRRR means all actuators are rotational with exception of the second one, being prismatic. The first joint can e.g. rotate from -150 to +150.
The tool is 100 mm long and is the white endpoint, being specified with G10 on the left.
¶ Angles
Depending on the number of joints (axes), which is viewable by the number of letters of the AT and AL parameter, this field contains comma separated angles (rotational) or mm positions (prismatic). The model will be updated immediately.
¶ DH Parameters
The G-Code lines in this field are used to build the model and can be used as code in config.g or stored as robot.g and included as macro into config.g. If using tool changer or dualextruder, the G10 command may need change or removal. The firmware calculates kinematics with the currently selected tool properties.
The parameters are described in the main documentation
Configuring_RepRapFirmware_for_a_Robot_printer
and DH parameters are explained in the DH page Configuring_Robot_DH_parameters
¶ Animate
This section is work in progress and will be enhanced to visualize G1 commands and other ideas. Currently it animates random moves and puts points at the robot's endpoints.
¶ Using as plugin with DWC
This is the usual installation method.
The plugin can be installed as 3rd party plugin by uploading the zip file from the dist directory in the github repository. The current plugin is tested with DWC 3.4.0.
¶ Running in dev mode inside DWC
If someone wants to compile in DWC and run in DWC development mode, proceed as follows:
- download DWC 3.4.0 and unpack
- add a RobotViewer subdirectory into the plugins subdirectory and copy the src files from github into it. main.js can be excluded from copy
- in plugins/index.js add a section new DwcPlugin for RobotViewer, I took GCodeViewer as template and changed id, name etc.
- run dev mode by calling npm run serve, running from the DWC root directory. This will probably take a few minutes.
- open browser and open localhost:8080 (or what npm run serve tells). Connection to a Duet is optional. Start the plugin by clicking on Run, which is visible as standard plugin. (I could not connect to Mini 5 WiFi (maybe AP mode would work), but Mini 5 Eth was possible in npm run serve mode).
¶ Local installation
RobotViewer can be installed as an isolated local application. Load and Save robot.g will not work (I try to reroute 0:/sys to local file system, but without success until now).
- install npm
- npm init vue@2
- cd into projectname folder
- npm install vue@2.6.14
- npm install @babylonjs/core@4.2.2
- npm install @babylonjs/gui@4.2.2
- npm install @babylonjs/inspector@4.2.2
- npm install vuetify@2.6.4
npm run dev
open localhost:3000 with browser and verify that Vuejs runs correctly
then remove all files in the src subdirectory and replace with the RobotViewer files. The local installation will start with main.js, while the plugin starts with index.js.