¶ Scope
This document is relevant to: Duet 2 WiFi / Ethernet, Duet 2 Maestro, Duet 3 MB6HC and Duet 3 Mini 5+
Firmware versions: RepRapFirmware 3.x and and 2.05.1
¶ Overview
This guide covers connecting and configuring a PWM-driven laser module to Duet 2 and Duet 3 boards.
¶ Assumptions
- Your laser runs on 12v
- Your laser requires a 5v active-high PWM
- You want to control the laser with M3 and M5 commands
- You have a laser module
- You have a Duet 2 or Duet 3 board
The Duet 3 main board revisions 1.0 and later, and the Duet 3 Mini 5+, have a 5V-level output that may be suitable for controlling your PWM laser directly.
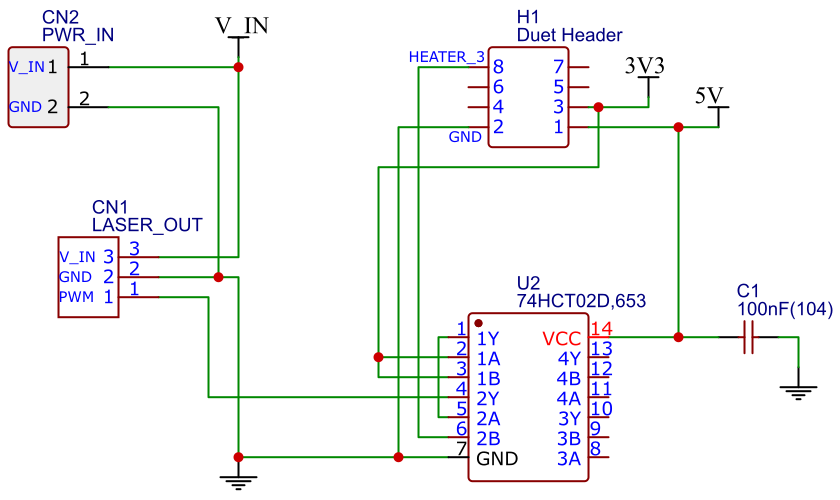
The Duet 2 board will not be able to drive the laser's 5V PWM directly, and will need some interfacing electronics. The circuit diagram for the needed circuit, including protection for shorting of 3v3 line to prevent unintended Laser Power on is shown below.
Assuming the above assumptions are correct for you, then you can continue with this guide.
¶ Connecting laser
Connect the laser GND, 5V and PWM wires to the appropriate pins on the Duet 3.
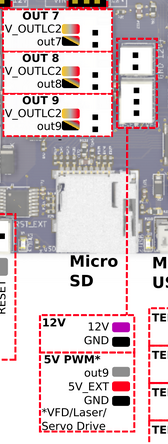
- The 3-pin 5V PWM output on the Duet 3 Mainboard 6HC is behind the MicroSD card holder. Connect the PWM wire to the 'out9' pin. See wiring diagram
- The 3-pin 5V PWM output on the Duet 3 Mini 5+ is in the centre of the board. Connect the PWM wire to the 'out6_buff' pin. See wiring diagram.

Duet 3 MB6HC out9 pin location
Note: if your system includes either a DueX expansion board or an expansion Breakout Board, then that board already includes this circuitry. You can use one of the 5V PWM pins on the DueX.
¶ Preparation

The Duet 2 board will not be able to drive the laser's PWM directly, and will need some interfacing electronics. The circuit diagram for the needed circuit, including protection for shorting of 3v3 line to prevent unintended Laser Power on is shown below.
There is an EasyEDA project here with the circuit, released as Open Source to utilise if needed.
You will need to provide +12V and GND to the laser module, along with PWM output from the above circuit.
¶ PWM Circuit
The circuit uses surface mount components, so bear that in mind if you get a board made. If recreating the circuit with e.g. Veroboard, remember to buy the through-hole version of the applicable components.
¶ Circuit operational theory
This circuit is based around the 74HCT02 Quad NOR Gate. The PWM heater output on the Duet acts on the negative side, to pull it low, rather than pulling it high, which is the inverse to what the Laser expects.
¶ NOR truth table
| Input A | Input B | Output |
|---|---|---|
| High | High | Low |
| High | Low | Low |
| Low | High | Low |
| Low | Low | High |
A simple approach would be to connect the heater PWM to two input pins of the 74HCT02. According to the truth table above, when both inputs are low, output is high, and when both inputs are high, output is low. This gives us both an inverted signal, and a signal that is pulled high, rather than pulled low, which is what the laser wants. This also functions as a level converter, as the output from the 74HCT02 is based on the voltage you feed it (5V in this case).
In the above circuit, this is augmented with 3v3 short detection. This simply feeds the 3v3 lines into inputs 1A and 1B, such that when 3.3v is present, 1Y (output) is low, and when not present, it is high. This means that if for some reason, the Duets 3v3 is shorted to ground, 1Y will output high. As 1Y is tied to 2A, this will present at least 1 high input meaning that NOR gate 2 cannot output high (as seen in the table above).
¶ Firmware Configuration
To configure RepRapFirmware for a laser engraver/cutter, follow the instructions for configuring RepRapFirmware for a 3D printer using the same architecture (e.g. Cartesian), ignoring anything to do with extruders. You still need to define at least one tool using M563, but it can have zero associated heaters and zero extruder drives.
To put the firmware in laser mode and tell it which output to use for laser control, use the M452 command, see M452 Select laser device mode.
For Duet 3, add the following to your config.g file:
; Duet 3 MB6HC
M452 C"out9" R255 F200 ; Enable Laser mode, on out9, with max intensity being 255, and a PWM frequency of 200

; Duet 3 Mini 5+
M452 C"out6" R255 F200 ; Enable Laser mode, on out6, with max intensity being 255, and a PWM frequency of 200
For Duet 2, in your config.g file, you'll need to add the following:
M452 C"exp.heater3" R255 F200 ; Enable Laser mode, on exp.heater3, with max intensity being 255, and a PWM frequency of 200
In your config.g file, you'll need to add the following:
M307 H3 A-1 C-1 D-1 ; Disable Heater output on H3
M452 P3 R255 F200   ; Enable Laser mode, on output 3 (heater 3), with max intensity being 255, and a PWM frequency of 200
¶ Controlling the laser
Most laser cutter/engraver software can output at least one of these forms of GCode. Note that RepRapFirmware 3 includes laser power velocity ramping. RepRapFirmware 2 does not.
¶ Using G1 S[0...254]
The recommended way to control a laser is to use S parameters on G1 commands to set the laser power. Most programs that generate GCode for laser devices have this option.
¶ Using G1 raster clustering
In RRF 3.5 and later:
- Snnn:nnn:... parameter is additionally used for 'Raster clustering' mode. Up to 8 S parameters are supported.
To increase the speed of raster engraving, raster clustering mode has been implemented. A single G1 move is split up into equal portions by multiple values in the S parameter, eg G1 X50 S100:50:25:50:100 would move 50mm and change the laser power every 10mm. This allows more commands to fit in the command buffer, to keep speed up. Laser cutter software such as Lightburn supports raster clustering.
¶ Using G1 E values
You can control the laser based on E values in G1 using M571, though this is no longer recommended. If you want to use this method, set the following:
ALL THE BELOW ARE NOT TESTED!
; Duet 3, RRF 3.x:
M571 P"out9" F200 S255

; Duet 2, RRF 3.x:
M571 P"exp.heater3" F200 S255

; Duet 2, RRF 2.x:
M571 P3 F200 S255
¶ Using M3 and M5
NOTE this is not supported in RRF 3.x. Use the G1 Snn instead.
M3 turns the laser on, with the S parameter setting the laser power (0 to 254), before a series corresponding G1 move. The relationship between the S parameter and laser power depends on the R parameter that was specified in the M452 command. M5 turns the laser off after the last G1 move. Note there can be issues using this mode as the M-command queue is only 8 commands long, while the G-command queue is 20 commands long. You may get stuttering, particularly when raster engraving. Best to use G1 with S parameter. Only supported in RRF 2.x.
¶ Notes
¶ M307
RRF 2.x only: The M307 command is used to set heating parameters. In this case, we use it to disable all applicable parameters as we'll be using it for PWM, not heating. Not needed if your are using RepRapFirmware 3.x.
¶ M452
The M452 command is used to select the laser mode in RRF, such as PWM that relates to max power, and the PWM frequency.
¶ Fans
RRF 2.x only: If you're using any fans, be sure to remember that as you're not using any heaters, you should probably disable thermostatic control on any fans with the M106 H-1 command. Not needed if your are using RepRapFirmware 3.x.