¶ Introduction
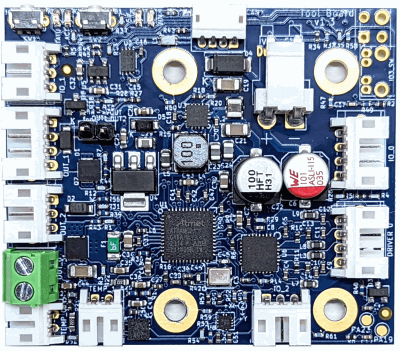
The Duet 3 Toolboard 1LC places the control requirements for a direct drive extruder right on the tool. It controls the stepper motor driver, 3 mosfets for heaters and fans, 2 fan tacho inputs, 2 temperature sensor interfaces, filament monitor, Z probe and endstop, using an ARM Cortex M0 processor.
This reduces the number of wires needed to two power wires and two twisted pairs for the CAN bus. In comparison a direct drive extruder tool such as the E3D Hemera would normally need four wires for the stepper motor, two for the heater, three to five for 2 fans, and at least 2 for the temperature sensor: total 11 or more wires. If a filament monitor is wanted, 3 more wires are needed; and if a Z probe is wanted, another 1 to 3 wires, totalling 14 to 17.
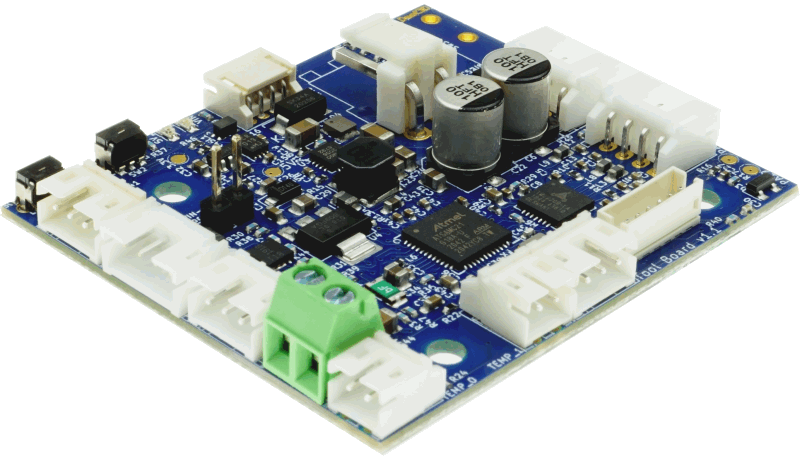
To make it easy to connect multiple direct driver extruders in a tool changer or other multi tool machine, we have also designed a Tool Distribution board. This takes power from the PSU and CAN bus from the Duet. It provides 4 power outputs for Toolboards using 2-pin JST VH connectors and 4 CAN connections for Toolboards using 4-pin JST ZH connectors.
¶ Features
¶ Hardware specification
| Processor | ATSAMC21G18A |
| Processor features | 32-bit, 48MHz ARM Cortex M0+, 256KB Flash, 32KB RAM |
| Networking/Comms | CAN-FD interconnect to Duet 3 Tool Distribution Board or Duet 3 Mainboard; serial port |
| On-board stepper driver | 1 x TMC2209 |
| Stepper driver features | Up to 1.6A peak current, microstep interpolation from any setting to x256, stall detection, stealthChop2 |
| High current outputs | 1 x 5A, VIN voltage only |
| Thermistor/PT1000 inputs | 2 x inputs, optimised for 100K thermistors and PT1000 sensors |
| Medium current outputs | 1 x 4-pin and 1 x 3-pin PWM-controlled output with tacho input. Voltage selectable between VIN and 12V. |
| Inputs/Outputs | 3 x on-board I/O connectors for endstop, switches, filament monitor, Z probe. Two push buttons. 1 x footprint for a switch (v1.1) or switch or optical proximity sensor (v1.2 and later) |
| Accelerometer | Integrated LIS3DH accelerometer (v1.1 and later) |
| Power monitoring | VIN voltage reporting |
¶ Operating limits
| Stepper driver | Up to 1.6A peak current, 1.1A RMS |
| High current output | 1 x 5A |
| Input power voltage | 12V to 32V |
| Power input connector rated current | 10A maximum, or fused limit (whichever is lower) |
| Inputs/Outputs | IO_0, IO_2 and IO_3 are 30V-tolerant, IO_1 is 3.3V-tolerant |
| Fuses | None onboard. Use Duet 3 Tool Distribution Board (5A fitted), or if directly connected to mainboard, use inline fuse holder with 5A fuse. |
| 5V / 3.3V current limit | 300mA peak, 50mA continuous (combined 5V and 3.3V total current limit) |
| 12V current limit | 800ma total (OUT_1 and OUT_2 pins only, when 12V selected) |
| Maximum ambient temperature | 70°C |
¶ Firmware notes
- Compatible RepRapFirmware versions: RRF 3.x
- Firmware limitations: See Duet 3 with CAN expansion firmware configuration limitations.
¶ Open source
- The Duet3 Toolboard 1LC is Open Hardware, see our license here.
- All hardware source files are available on Github.
- Both the Duet Web Control web interface and RepRapFirmware are Open Source Software with source files available and actively maintained, see Contributing to development for more information.
- The Duet hardware and RepRapFirmware are built with Open tools: designed in KiCad and Eclipse using open tools means the barrier to getting involved is as low as possible.
¶ Physical properties
¶ Dimensions
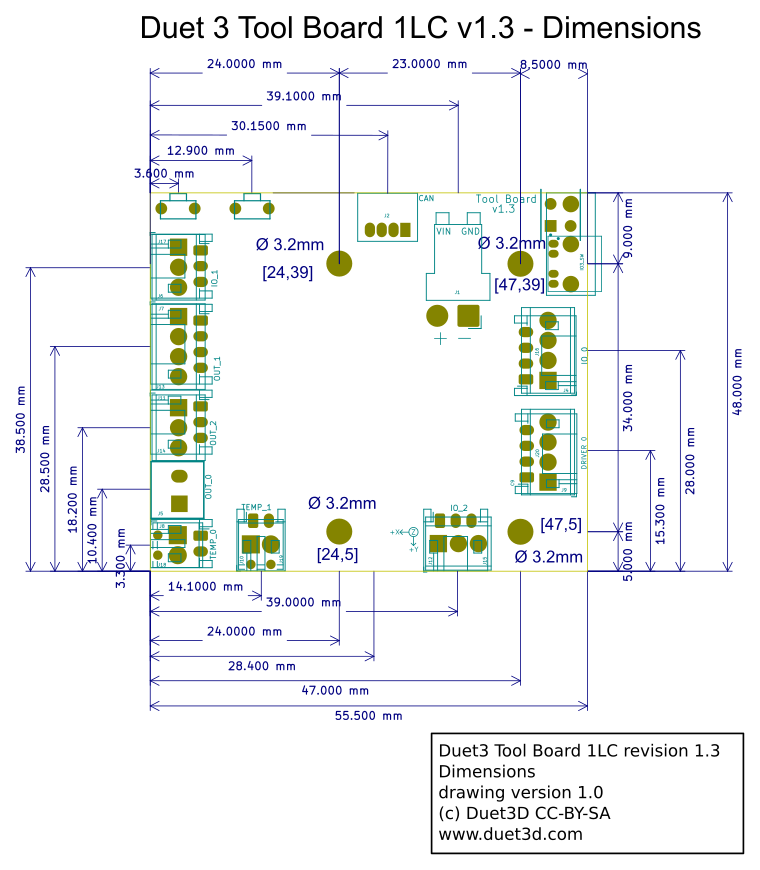
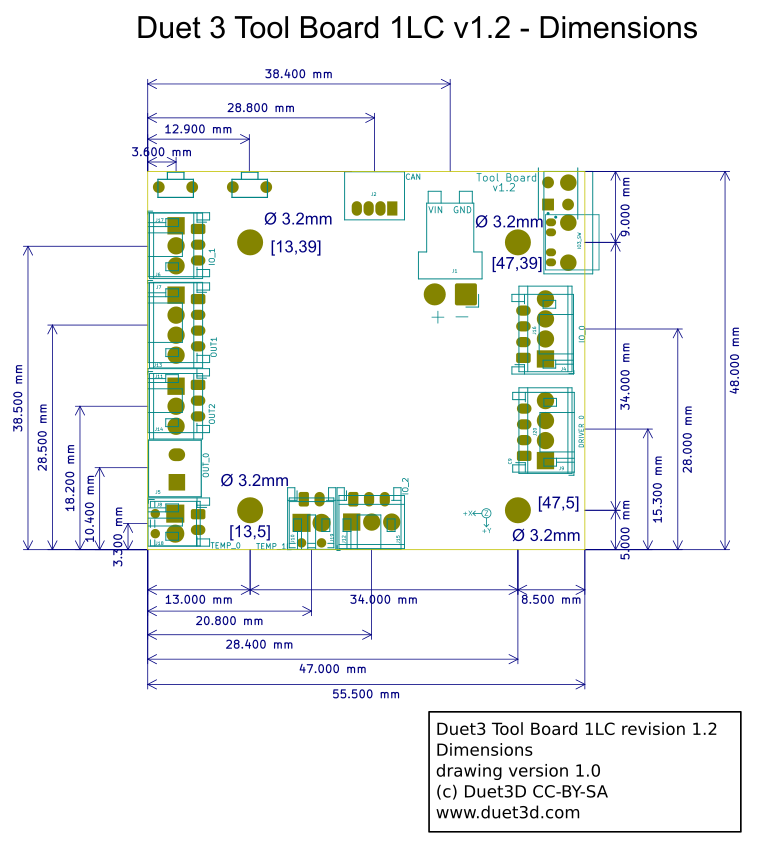
There are two mounting hole patterns for the Duet3 Toolboard. Versions up to and including v1.2 have hole pattersn sized to for the original E3D Hemera. V1.3 has mounting hole patterns sized for the E3D Hemera XS. The overall dimensions of the board have not changed and no functionality is removed in v1.3
The power in screw terminal projects 8.5mm from the top of the PCB. When the JST power connector is fitted, the highest part is the latch on that connector, which at its highest point is nearly 10mm above the PCB surface, although the latch could be cut off if space was critical.
The STEP file is available on Github here.
The power in screw terminal projects 8.5mm from the top of the PCB. When the JST power connector is fitted, the highest part is the latch on that connector, which at its highest point is nearly 10mm above the PCB surface, although the latch could be cut off if space was critical.
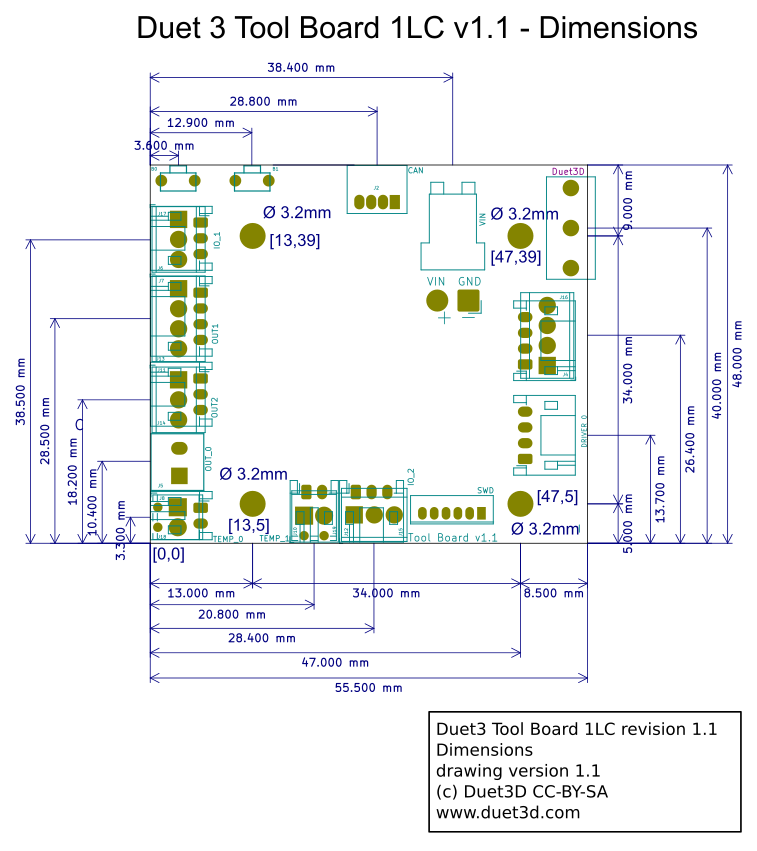
The mounting hole spacing has been designed to be compatible with the E3D Hemera extruder.
Note there is a SOD123 diode soldered on the back of the v1.1 toolboards which should be taken into account when mounting the board.
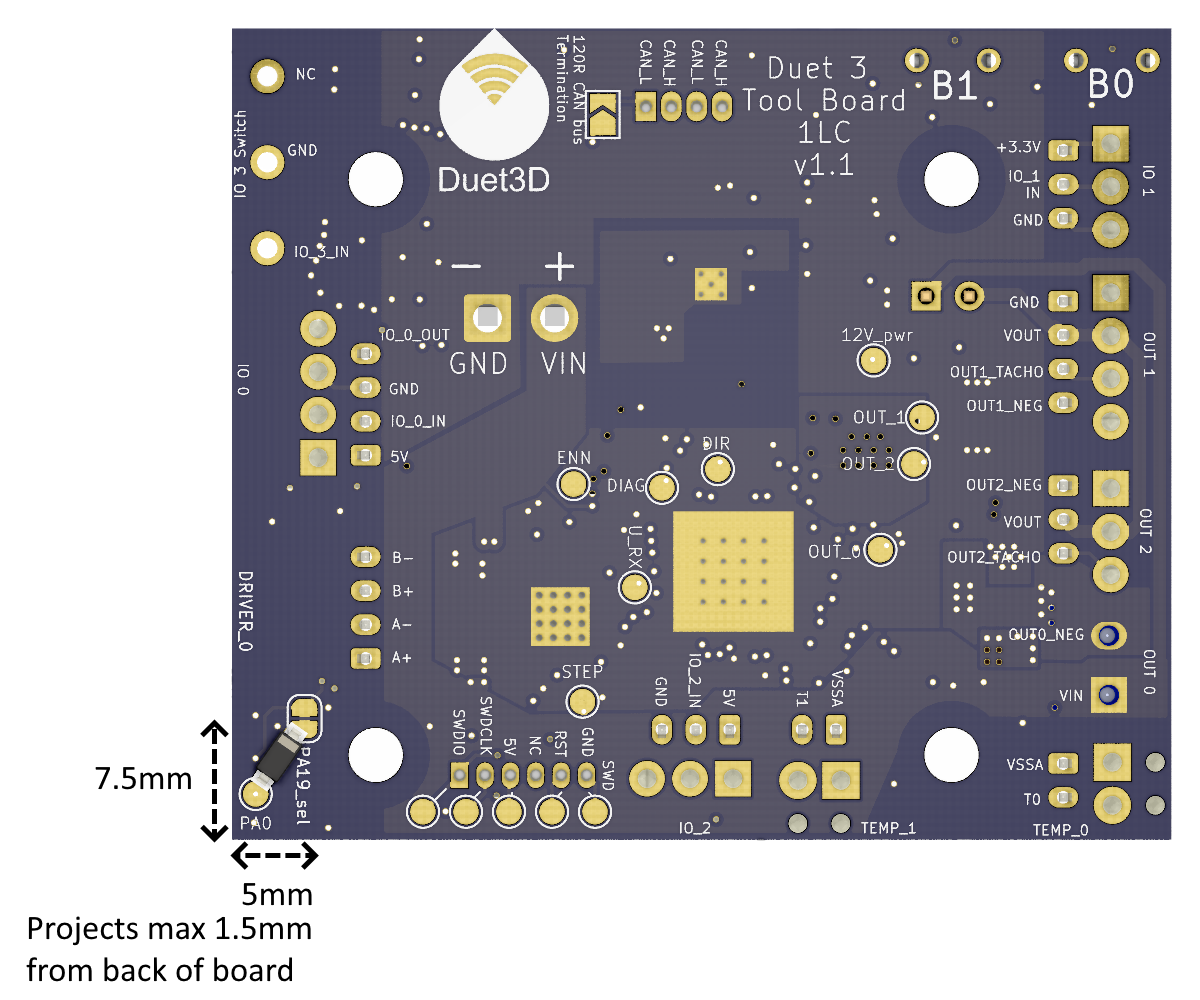
this is included in the STEP file linked below.
The STEP file is available on Github here.
The tallest components on the board are the out2 screw terminal which projects 10mm (this is not shown in the step file). The other screw terminals project 8.5mm from the top of the PCB. When the JST power connector is fitted, the highest part is the latch on that connector, which at its highest point is nearly 10mm above the PCB surface, although the latch could be cut off if space was critical.
The mounting hole spacing has been designed to be compatible with the E3D Hemera extruder.
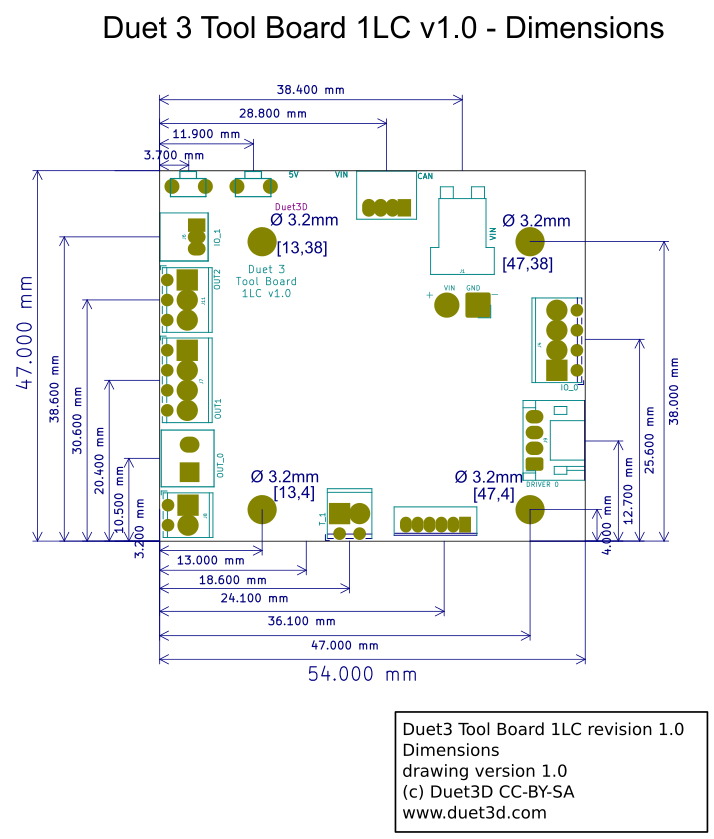
Dimensions, mounting holes and center point of connectors for the Duet3 Toolboard 1LC v0.6
The STEP file is available on Github here
The tallest components on the board are the screw terminals which project 8.5mm from the top of the PCB. When the JST power connector is fitted, the highest part is the latch on that connector, which at its highest point is nearly 10mm above the PCB surface, although the latch could be cut off if space was critical.
The mounting hole spacing has been designed to be compatible with the E3D Hemera extruder.
¶ Mounting
See dc42's blog post here which details how to replace two of the original Bowden tools on an E3D Tool Changer with Hemera tools using Toolboards.
¶ 3D model
A STEP 3D model of each revision of the board is available on github here.
¶ Physical connections
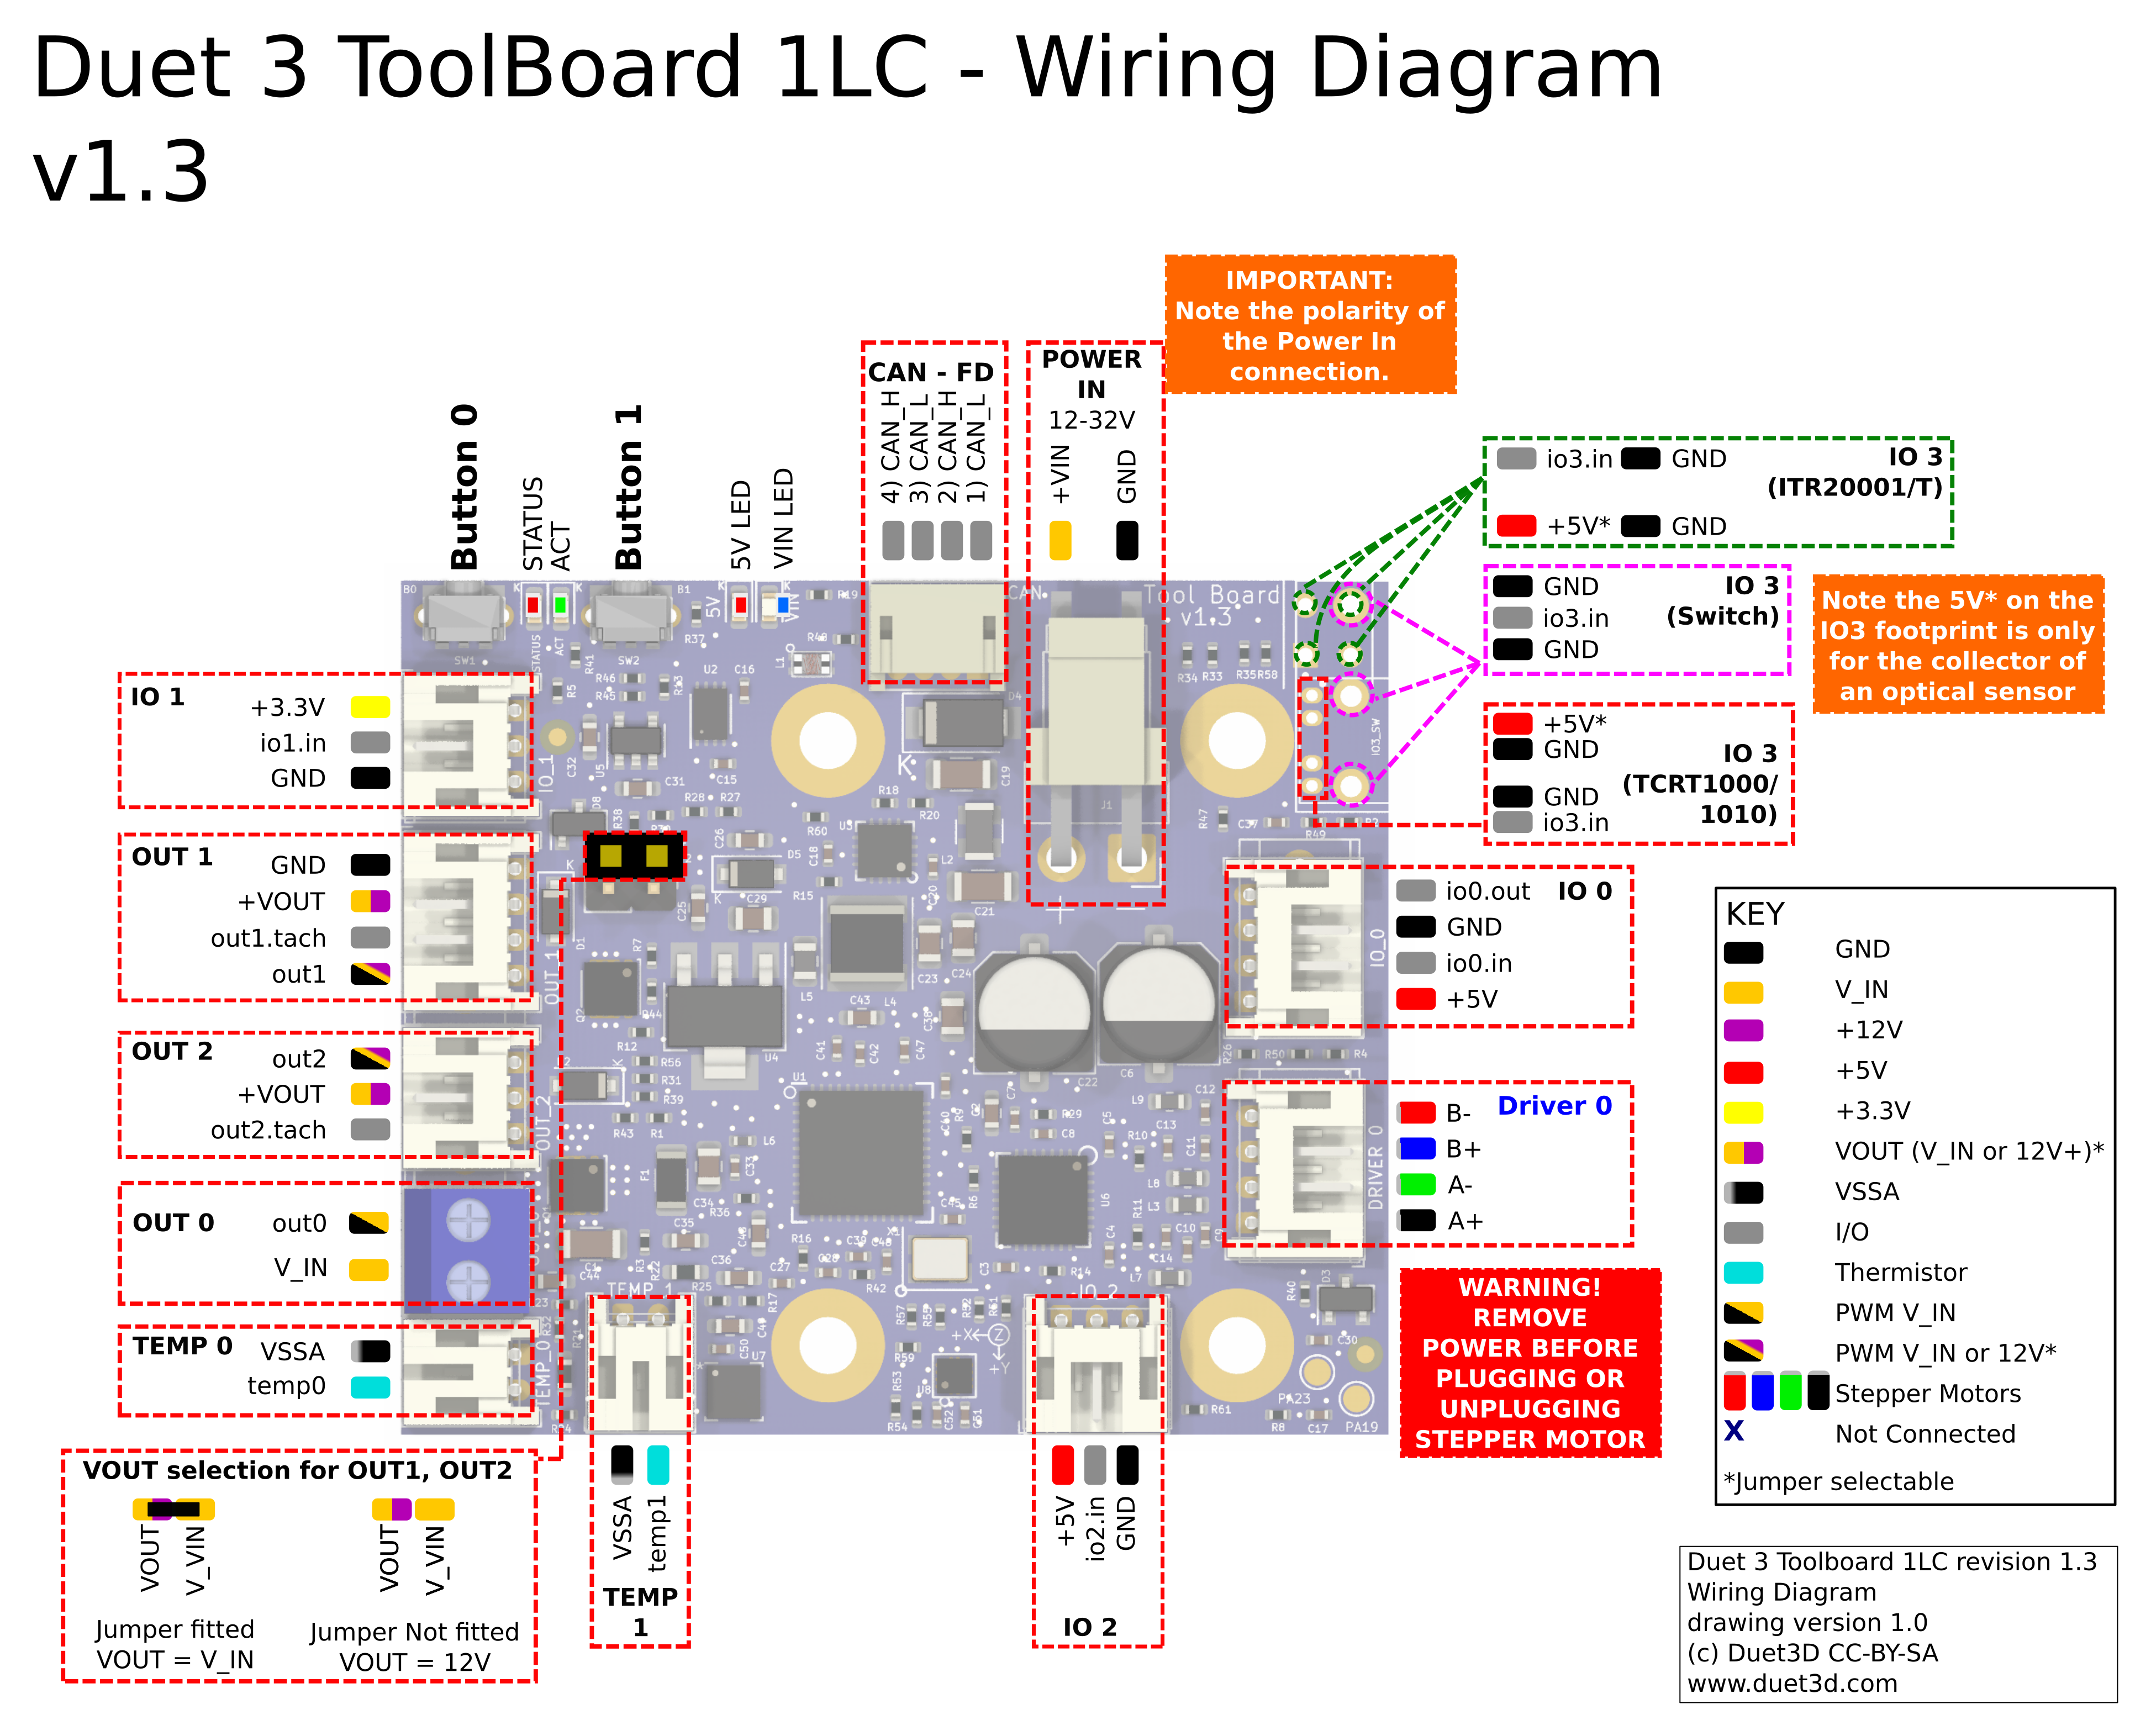
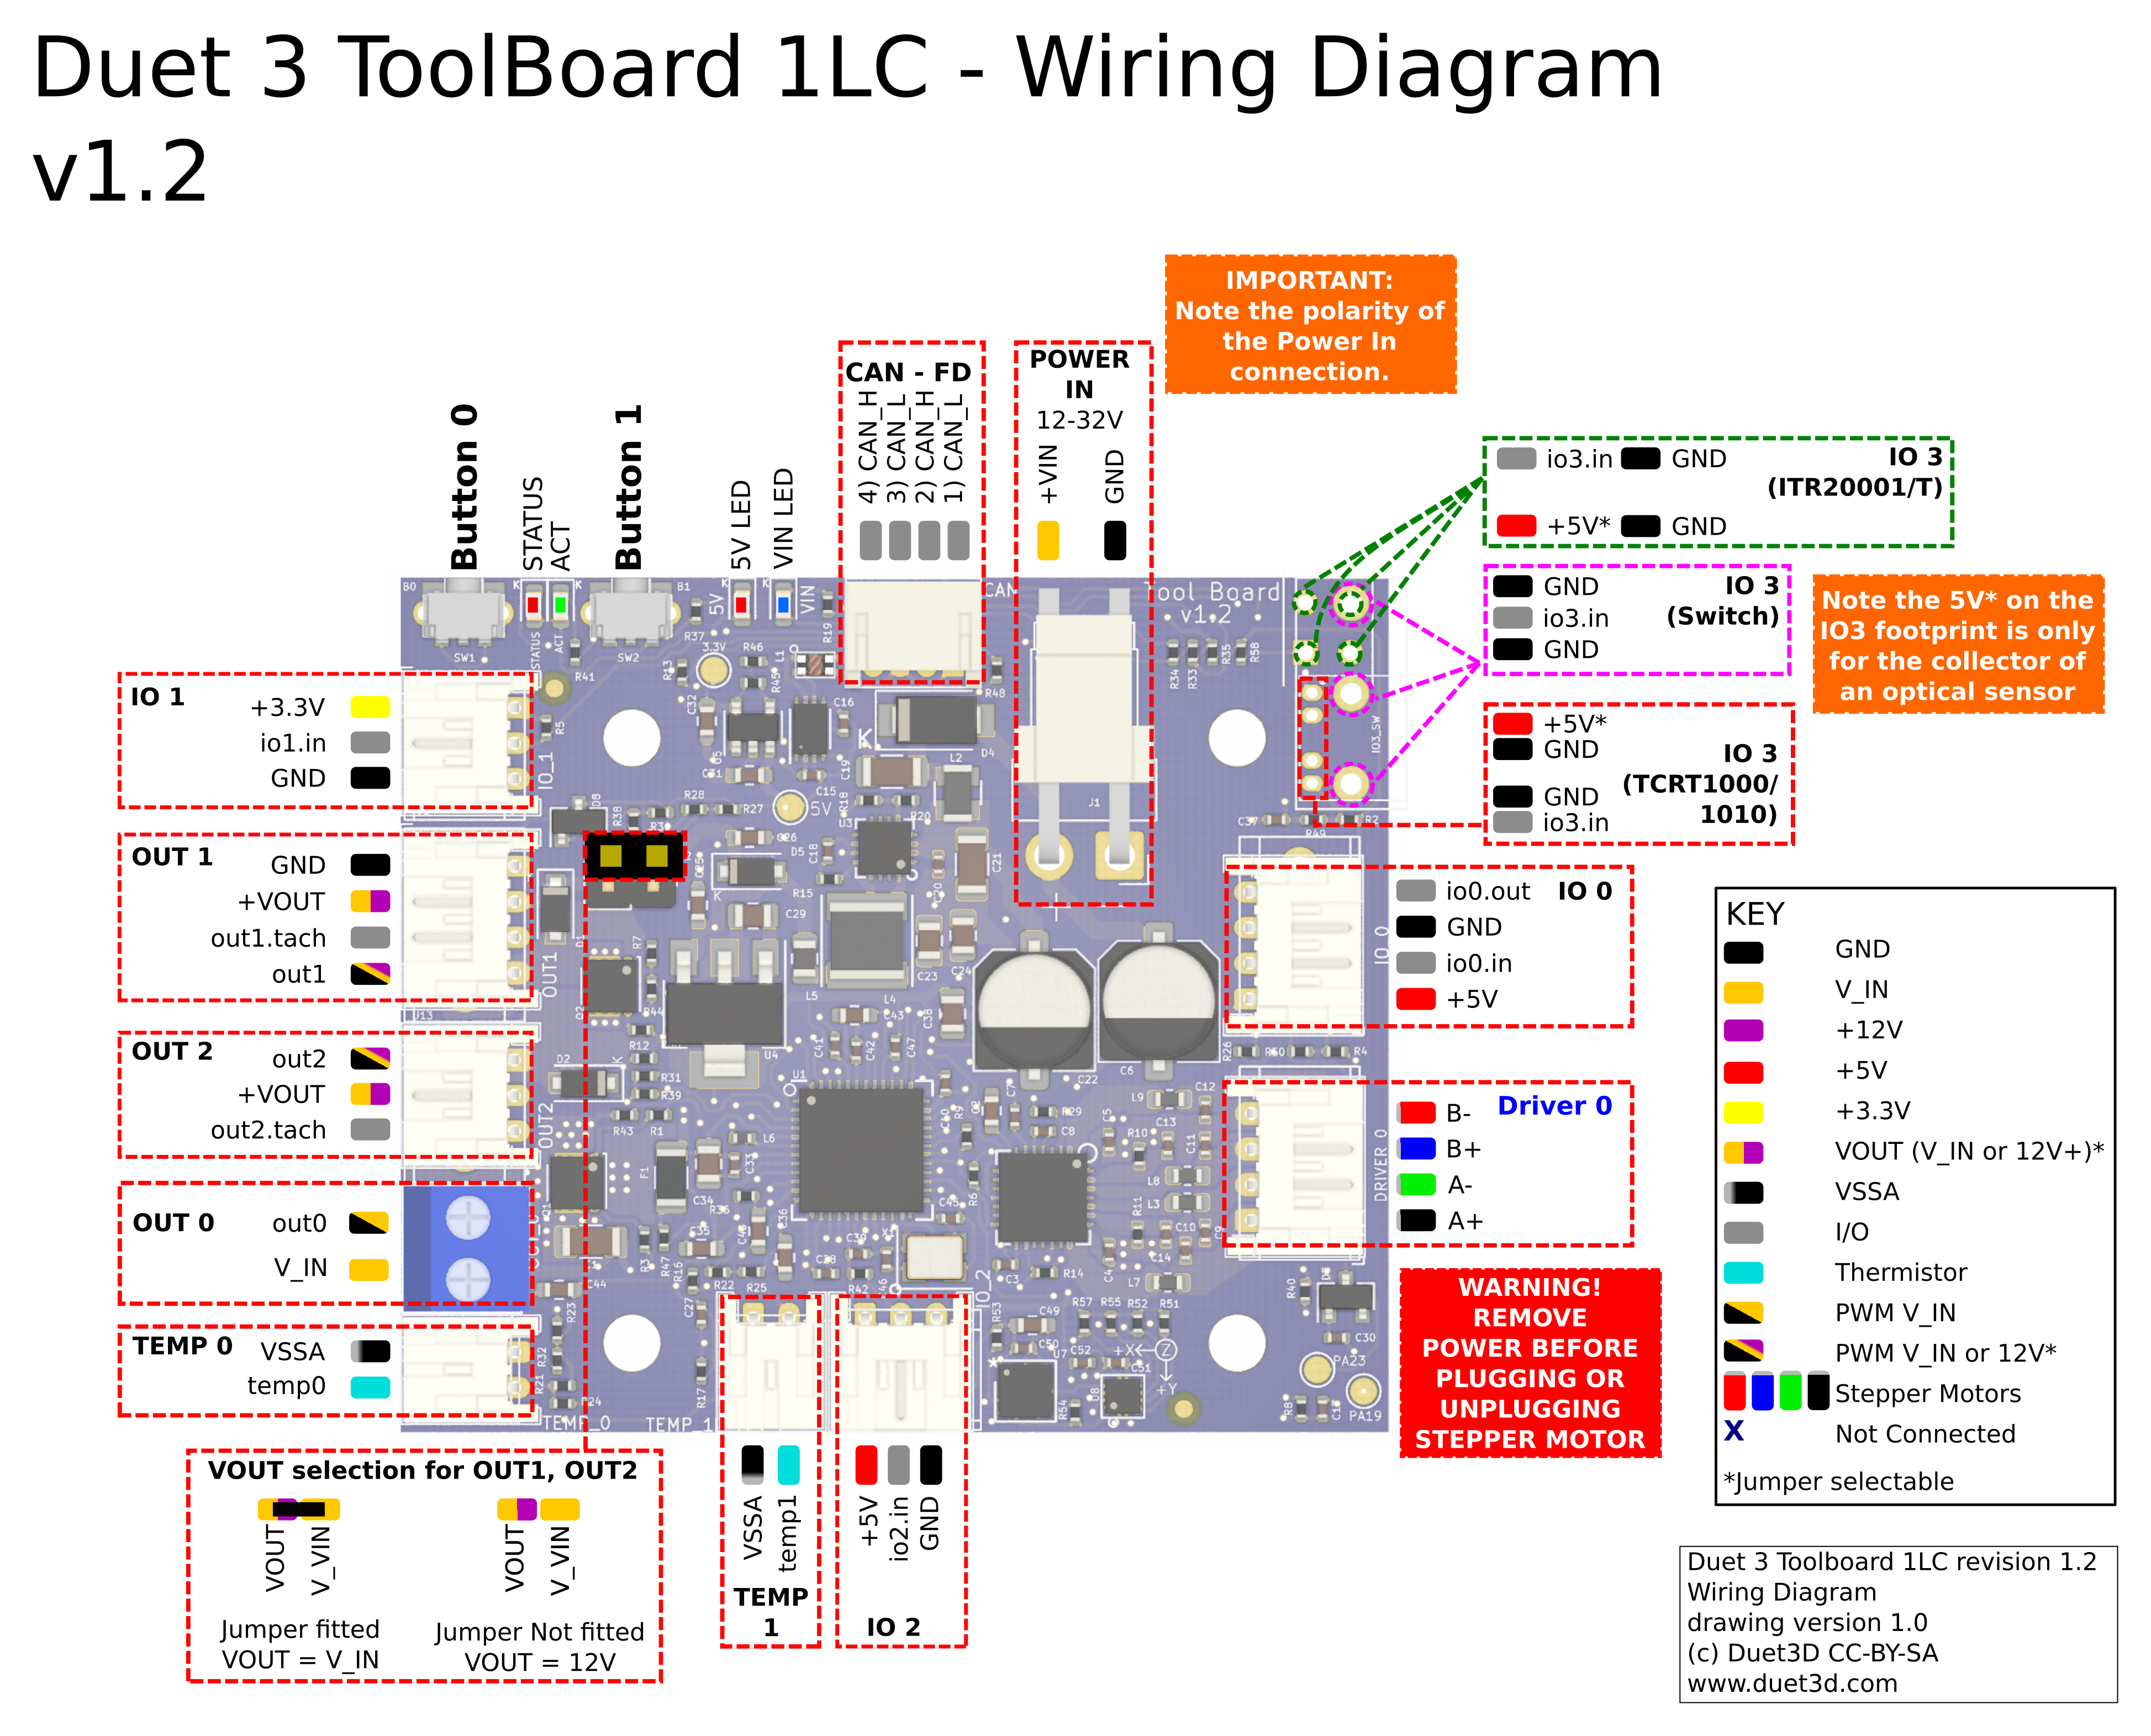
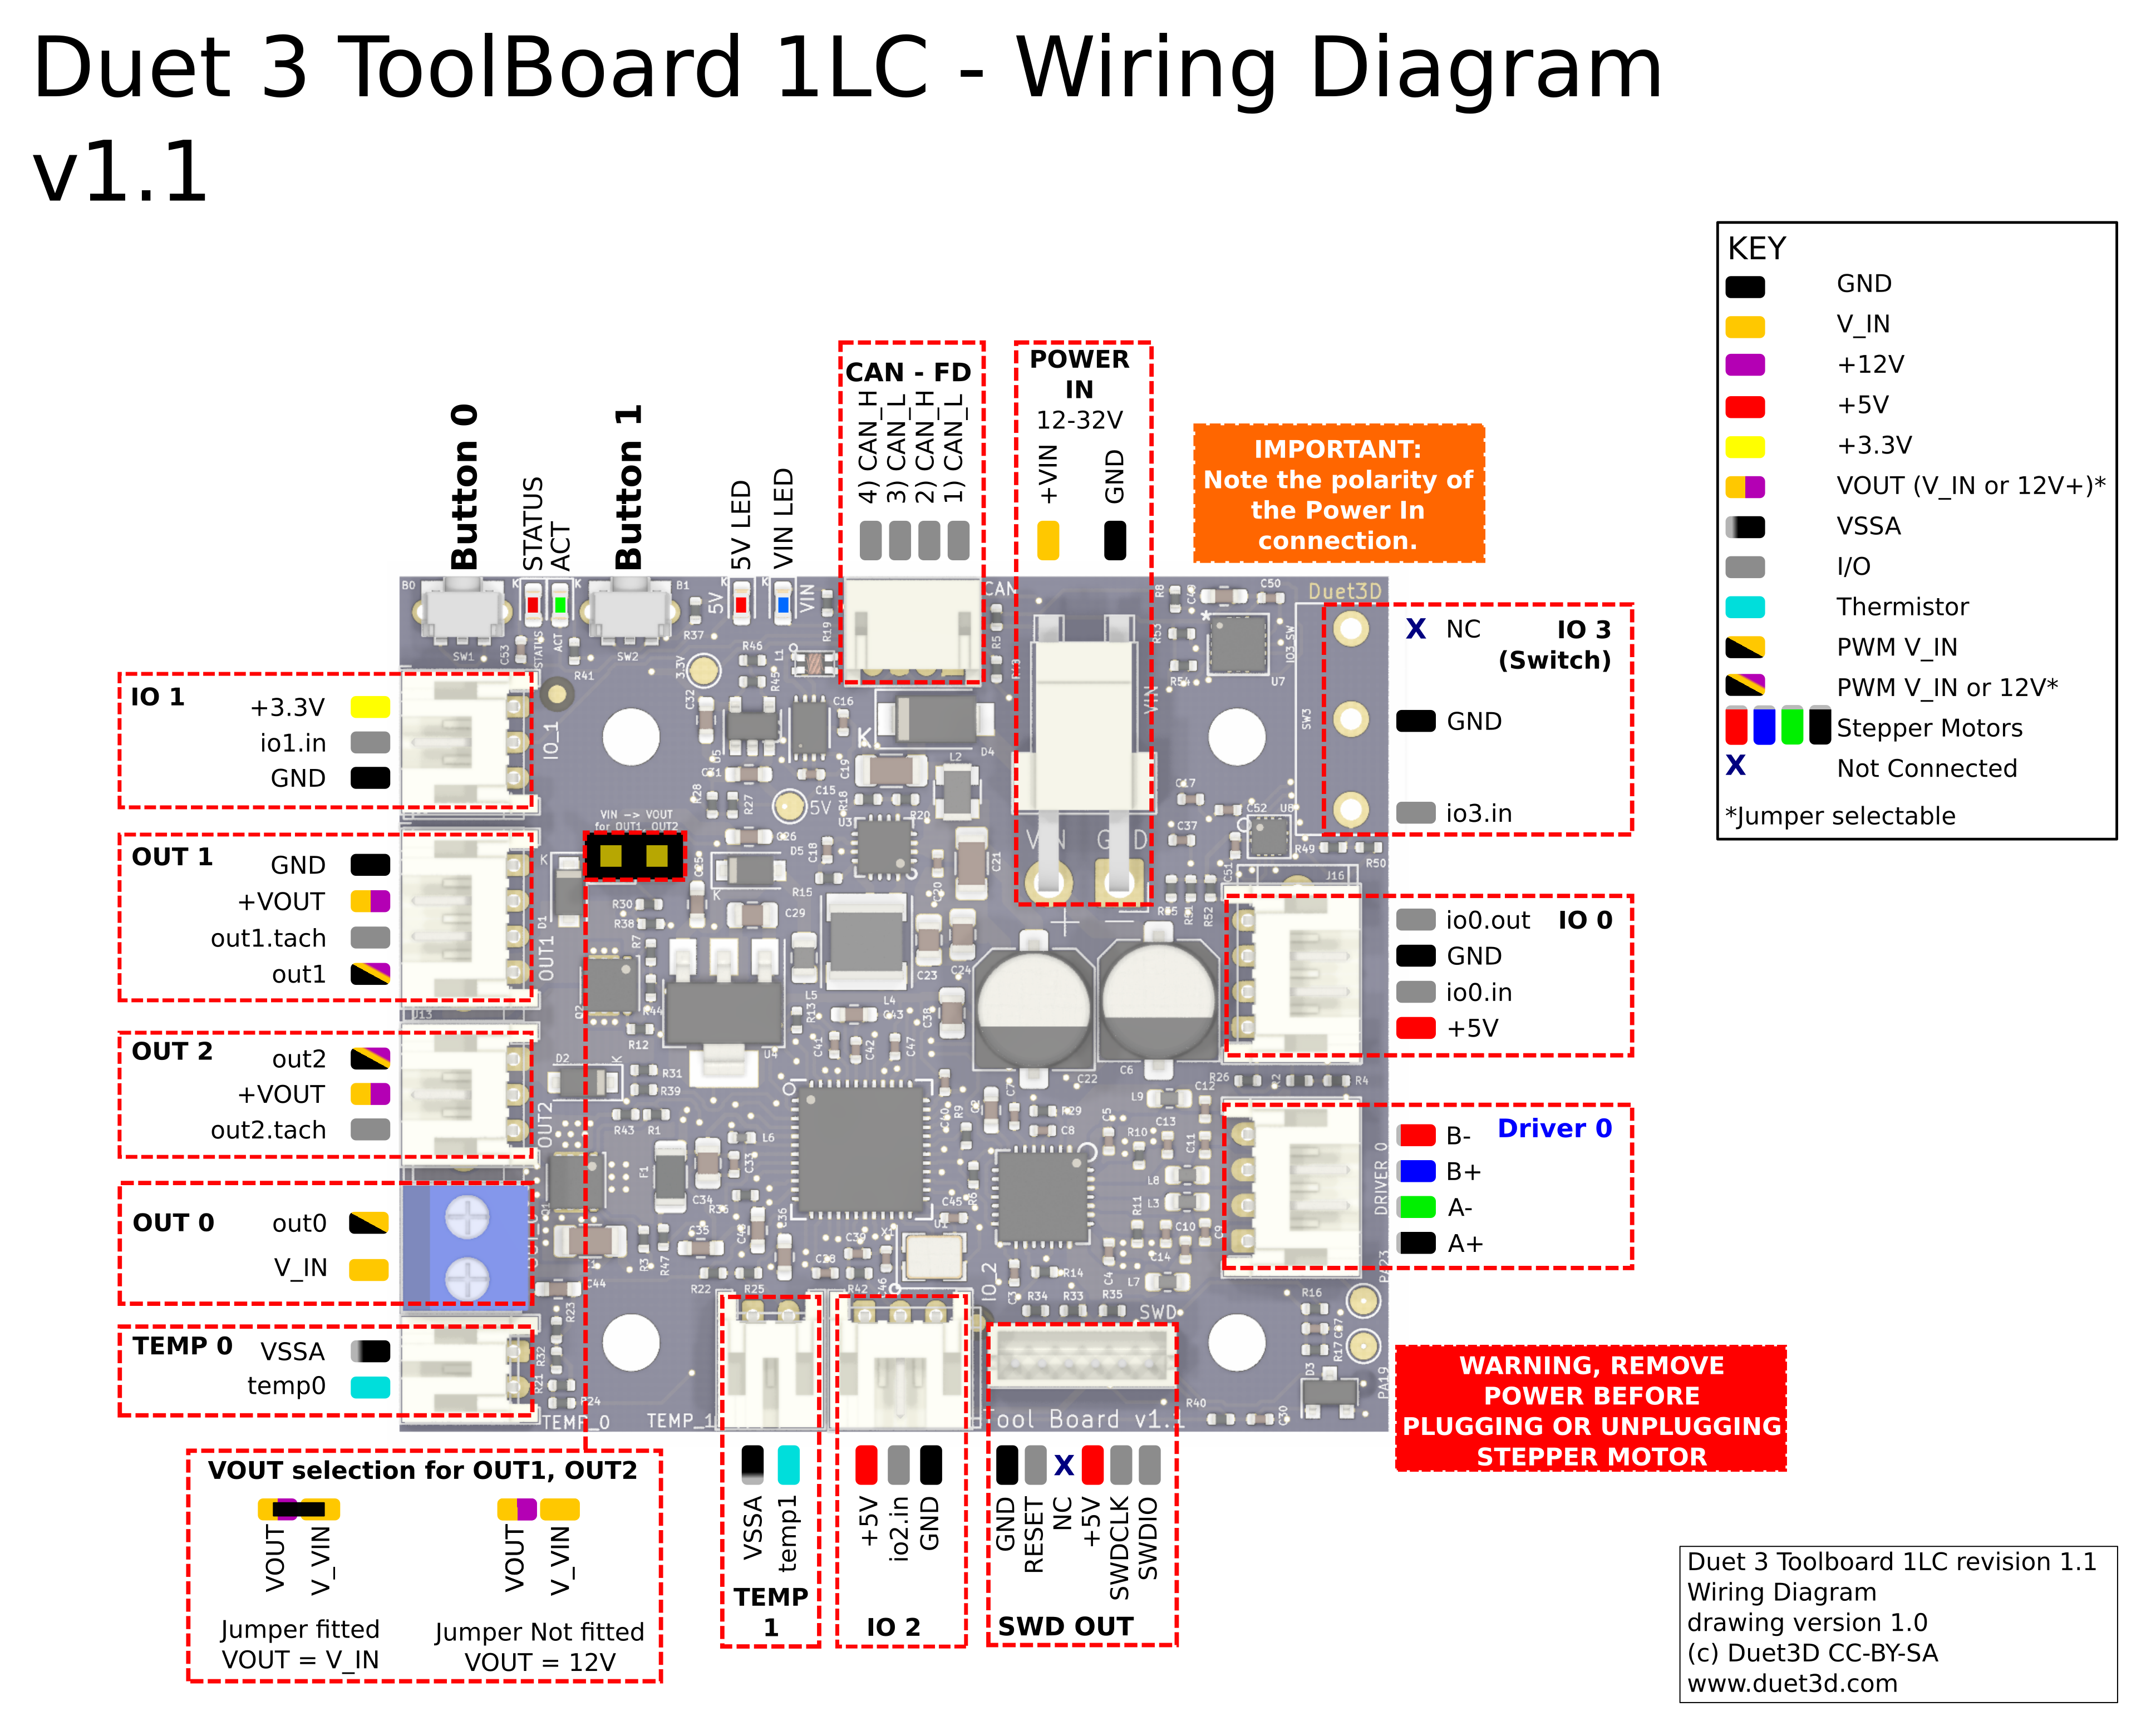
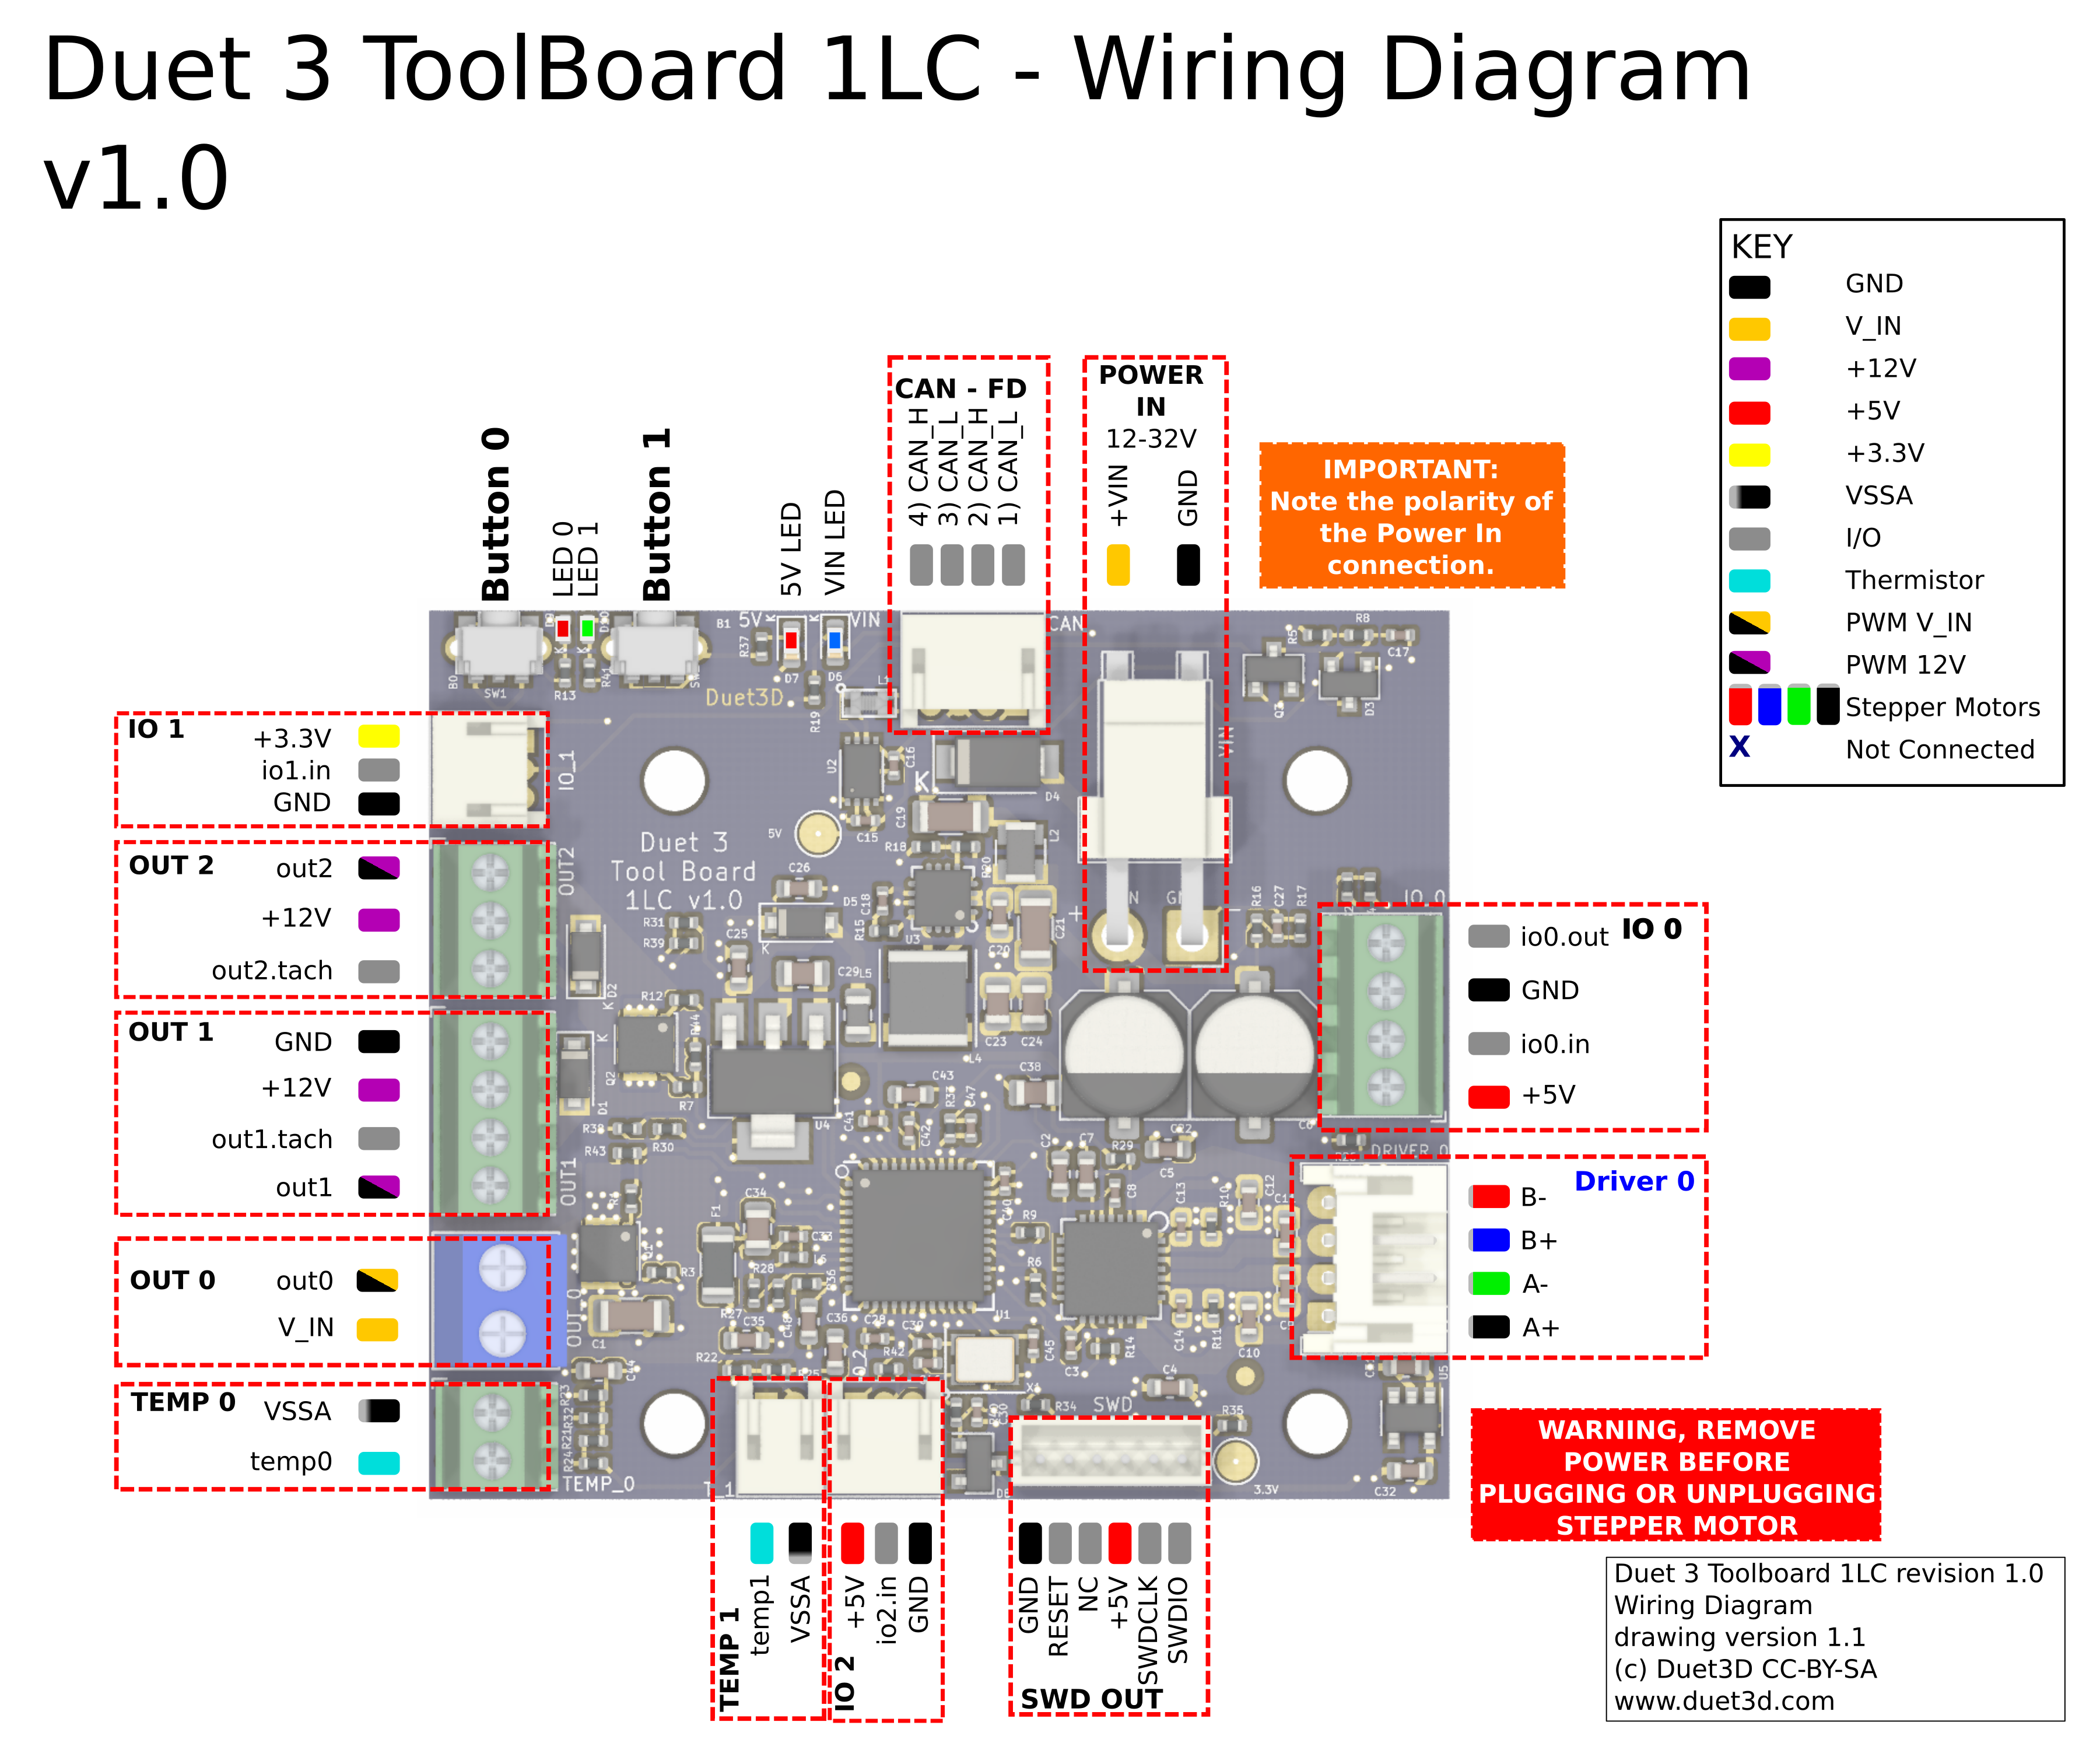
¶ Wiring diagram
¶ Wiring notes
- JST ZH: (CAN, v1.0 headers) These are difficult to crimp because they are so small, so Duet3D supply pre-terminated connectors. You can connect longer wires to them by hand soldering or using small size (white) solder sleeves.
NOTE: Some of the supplied JST ZH pre-terminated connectors may have a different order for the colours of the wires! Please check your wiring before powering on. - Screw terminals: These are not high current so fitting the wires directly into the screw terminals is fine. Using small ferrules is also fine; Duet3D supply 0.5mm^2 white ferrules.
- We recommend connecting the hot end metalwork to ground on the toolboard via a resistor (10k to 1M Ohm), if it is not grounded through its mounting system. This will prevent the hot end building up static charge, which might otherwise occur as filament is extruded and may then flash over to the tool board thermistor input, causing damage.
- On the v1.3 toolboard the mounting screw holes are all grounded via 100K resistors to provide a path to ground for any static build up in the extruders, assuming the toolboard is mounted to the extruder.
¶ Description of Connections
Duet 3 Toolboard 1LC provides the following connectors:
| Connector (board revision) | Label | Function | ||
|---|---|---|---|---|
| v1.1-v1.3 | v1.0 | v0.6 | ||
| 1 x 2-pin JST VH | POWER IN, VIN, GND | Two pins for main VIN and GND | ||
| 4-pin JST PH | Screw terminal | IO_0 | Input/output with +5V power, for endstops, Z-probes. Input is 30V-tolerant |
|
| 3-pin JST PH | 3-pin JST ZH | Screw terminal | IO_1 | Input only with +3.3V power, intended for filament monitors. Note: Input is 3.3V-tolerant |
| 3-pin JST PH | 3-pin JST ZH | Screw terminal | IO_2 | Input only with +5V power, for endstops or tool pickup detection switch. Input is 30V-tolerant |
| 1 x 3-pin footprint | N/A | IO_3 | (v1.1 board) Footprint to mount an Omron D2FD-1L30-1T ultra subminiture switch or similar. In v1.2 and v1.3 the footprints for an ITR20001/T or TCRT1000/1010 reflective optical sensor are also added. Example use case is a tool docking confirmation switch. |
|
| 4-pin JST PH | DRIVER_0 | Stepper motor connection | ||
| 1 x 6-pin JST ZH | SWD | This is for firmware debugging and also provides a backup mechanism to program firmware. | ||
| 2-pin JST PH | Screw terminal | TEMP_0 | Thermistor or PT1000 input. TEMP_0 uses a 16-bit ADC for high resolution reading of PT1000 sensors. |
|
| 2-pin JST PH | 2-pin JST ZH | Screw terminal | TEMP_1 | Thermistor or PT1000 input |
| 1 x Screw terminal | OUT_0 | High current output intended for extruder heater, maximum current 5A, this is VIN voltage only. There is no flyback diode on this output, so if you connect a high-current inductive load, you must use an external flyback diode. |
||
| 4-pin JST PH | Screw terminal | OUT_1 | 4-wire fan output (also accepts a 2- or 3-wire fan) intended for use as the print cooling fan. 2A total max current for OUT1 and OUT2 when VIN selected (v1.1 board), 0.8A total max current for OUT1 and OUT2 on 12V. This output is protected by a flyback diode. Note On v1.0 boards and earlier, VOUT on OUT_1 and OUT_2 is set to 12V. On v1.1 boards, voltage is selectable between 12V and VIN, using VOUT for OUT_1, OUT_2 pins. Note When using a 4-wire fan, the tacho reading is valid at all PWM settings. |
|
| 3-pin JST PH | Screw terminal | OUT_2 | 3-wire fan output (also accepts a 2-wire fan) intended for use as the hot end fan. 2A total max current for OUT1 and OUT2 when VIN selected (v1.1 board), 0.8A total max current for OUT1 and OUT2 on 12V. This output is protected by a flyback diode. Note At power on/reset, before it comes under firmware control, OUT2 is on by default. This is so the hotend fan is on in the event of a firmware failure or reset. Note On v1.0 boards and earlier, VOUT on OUT_1 and OUT_2 is set to 12V. On v1.1 boards, voltage is selectable between 12V and VIN, using VOUT for OUT_1, OUT_2 pins. Note the tacho reading is valid only when running the fan at full speed. |
|
| 1 x 2-pin KK | N/A | VOUT for OUT_1, OUT_2 | (v1.1 board) Voltage select for OUT_1 and OUT_2, between 12V and VIN. On V1.0 boards it is set to 12V. 0.8A total for OUT1 and OUT2 when set to 12V because the maximum output current of the 12V regulator is 1A, and the 5V rail is also derived from that regulator. | |
| 2 x Push button | Button 0, Button 1 | Buttons can be used to generate triggers. If both buttons are held down at power on, the board will factory reset, see the Factory Reset. | ||
| 1 x 4-pin JST ZH | CAN | CAN connector. See CAN section below. | ||
¶ LED indications
LEDs are provided to indicate the following:
| Label | Colour | Function |
|---|---|---|
| VIN | Blue | Indicates presence of VIN power (VIN should be externally fused) |
| 5V | Red | Indicates presence of 5V power from on-board regulator |
| ACT / LED 1 | Green | Indicates activity on the CAN-FD bus |
| STATUS / LED 0 | Red | Status LED. See description below |
Status LED: In normal use, the red LED flashes slowly in sync with the main board to indicate that it has CAN sync, or flashes continuously and rapidly to indicate that it doesn't. It also flashes startup error codes, for example if the bootloader doesn't find valid firmware on the board. For a list of these error codes see CAN_connection basics.
¶ Pin names
For more information on pin names, see Pin Names.
RepRapFirmware 3 uses pin names for user-accessible pins, rather than pin numbers, to communicate with individual pins on the PCB. In RRF 3 no user-accessible pins are defined at startup by default. Pins can be defined for use by a number of gcode commands, eg M574, M558, M950.
The Duet 3 series uses the pin name format "expansion-board-address.pin-name" to identify pins on expansion board, where expansion-board-address is the numeric CAN address of the board. A pin name that does not start with a sequence of decimal digits followed by a period, or that starts with "0." refers to a pin on the Duet 3 Mainboard.
| Function | Pin location | RRF3 Pin name | Notes |
|---|---|---|---|
| Outputs | OUT_0 | out0 | 5A max output at VIN voltage |
| OUT_1 | out1 | 2A total max current for OUT1 and OUT2 when VIN selected (v1.1 board), 0.8A total max current for OUT1 and OUT2 on 12V. | |
| out1.tach | |||
| OUT_2 | out2 | 2A total max current for OUT1 and OUT2 when VIN selected (v1.1 board), 0.8A total max current for OUT1 and OUT2 on 12V. | |
| out2.tach | |||
| Inputs/Outputs | IO_0 | io0.out | 5V. 300mA peak total max output, 50mA continuous |
| io0.in | 30V tolerant | ||
| IO_1 | io1.in | 3.3V tolerant | |
| IO_2 | io2.in | 30V tolerant | |
| IO_3 | io3.in | 30V tolerant. Only available on v1.1 and later revisions | |
| TEMP_0 | temp0 | ||
| TEMP_1 | temp1 | ||
| Button 0 | button0 | ||
| Button 1 | button1 |
¶ Input/Output
OUT_0, OUT_1 and OUT_2 are PWM-capable.
The individual IO_x connectors have the following capabilities:
| IO # | UART/I2C? | Analog in? | PWM out? | Notes |
|---|---|---|---|---|
| IO_0 | No | Yes | Yes | |
| IO_1 | No | No | No | Input only, no output pin |
| IO_2 | No | No | No | Input only, no output pin |
| IO_3 | No | No | No | Input only, no output pin |
¶ Power wiring
Supply between 12V and 32V to the 2-pin JST VH power connector on the board, observing the correct polarity.
If you use a relay to control VIN power to the board, ie the power supply is already switched on, and a relay is used to turn on power to the board, you should use an inrush current limiter wired in series with VIN. See the section on Inrush current here.
OUT ports on the mainboard should NOT be used to switch power to expansion or tool boards directly. See the note at the end of the 'inrush current' section at the link above.
¶ CAN
The Duet 3 Tool Distribution Board is available to simplify the connections to up to 4 Toolboards.
¶ Power connection
Apply between 12V and 32V to the VIN connector of the Tool Distribution Board. Then connect each tool to one of the JST VH terminals.
Each power connection is individually fused.
¶ CAN connection
Connect the 4-pin CAN connector on the Toolboard to one of the corresponding 4-pin connectors on the Tool Distribution Board, using a straight-through cable comprising two twisted pairs. One pair should use pins 1 and 2, the other should use pins 3 and 4. Note, this is not the same as for a CAN cable terminated in 6p4 RJ11 connectors, which by convention connects one twisted pair to the two middle pins and the other to the two outer pins.
¶ Address
See "Set the CAN address" below.
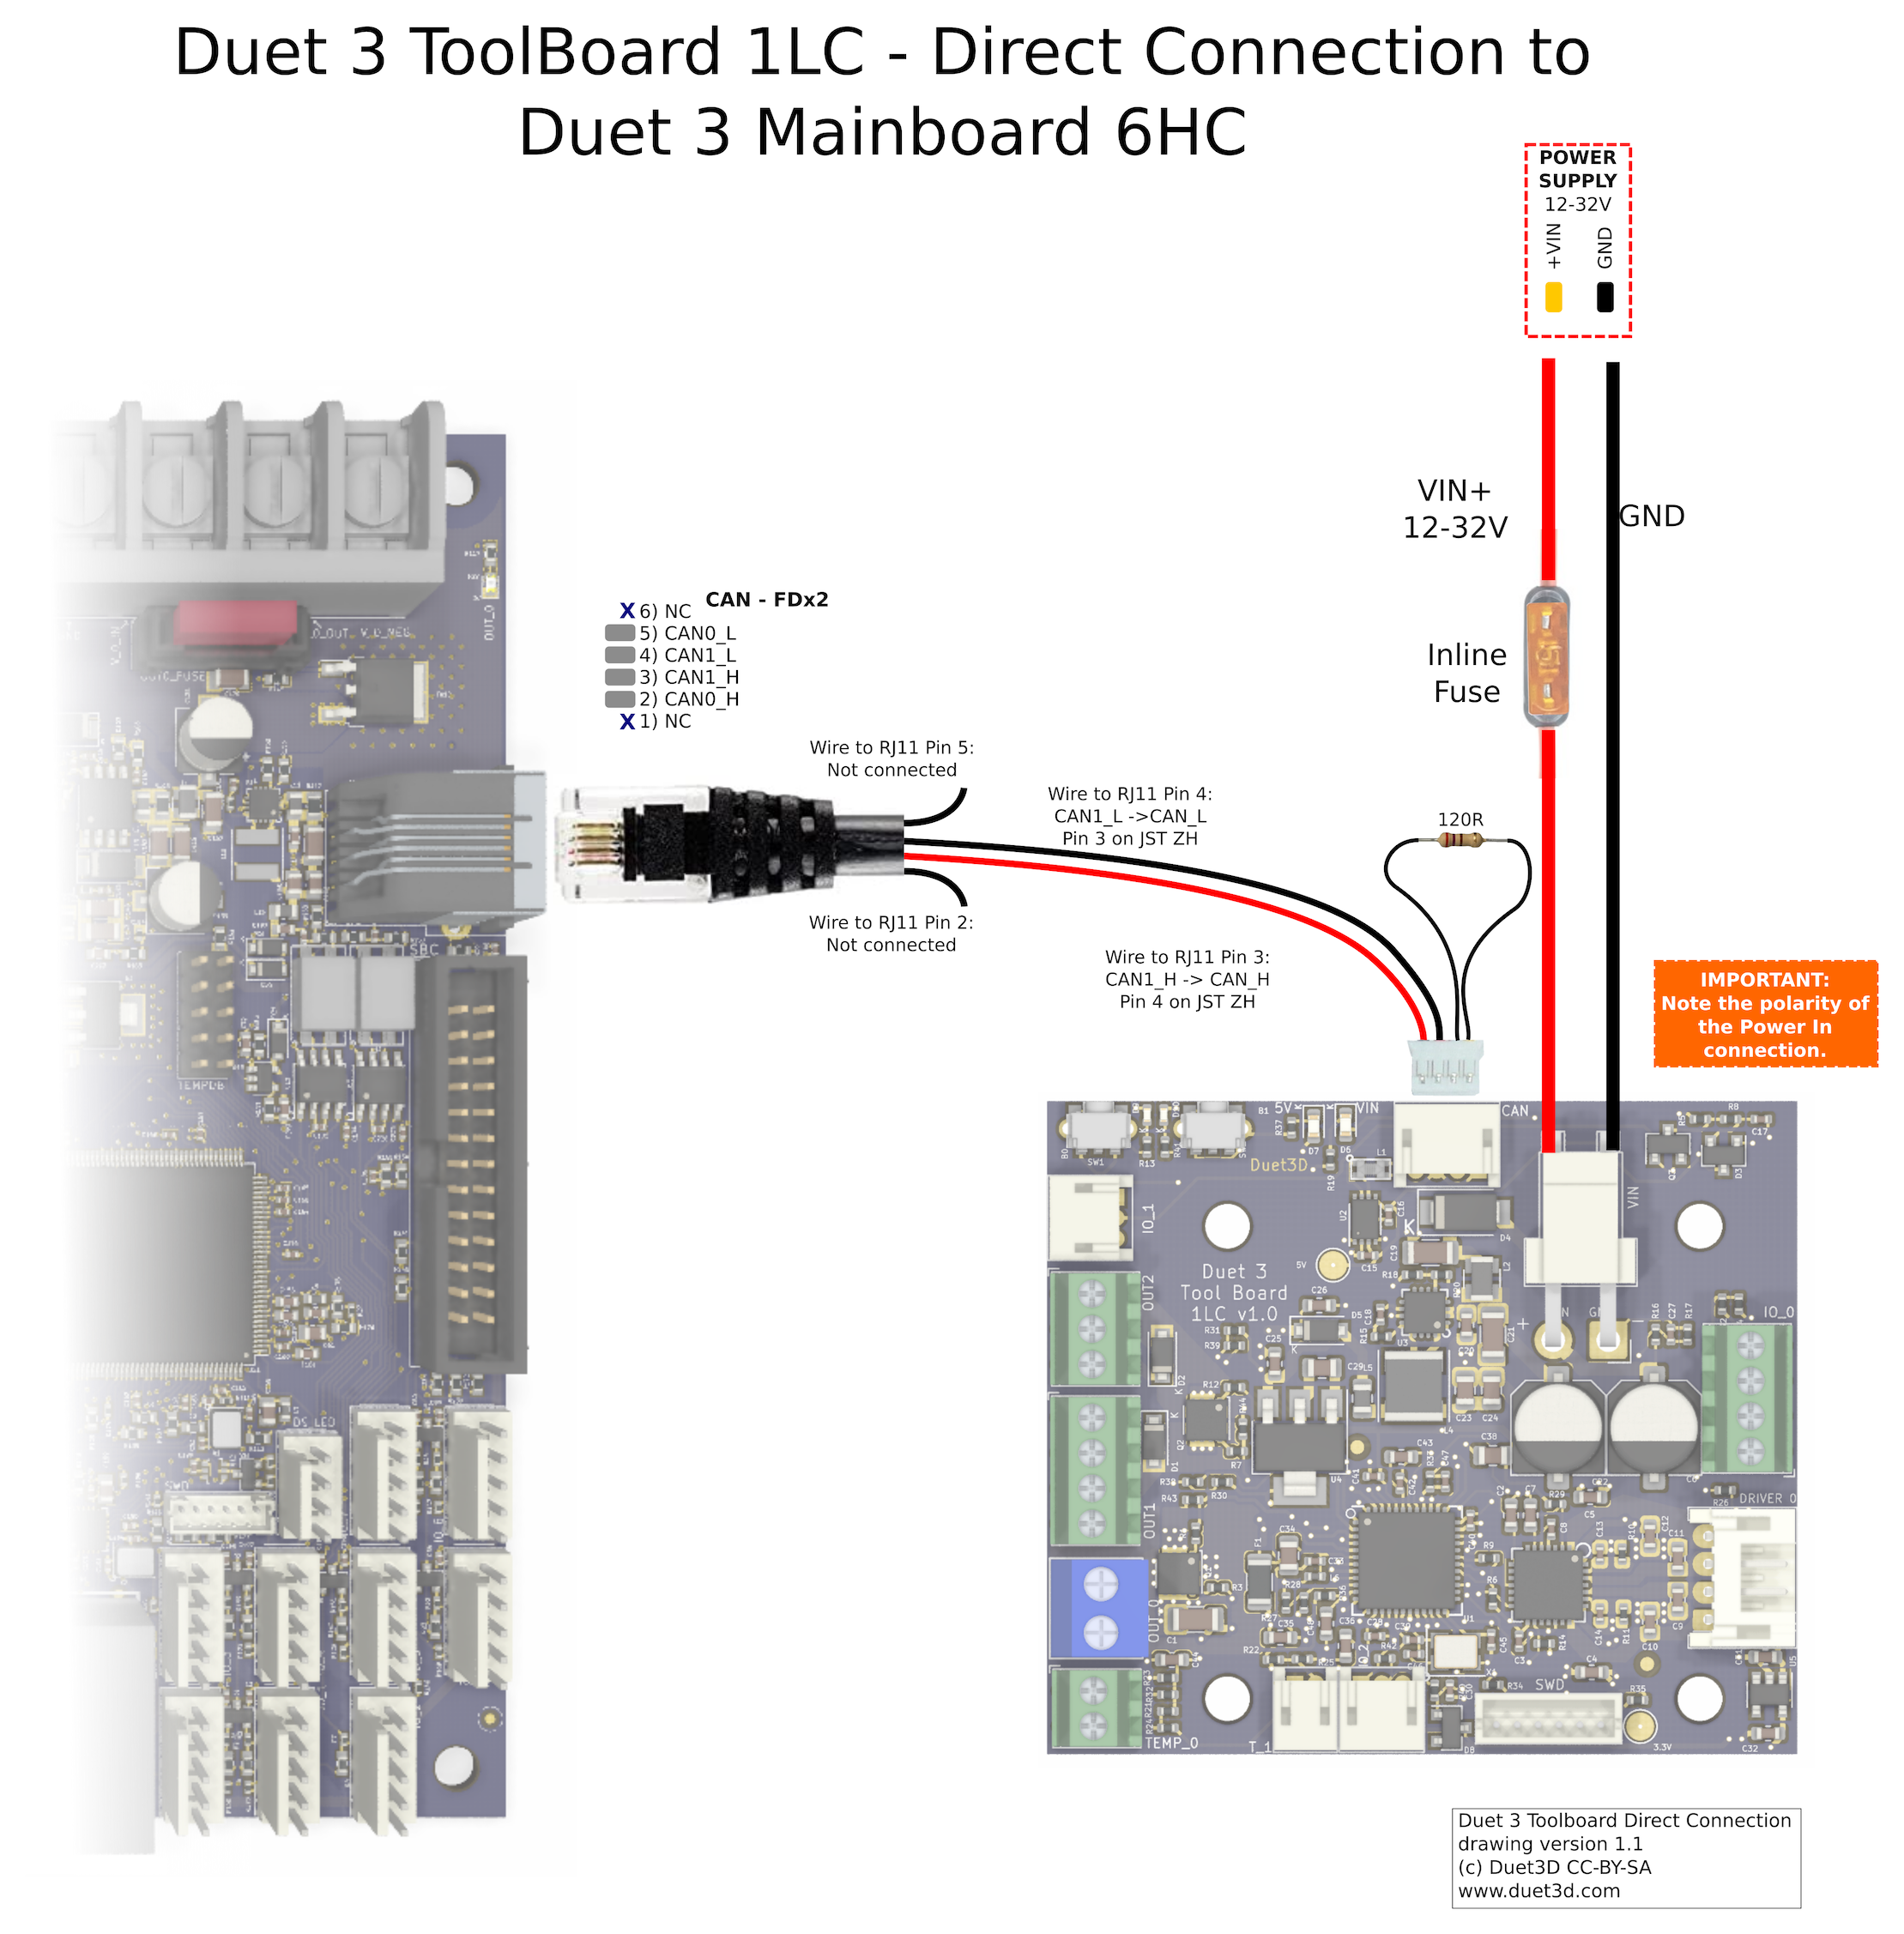
It is also possible to connect a Toolboard directly to the Duet 3 Mainboard 6HC, 6XD, Duet 3 Mini 5+, or any Duet 3 Expansion board.
¶ Power connection
Supply between 12V and 32V to the 2-pin JST VH VIN power connector on the Toolboard through a fuse and observing the correct polarity. Inline blade fuse holders are readily available, pick the lowest rated fuse appropriate for your heater and motor current draw.
¶ CAN Connection
Connect the RJ11 socket on the Duet 3 Mainboard 6HC, 6XD or Expansion board, to the correct 2 CAN pins on the Toolboard, and terminate the other 2 CAN pins on the Toolboard. If using one Toolboard, connect pins 3 and 4 (the middle 2 pins) of the RJ11 connector on the Duet to pins 4 and 3 of the Toolboard, making sure you get them the right way round i.e. CAN1_H in the Duet to CANH on the Toolboard. (Pins 2 and 4 of the Toolboard are interchangeable, as are pins 1 and 3.) Don't connect anything to pins 2 and 5 of the RJ11 connector on the Duet.
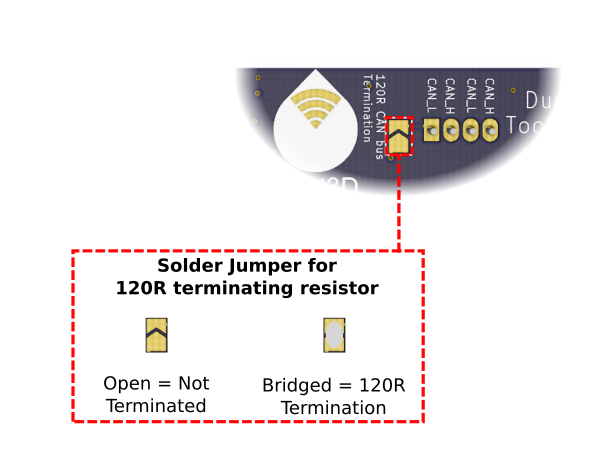
The image above shows Duet 3 Toolboard 1LC v1.0. V1.1 and later have a built in termination resistor that is jumper selectable, see below.
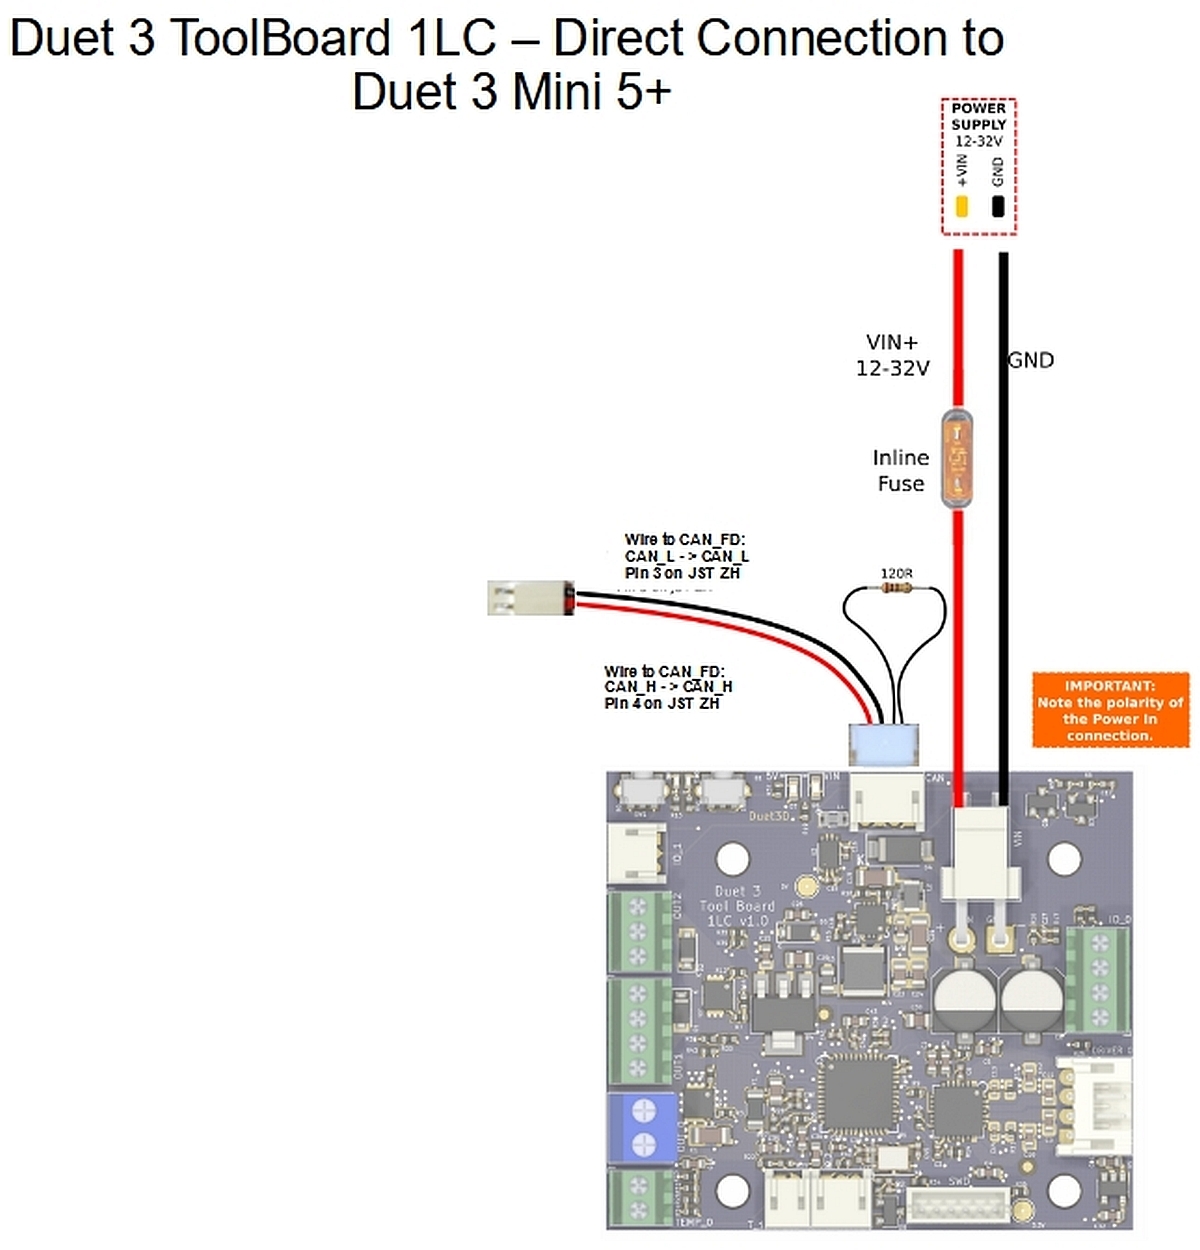
On the Duet 3 Mini 5+ connect the CAN_FD socket to the 2 CAN pins on the Toolboard, and terminate the other 2 CAN pins.
The image above shows Duet 3 Toolboard 1LC v1.0. V1.1 and later have a built in termination resistor that is jumper selectable, see below.
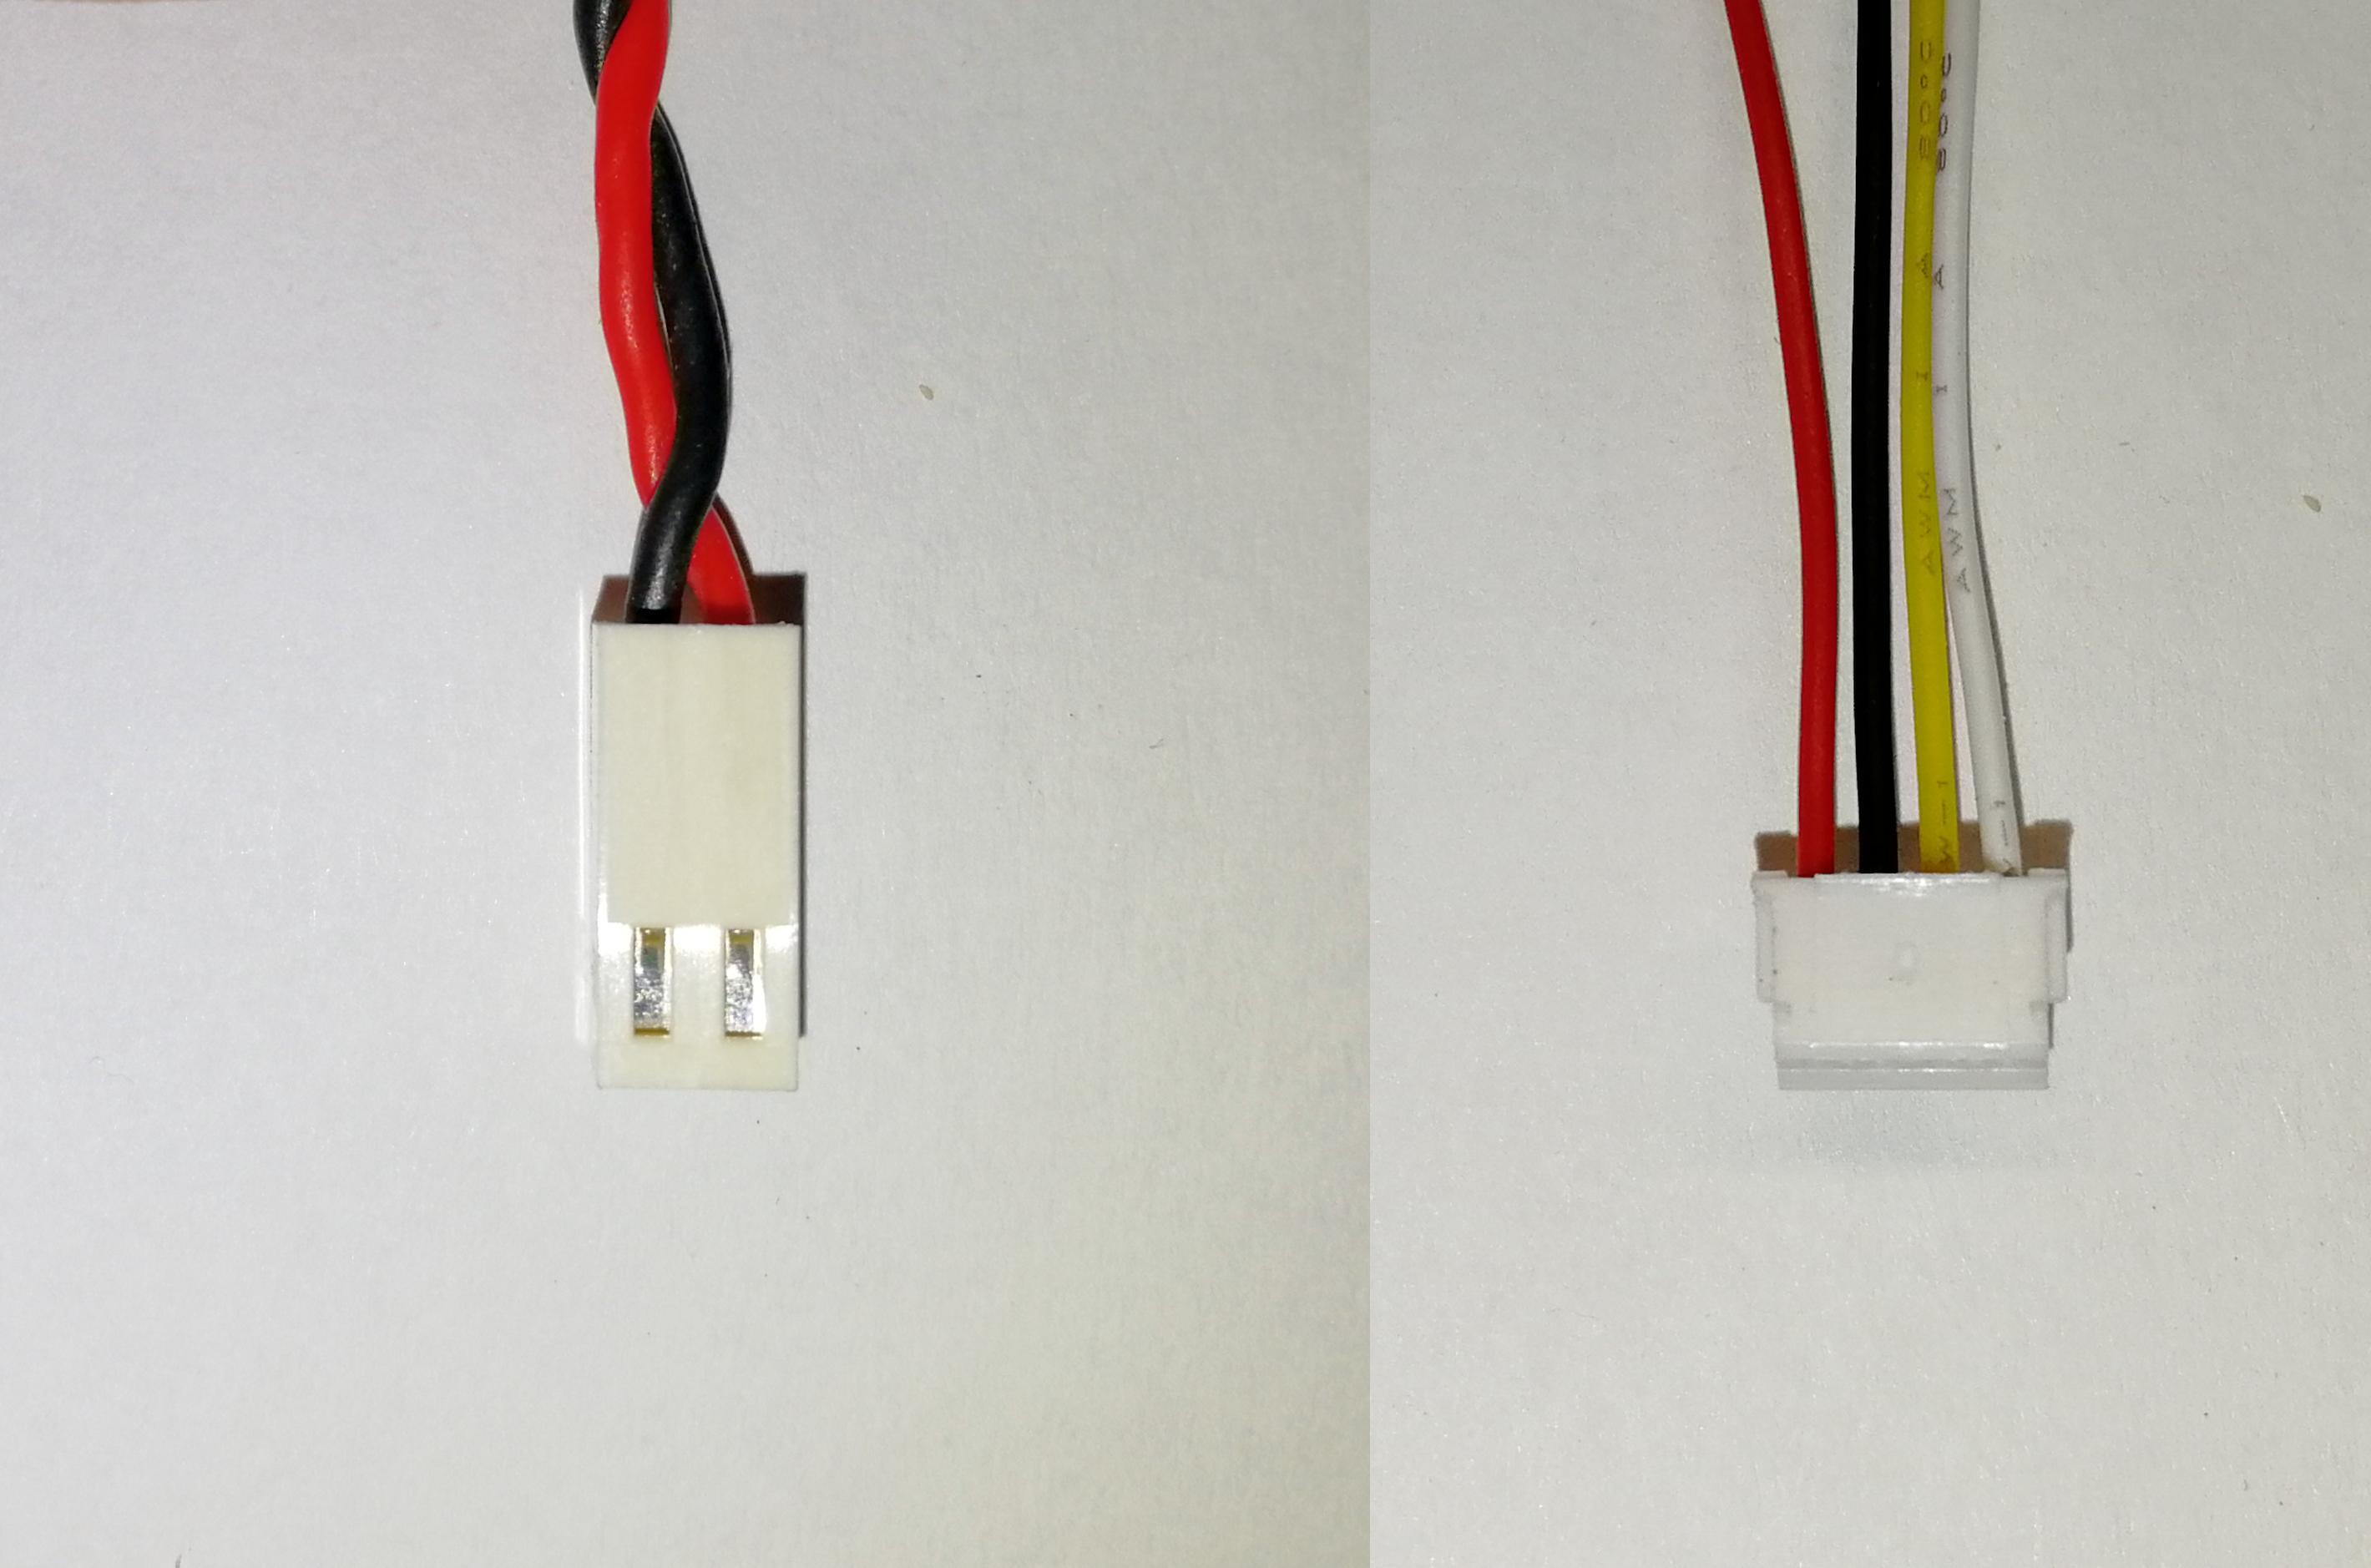
This image shows a cable made to connect a Duet 3 Mini 5+ to a Duet 3 ToolBoard 1LC. red to red black to black and while/yellow unconnected.
¶ Terminating resistor
Bridge the solder jumper on the back of the Toolboard to bring the 120R resistor into the circuit:
¶ Address
See "Set the CAN address" below.
¶ Commissioning
All boards in the system must have different CAN addresses. Toolboards are shipped set to a default CAN address (normally 121, but 10 for some of the initial production run). Therefore, if you have more than one new Toolboard, only one of them must be powered up and connected to the CAN bus. So disconnect power to all but one of them (you can leave the CAN bus connected if it's easier).
¶ Buttons and LEDs
The board has two buttons. Button 0 is in the top left corner of the board and button 1 is to the right of it. Between the two buttons are red and green LEDs. In normal use, the red LED flashes slowly in sync with the main board to indicate that it has CAN sync, or flashes continuously and rapidly to indicate that it doesn't. It also flashes startup error codes, for example if the bootloader doesn't find valid firmware on the board.
The buttons can be used to generate triggers in the normal way. Their pin names are "button0" and "button1". The required pullup resistors are enabled automatically on these pins.
¶ Factory Reset
The board will do a factory reset if you power it up with both buttons held down. The CAN address will be reset to the default (121), the CAN bus timing will also be reset to default (1Mbps), and the bootloader will request a firmware update.
¶ Startup Time
It is recommended to add the following to config.g, before any commands that reference any CAN bus connected expansion boards
G4 S2 ; wait for expansion boards to start
¶ Testing communication
Check that you can communicate with the Toolboard, by sending
M115 B121
(if that fails, try M115 B10).
You can reset the CAN-FD bus back to defaults (CAN Address 121, Bus speed 1Mbps) by holding down both buttons and powering up the board).
¶ Update the bootloader
Duet 3 expansion boards and tool boards have a bootstrap loader written to the start of flash so that they can load firmware from the main board via CAN. This bootloader may occasionally need to be updated in order to support new features. See Updating the bootloader on Duet 3 expansion and tool boards.
¶ Updating the firmware
The firmware filename is Duet3Firmware_TOOL1LC.bin and this needs to be uploaded to the /firmware folder of the SD card on the attached SBC, or the SD card in the Duet 3 main board if it is running in standalone mode. (note for RRF versions prior to 3.3 firmware files were in the /sys directory not the /firmware directory).
- If the toolboard is recognised and connected to the mainboard, update the firmware by using the M997 B# command, where # is the CAN address of the new board.
- If the toolboard cannot connect to the mainboard, hold both buttons down as the board is powered up to cause a factory reset. The CAN address is set back to default 121 and the bootloader requests firmware file Duet3Firmware_TOOL1LC.bin from the main board.
CAUTION! On version 0.6 Toolboards, the heater and fans will be turned on when the board is powered up unless valid firmware is loaded. This means that the heater and fans will be on during a firmware update. This isn't normally a problem unless you have a very fast hot end heater, because the firmware update process takes only a few seconds. However, if the firmware update fails, the heater could be left on for an extended period of time. Therefore, when updating firmware, you should either disconnect the heater, or watch the red LED carefully and be ready to turn power off if it doesn't resume flashing in sync with the Duet 3 Mainboard within a few seconds.
¶ Set the CAN address
- Send command M115 B# to verify that the main board can communicate with the Toolboard, where # is the original CAN address (normally 121)
- Send command M952 B# A## where ## is the new address you want to use. We suggest you use addresses starting at 20 for Toolboards. So for the first Toolboard, if your new CAN board was at address 121, send M952 B121 A20.
- Power the system down and up again, or send M999 B121. This will cause the Toolboard to restart with the new address.
- Send command M122 B20 (or whatever address you chose) to verify that you can communicate with the Toolboard at its new address
- You can now power up the next Toolboard and commission it in the same way, choosing a different CAN address for it.
¶ Connecting peripherals
For an overview of using accelerometers to capture data on axis movement see: Connecting an accelerometer
¶ Firmware Support
Full support for using an accelerometer with input shaping is implemented in RRF 3.4. It is recommended that the input shaping plugin is used to help select and turne the best input shaper for a specific application.
Accelerometer data can be captured and written to a file using M956. There is a plugin for RRF in 3.3RC1 that will display the data:

¶ Orientation
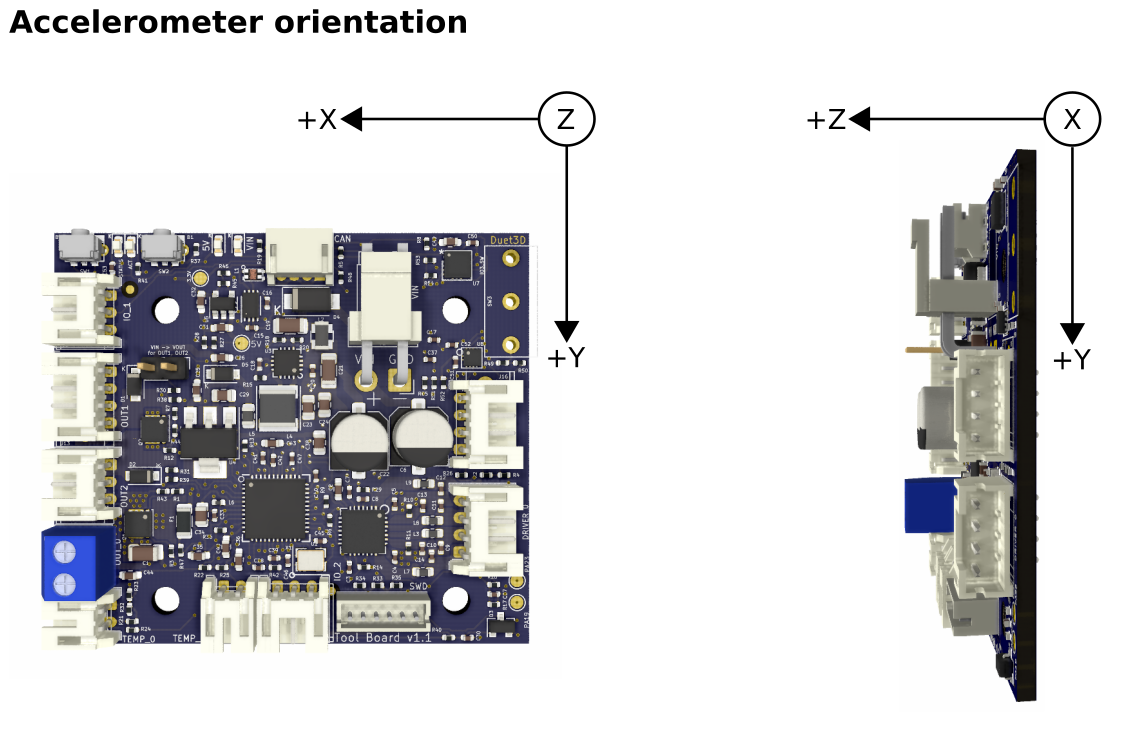
See M955 for how to setup and configure the accelerometer, including its orientation in relation to the printer XYZ axis.
Forum user Nuramori has produced a graphical guide to help illustrate the orientation options.
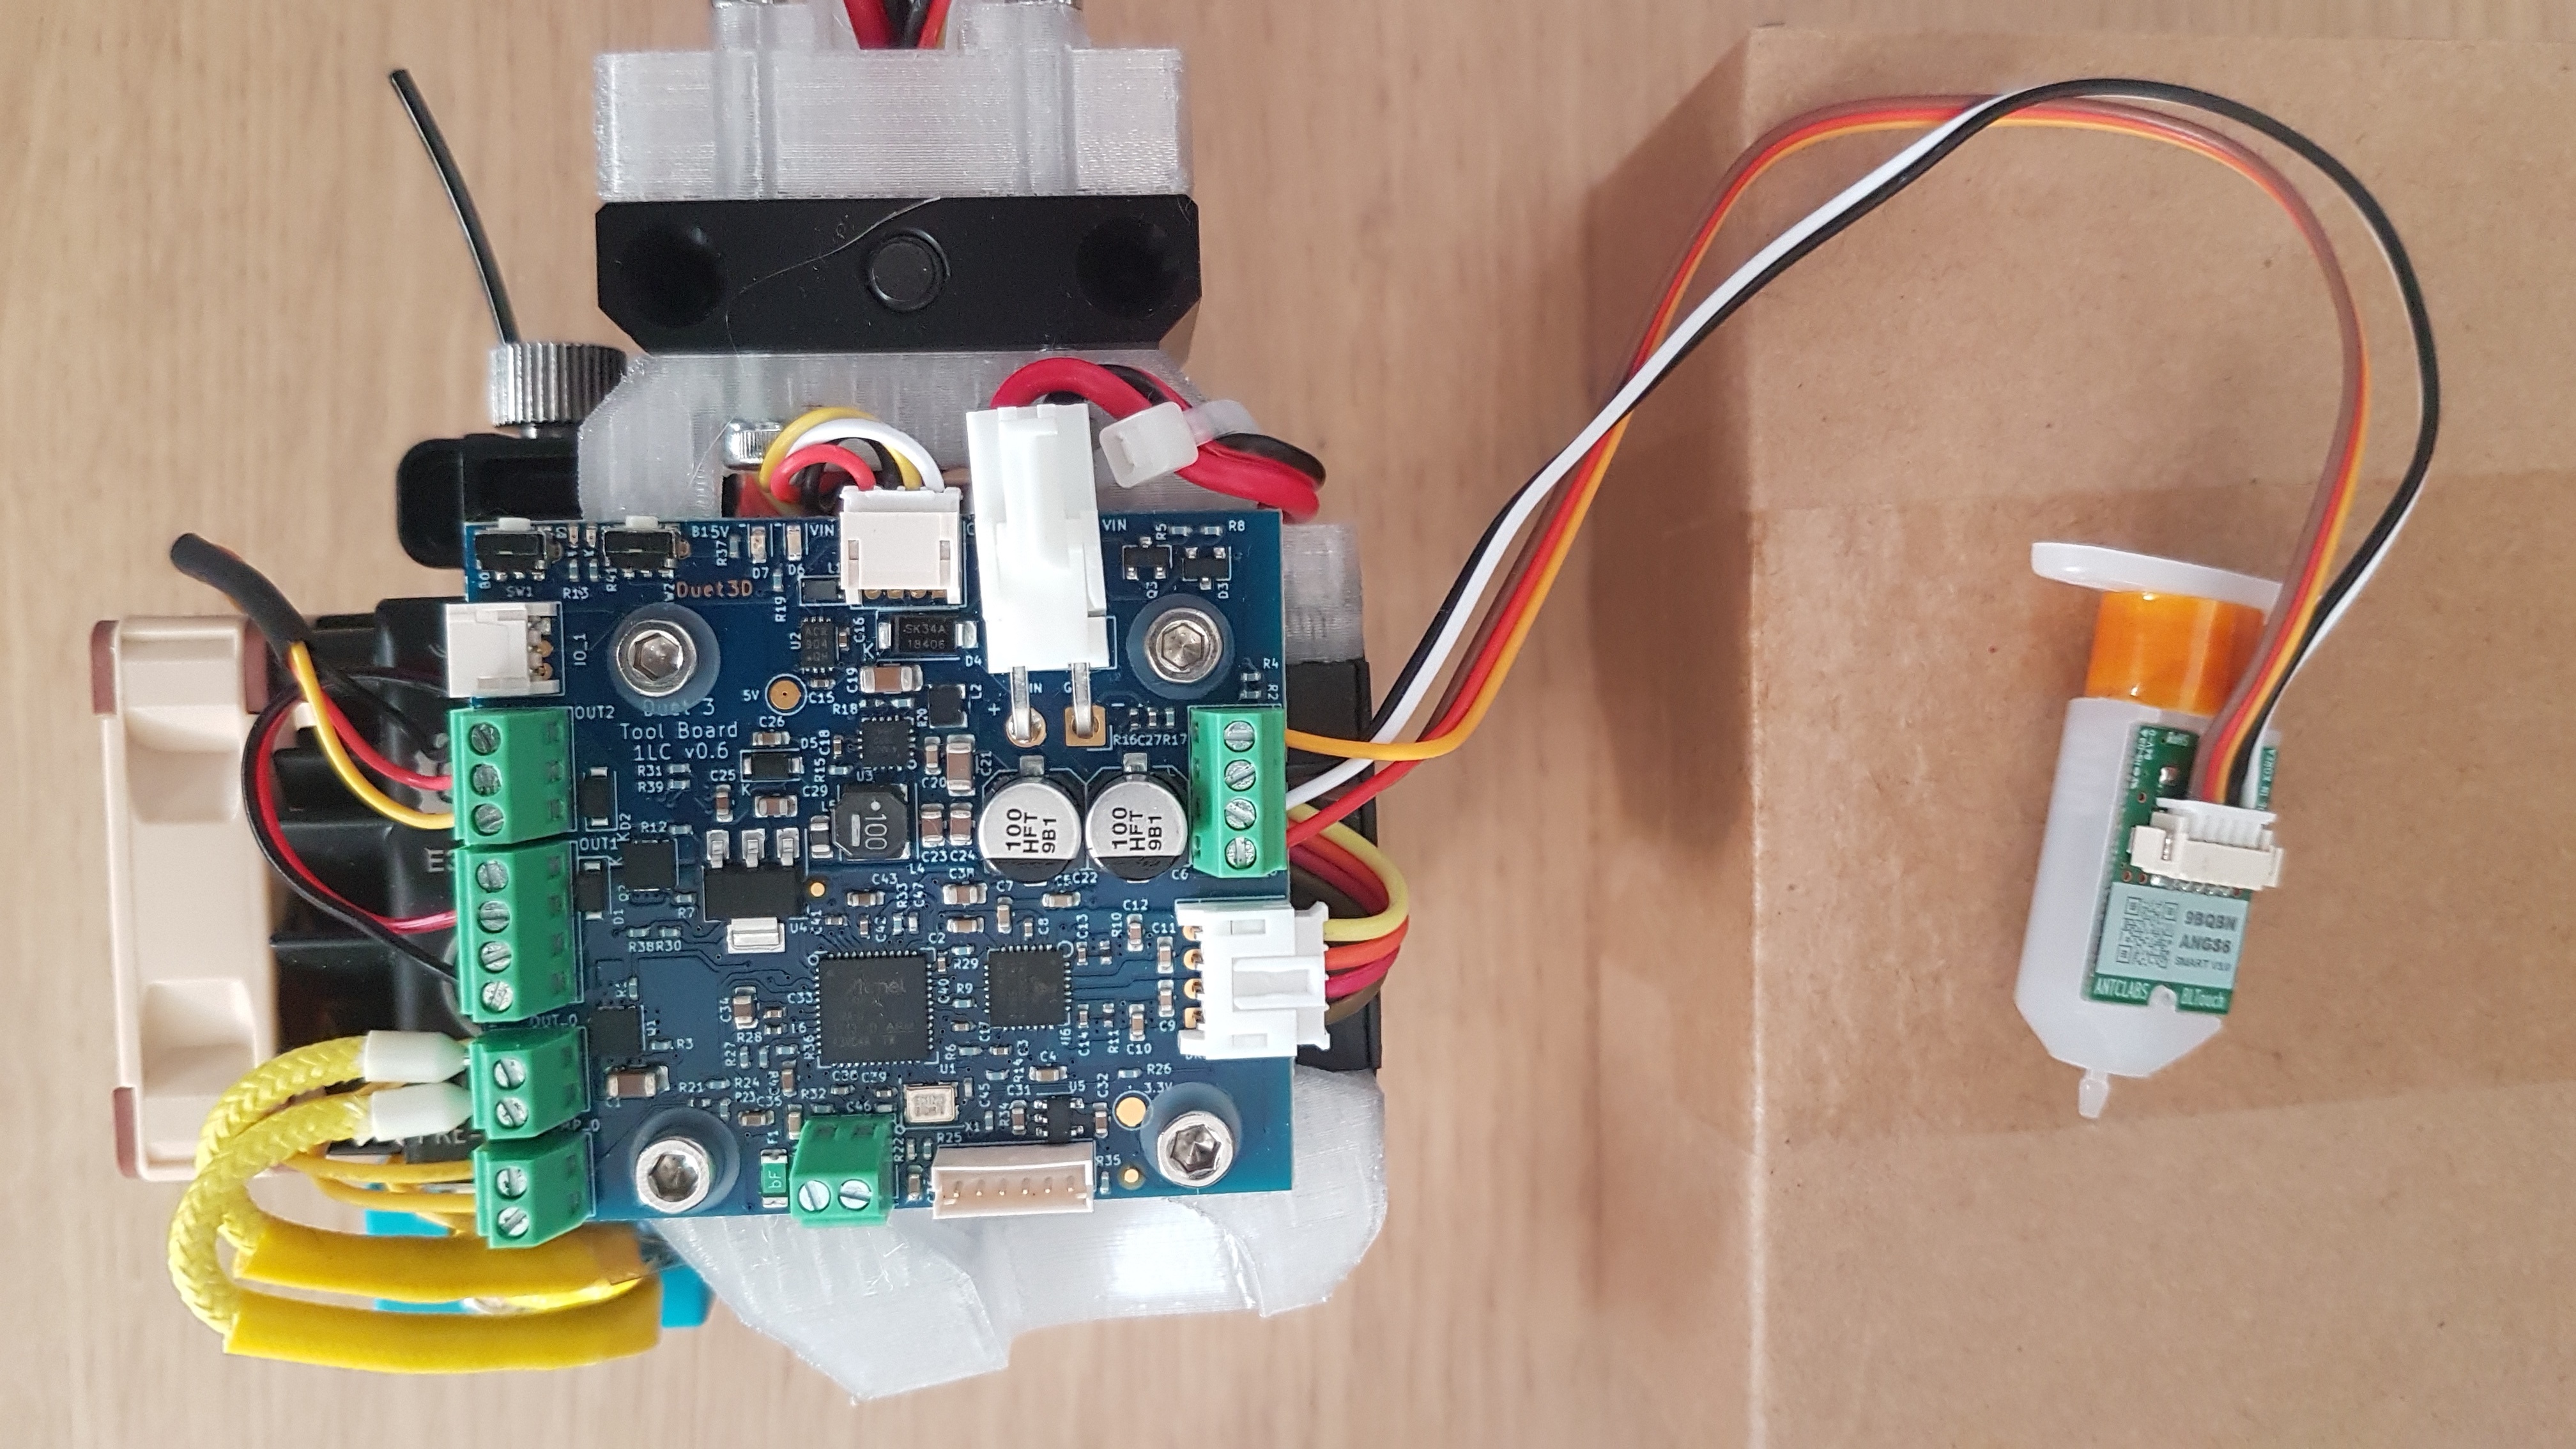
The Toolboard supports probe type 8 (unfiltered switch) and 9 (BL Touch). To connect a BL Touch, see table below.
| Toolboard IO_0 connector pin | BLTouch pin | Colour |
|---|---|---|
| io0_out | Control | Orange |
| GND | GND | Black + Brown |
| io0_in | OUT | White |
| 5V_EXT | +5V | Red |
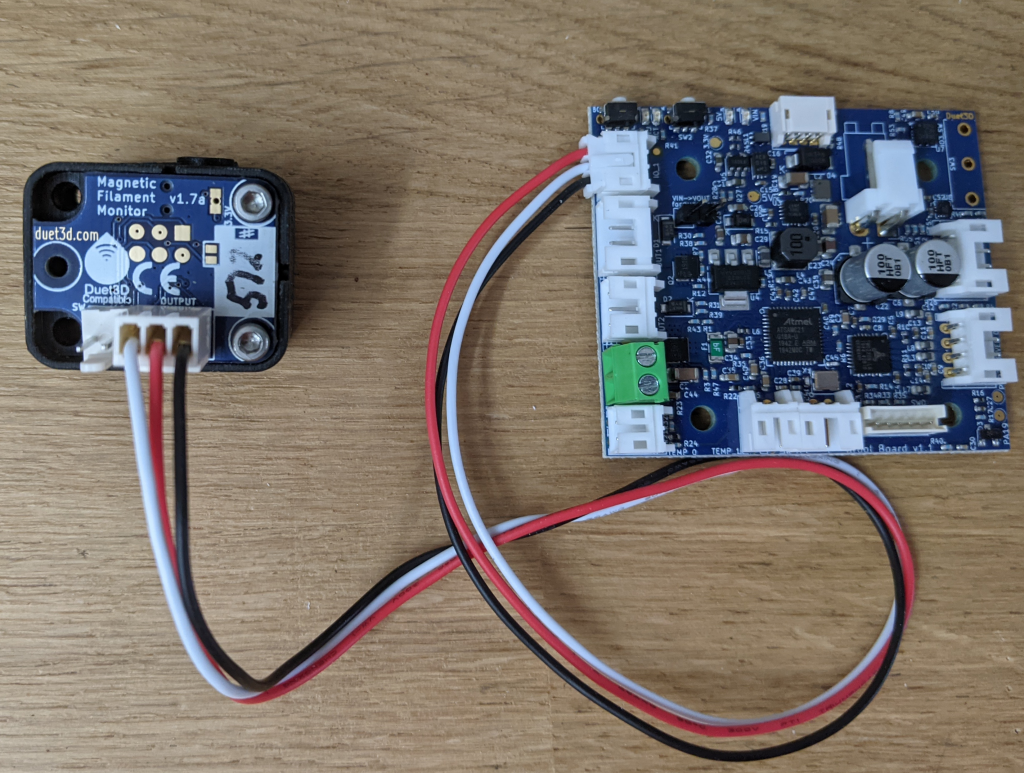
RepRapFirmware 3.2 and later support filament monitors attached to tool and expansion boards. Connector IO_1 provides a 3.3V supply and 3.3V input signal level, suitable for a Duet3D laser or Rotating Magnet filament monitor. Here's an example of connecting a Rotating magnet filament monitor to a Toolboard.
Note: different versions of the Magnetic Filament Monitor have different pinouts, check the wiring diagram
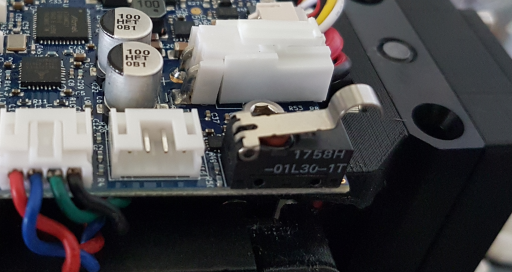
From version 1.1 the Toolboard has a footprint to allow adding an Omron D2FD-1L30-1T ultra subminiature switch or similar.
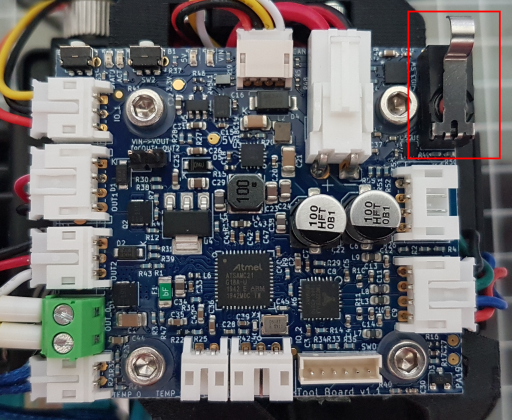
The switch has three through hole pins and is designed to be placed as shown, with the pins soldered on the other side of the board. Do not attempt this addition if you are not comfortable soldering a through hole component to a PCB with a soldering iron. In addition be careful not to excessively heat or stress the PCB while adding the switch.
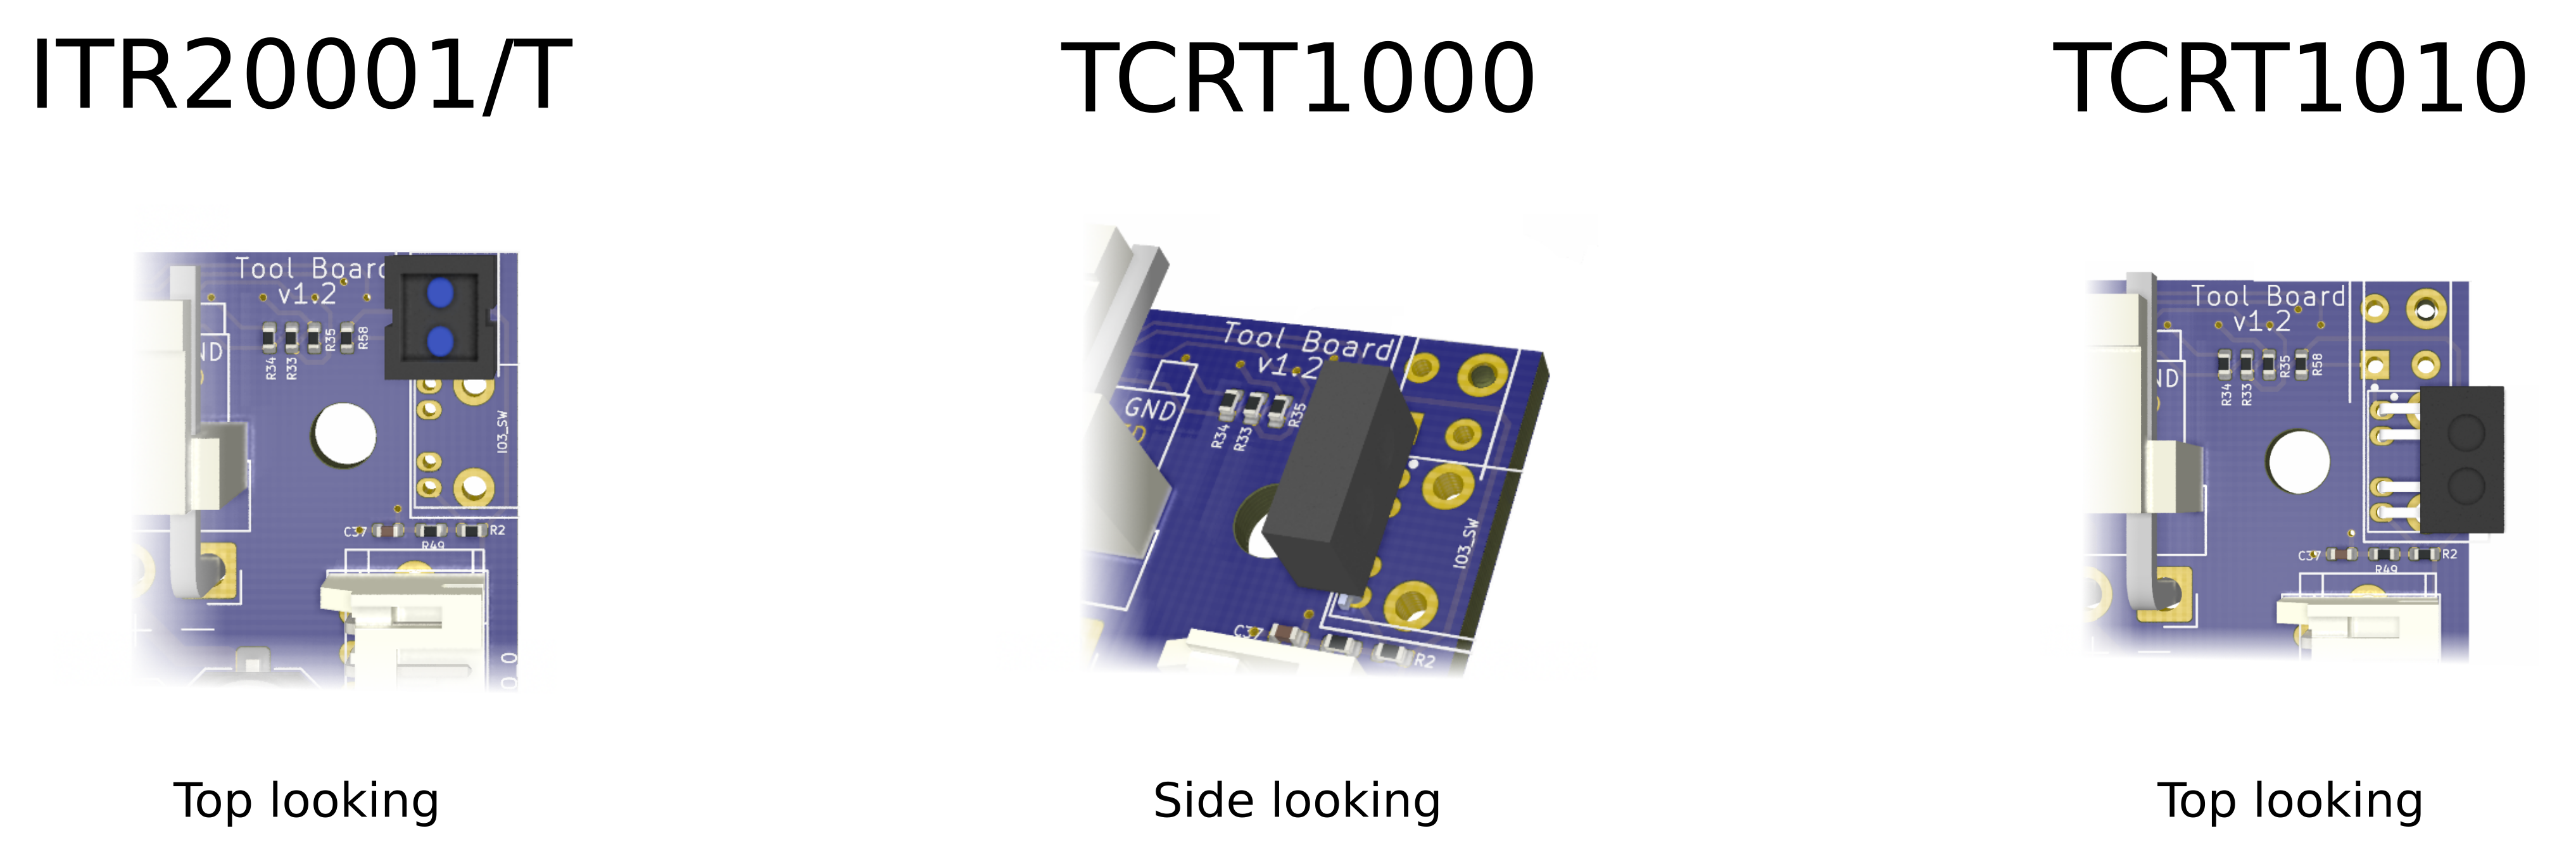
From v1.2 the footprints for an ITR20001/T or TCRT1000/1010 reflective optical sensor are also added. Note these overlap so only a mechanical switch or optical reflective sensor can be used, not both.
¶ PCB Revision History
- Changed the mounting holes to the Hemera XS dimensions, the overall board dimensions are unchanged.
- Provided a path to ground, via 100K resistors from the mounting holes to make it easier for static charge build up on the extruder to dissipate if the Toolboard is mounted on the Hemera XS
- Changed to higher power protection resistors for the thermistor inputs to better resist ESD/short from thermistor to 24V.
- Changed the circuit around the VSSA fuse to make it more robust to ESD events.
Small revision to v1.2, still in production concurrent to version 1.3 while the original mounting hole patter is still in demand.
- Provided a path to ground, via 100K resistors from the mounting holes to make it easier for static charge build up on the extruder to dissipate if the Toolboard is mounted on the Hemera XS
- Changed to higher power protection resistors for the thermistor inputs to better resist ESD/short from thermistor to 24V.
- Changed the circuit around the VSSA fuse to make it more robust to ESD events.
- Changed to a slightly shorted JST VH power input header - makes plugging and unplugging it easier on a Toolboard mounted on a Hemera.
- 2 more footprints for either an ITR20001/T or TCRT1000/1010 reflective optical sensor to be added to the board as an alternative to the IO3 microswitch. Note all these footprints overlap so only one can be fitted.
- There are now 2.54mm spaced through hole pads under all JST PH connectors. The connectors could be de-soldered and replaced with screw terminals (note doing this would void any warranty).
- SWD programming header removed due to lack of space. Pads are available under the PCB.
- Accelerometer moved to the edge of the board that would be at the bottom if the board was mounted on an E3D Hemera.
- The driver and IO0 connector have moved slightly (see the v1.2 dimension diagram above)
- Added a LSI3DH accelerometer.
- Changed all headers other than VIN, OUT0 and CAN to JST PH right angle connectors. Note the screw terminal holes are still on the PCB so the PH connectors could be desoldered (or not fitted) and screw terminals used instead.
- Added a footprint for a Omron D2FD-1L30-1T or similar switch, connected to IO3.in
- Added a solder jumper that brings a 120R CANFD bus terminating resistor into the bus circuit to allow a Toolboard to be directly connected to a Duet 3 Mainboard without a tool distribution board.
- Board dimensions changed slightly (mounting holes unchanged) see the Dimensions section above
- Added a jumper to switch VOUT on OUT1 and OUT2 between 12V and VIN.
- Rename DIAG LED to STATUS and LED1 to ACT on silk screen to match other Duet 3 boards
- Added Programming pads so the SWD header does not need to be used for initial programming.
- Various other changes to component location and routing to accommodate the above changes
- Recessed the VIN connector even more from the edge of the board, to improve ease of wiring.
- Changed OUT_0 terminal block to 3.5mm to make it easier to insert thicker heater wires
- Added IO_2 as an additional 3 pin IO header - an example use case is an endstop or tool pickup detect switch mounted on the tool.
- Changed Temp 1 to JST ZH to make space for IO_2
- Increased LED1's brightness
- The three pin terminal blocks used are slightly higher than the 0.6, this will be reverted to the normal height on the next production run.
- Added a pulldown resistor so that OUT0 defaults to off if no firmware is loaded
Changes from the prototype board listed below
- Removed TEMP2 input to make space for larger screw terminal headers
- Change power connector polarity and position/footprint to match other Duet 3s and make it easier to mount.
- 5V LED added
- Out0, Temp0, Out1, Out2,IO_0 and Temp 1 changed to screw terminals.
- Board outline changed to rectangular
