¶ Introduction
This guide describes how to setup an optional Single Board Computer (SBC) with Duet 3, allowing the Duet to run in 'SBC mode'. If you don't have, or don't want to connect, an SBC to your Duet, it is not necessary; you can run your Duet in 'standalone' mode, and ignore this guide.
 Duet 3 mainboards support connecting a Single Board Computer (SBC) such as a Raspberry Pi. The SBC runs its operating system (Raspberry Pi OS in the case of Raspberry Pi), with the Duet Software Framework (DSF) running on the Raspberry Pi OS. DSF is the bundle of software programs that connects to and controls the Duet 3.
SBC mode allows part of the functionality to be handled by the SBC. This offers a number of benefits:
- Faster network transfer speeds
- Support of plugins requiring more than RRF/DWC
- Usage of external HDMI or DSI screens
- Easy software and firmware update via package manager
- Optional webcam integration
- Optional HTTPS support
This guide assumes you are using a Raspberry Pi and the SD card image specifically set up for Duet 3 in SBC mode. In the future other SBCs may be officially supported.
If you want to install DSF on an existing Raspberry Pi OS installation, or on a custom Debian board/installation, please see this page: Duet Software Framework (DSF) on other boards
Duet 3 mainboards are supplied with an SD card that is set up for standalone mode (ie a Duet mainboard without a connected SBC). You will need to flash the SD card with the SBC image; see step 1 below.
Duet 3 mainboards are supplied with an SD card split into two partitions; one FAT32 partition with the files needed for standalone mode, and one partition pre-loaded with the Raspberry Pi OS + DSF, suitable for use with Raspberry Pi 3 or 4.
Most of the time you can start at Step 2 below, as you will receive an SD card pre-flashed with the Raspberry Pi OS + DSF. If you want to use the whole capacity of the SD card for an SBC installation, start at step 1.
If your SD card supplied with the Duet 3 mainboard becomes damaged or lost, start at step 1.
¶ 1. Flash the image file
If you are planning to use the SBC for more than plain 3D printing or if you have an SBC with little RAM + external display, it is HIGHLY recommended to obtain a class A1- or A2-rated microSD card instead of the shipped SD card. If your SD card speed is insufficient, you may experience occasional problems when data between the SBC and Duet is exchanged.
- If there are any issues with this step, try following the Raspberry Pi documentation for flashing OS images
- You will need at least an 8Gb class 10 SD card. A class A1- or A2-rated microSD is highly recommended.
- There are multiple programs to write an image file to an SD card. We recommend using the Raspberry Pi Imager, which has versions for Windows, MacOS, Linux and Raspberry Pi.
- You can download the latest Raspberry Pi image already setup for Duet 3, available from the Duet 3D package server. Images are available for setups where a display is attached, or the 'lite' image suitable for a GUI-less install and/or older Raspberry Pis with less memory. There are also 64- and 32-bit versions of both of these:
Bookworm DuetPi 64-bit images - Recommended for most installations
https://pkg.duet3d.com/DuetPi-arm64.zip
https://pkg.duet3d.com/DuetPi-lite-arm64.zip
Bookworm DuetPi 32-bit images - Recommended for RPi with 1GB RAM or less
https://pkg.duet3d.com/DuetPi-lite.zip
https://pkg.duet3d.com/DuetPi.zip - Alternatively, if you use the Raspberry Pi Imager, you can choose the DuetPi version from the repository, see instructions below.
To write the Raspberry Pi image to the SD card: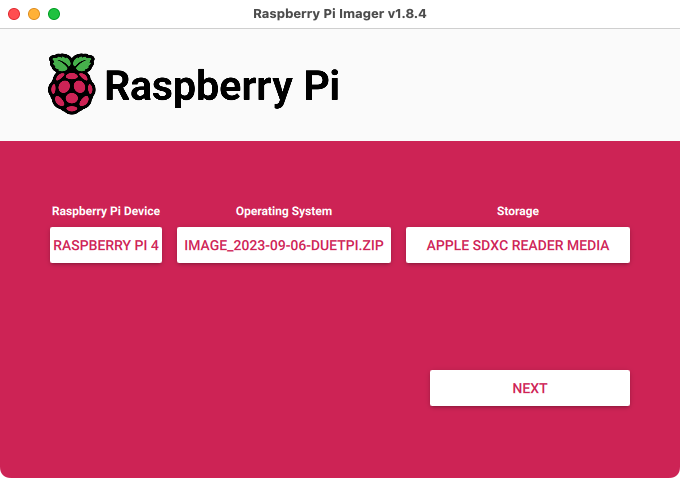
- Open Raspberry Pi Imager, and:
- under 'Raspberry Pi Device' select 'Choose device' and select your RPi from the list
- under 'Operating System' select 'Choose OS' and
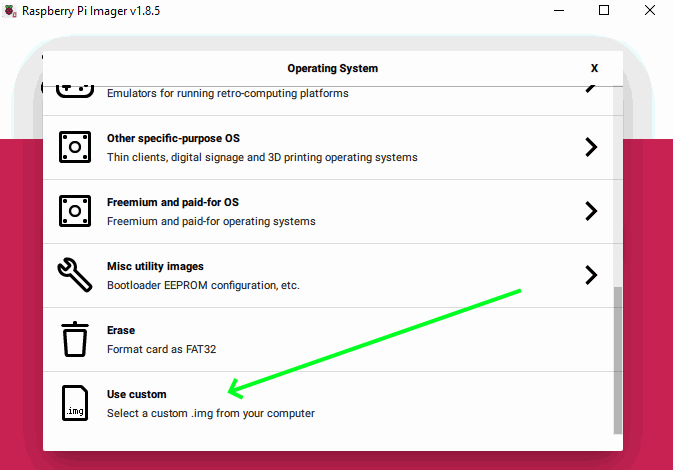
EITHER scroll to the bottom of the list and select 'Use Custom', then select the DuetPi image you downloaded (no need to unzip it)
OR choose the DuetPi version from the RPi imager repository, by scrolling down to 'Other specific-purpose OS > 3D printing > DuetPi' and select DuetPi version - under 'Storage' select the SD card, then click 'Next'.
- You can setup the RPi so it doesn't need to be configured at startup, by using 'OS customisations'. Click 'Edit settings' to set hostname, username, password, Wi-Fi credentials, and locale. If you want to connect to the RPi from a PC on the network (e.g. you are using the RPi 'headless', without a connected display), select 'Services' and 'Enable SSH' with 'Use password authentication'. 'Save' settings, then select 'Yes' to apply.
- If you don't setup 'OS customisations', you will need to connect a screen and keyboard to the Raspberry Pi at first boot to configure it. See 'First boot' section below.
- The DuetPi image will be written to the SD card. Once this is complete Windows may prompt you to format the disk. Do not do this, it is because Windows does not recognise one of the partitions on the image.
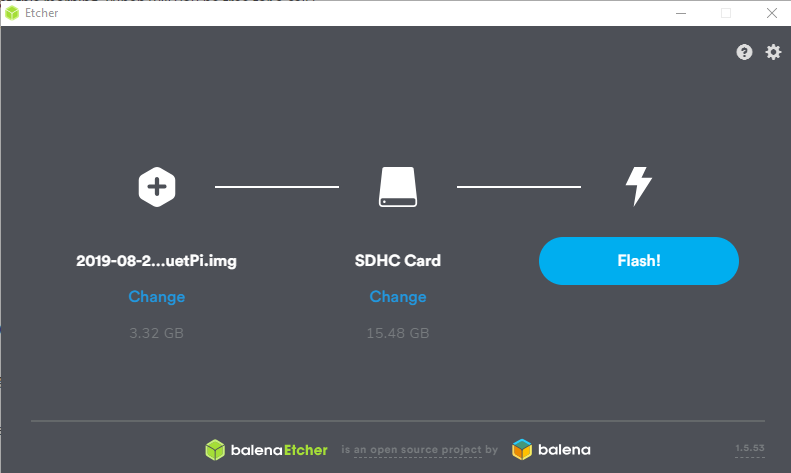
- You will need at least an 8Gb class 10 SD card. A class A1- or A2-rated microSD is highly recommended.
- Download an appropriate DuetPi image from the links above.
- There are multiple programs to write an image file to an SD card. Under Windows, MacOS and Linux, flash the file using, for example, balenaEtcher
- Select the image, select the SD card. Click flash. It will take about 5 minutes to flash the image to the SD card.
- Once this is complete, Windows may prompt you to format the disk. Do not do this, it is because Windows does not recognise one of the partitions on the image.
¶ 2. Setup WiFi
This step is unnecessary if you have set up WiFi in 'OS customisations' in the Raspberry Pi Imager.
If you did not setup 'OS customisations' in the Raspberry Pi Imager, you will need to connect a screen and keyboard to the Raspberry Pi at first boot to configure it. See 'First boot' section below.
This method of setting up WiFi is not supported for the current 'Bookworm' images, only older 'Buster' versions.
-
This step is optional if you are going to connect to the SBC using an Ethernet network, or if you are going to plug a monitor, keyboard and mouse into the SBC.
-
Navigate to the “boot” partition on the SD card (note on Windows the other partition will be inaccessible and give an error if you try and access it, this is normal as it is formatted in a filesystem that Windows does not support).
-
Create a new file named “wpa_supplicant.conf” (exact naming is critical, do not have a ".txt" at the end of the file).
-
In a text editor add the following:
country=GB
update_config=1
ctrl_interface=/var/run/wpa_supplicant

network={
 ssid="SSID_OF_NETWORK"
 psk="PASSWORD_OF_NETWORK"
 }
-
Replace GB with your country code, the SSID_OF_NETWORK with your WiFi SSID and PASSWORD_OF_NETWORK with your password.
-
Save and safely eject the SD card.
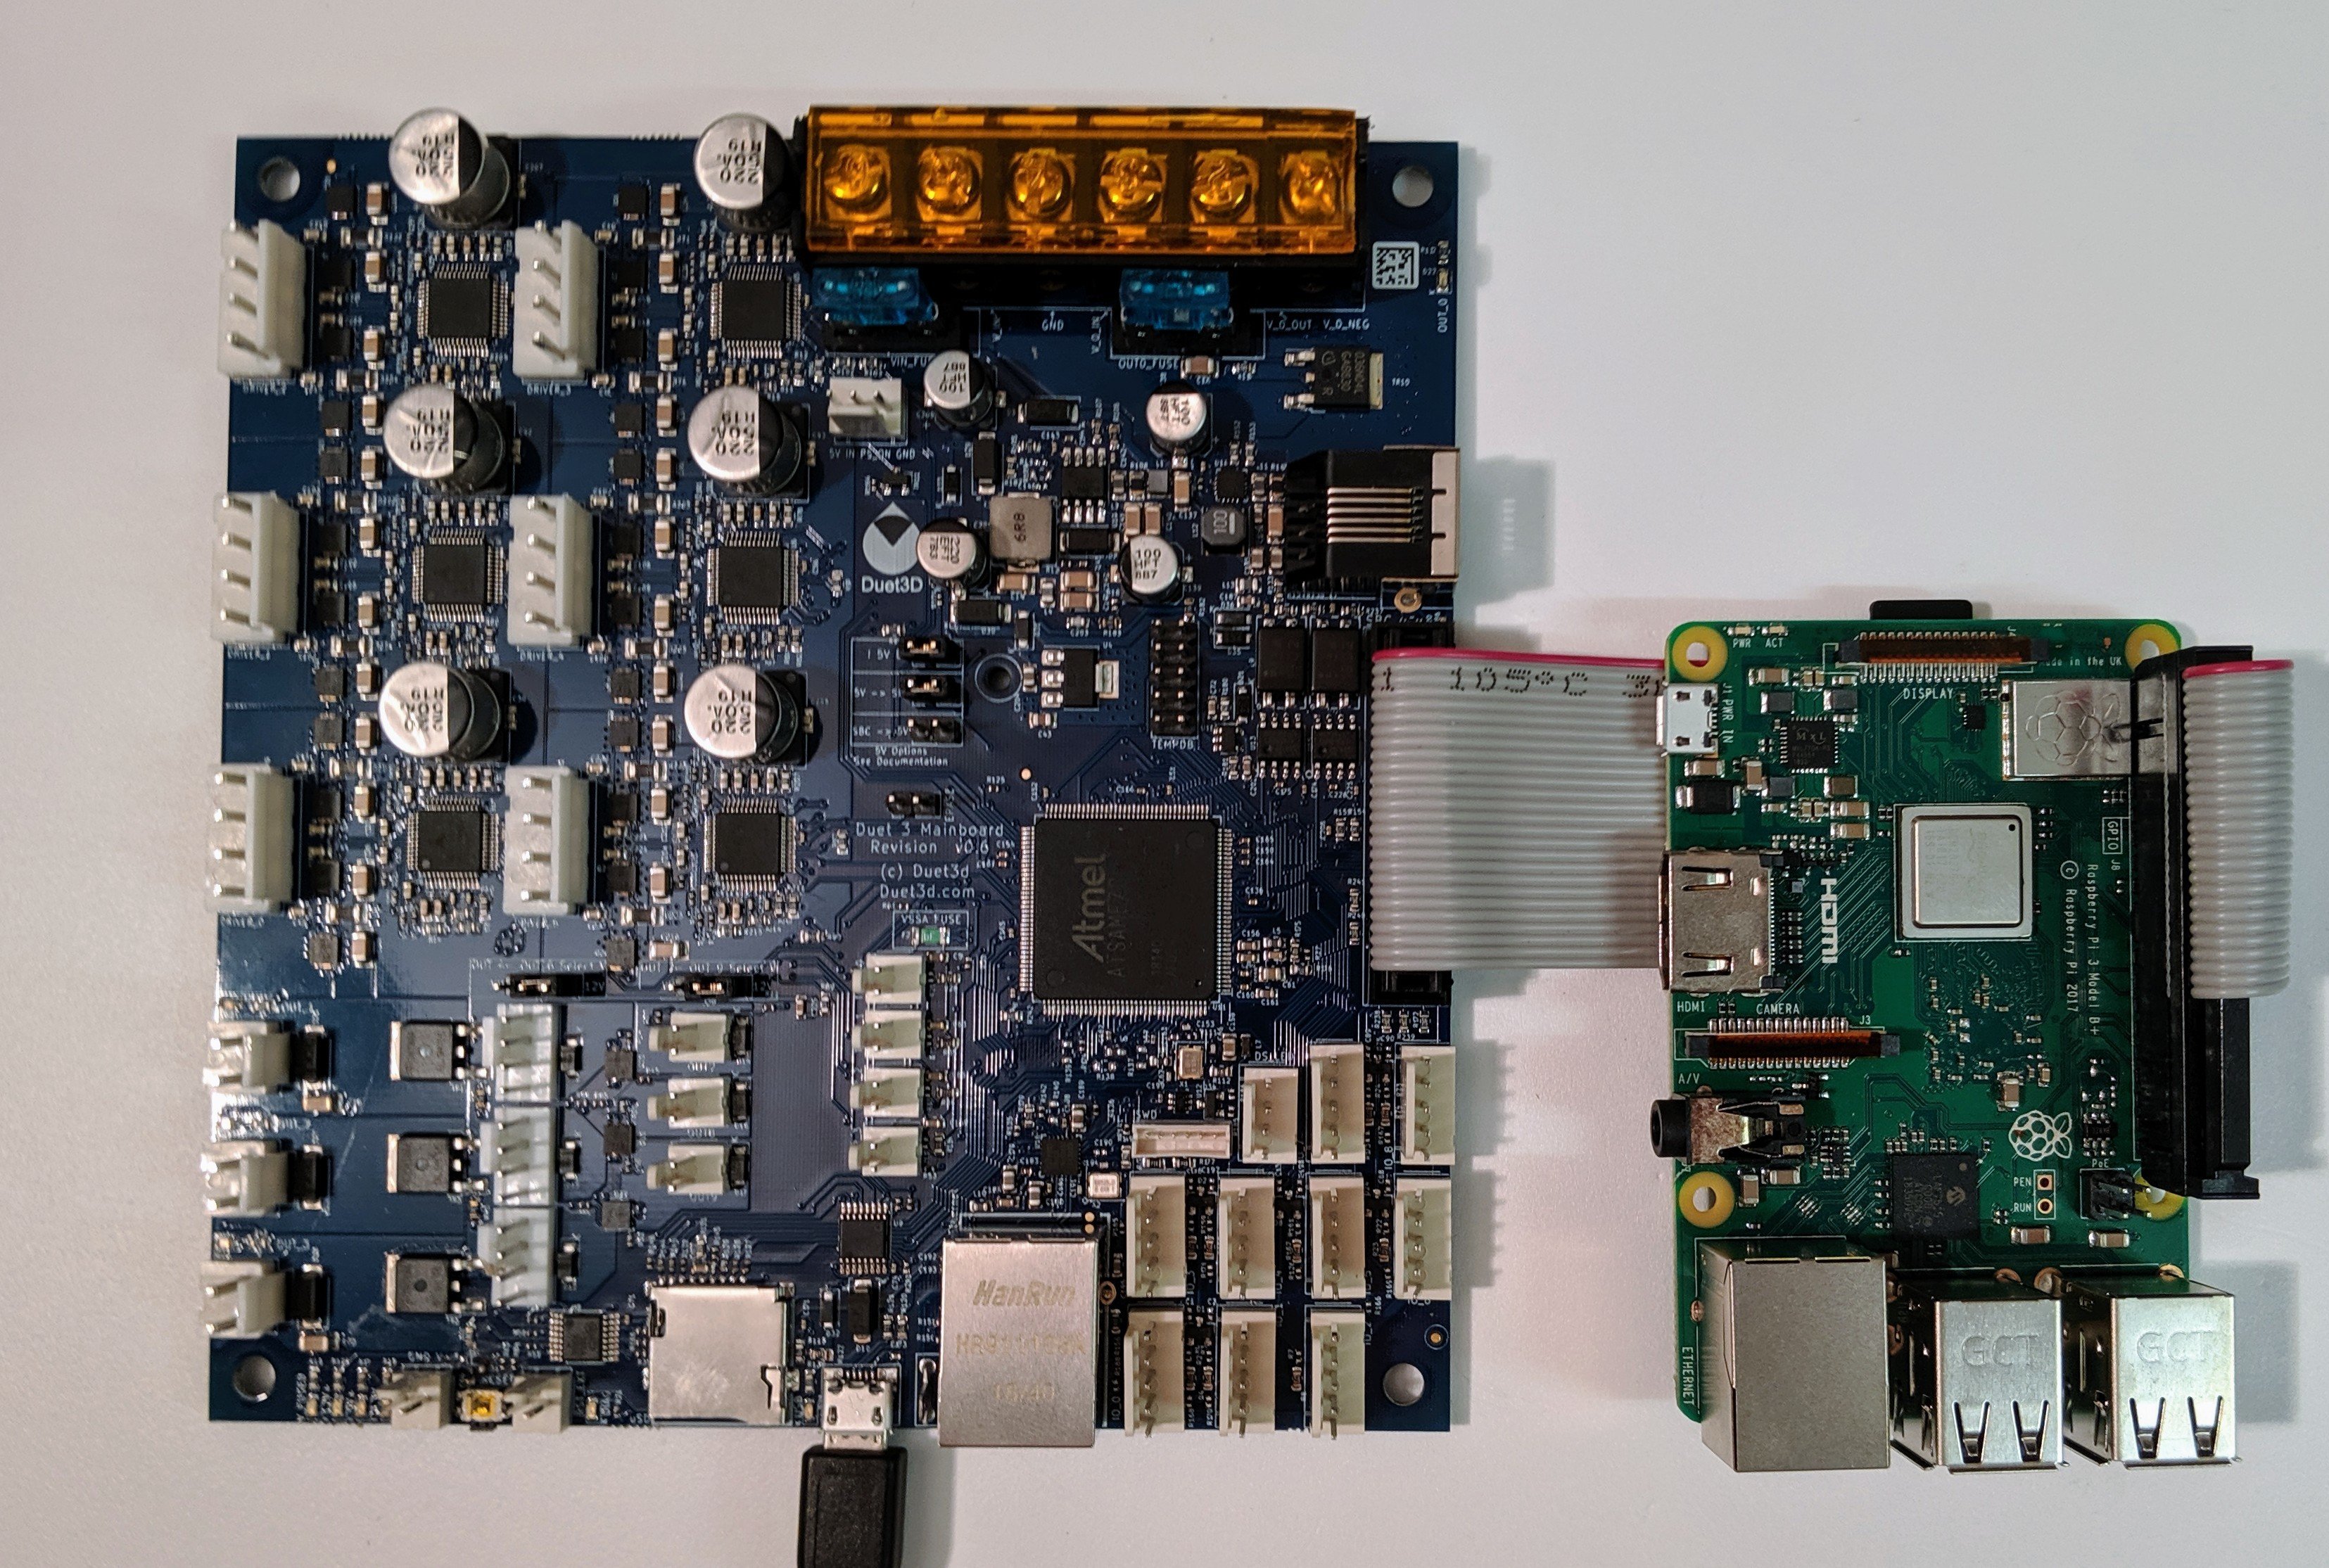
¶ 3. Connect Single Board Computer (SBC)
- Put the SD card in the SBC.
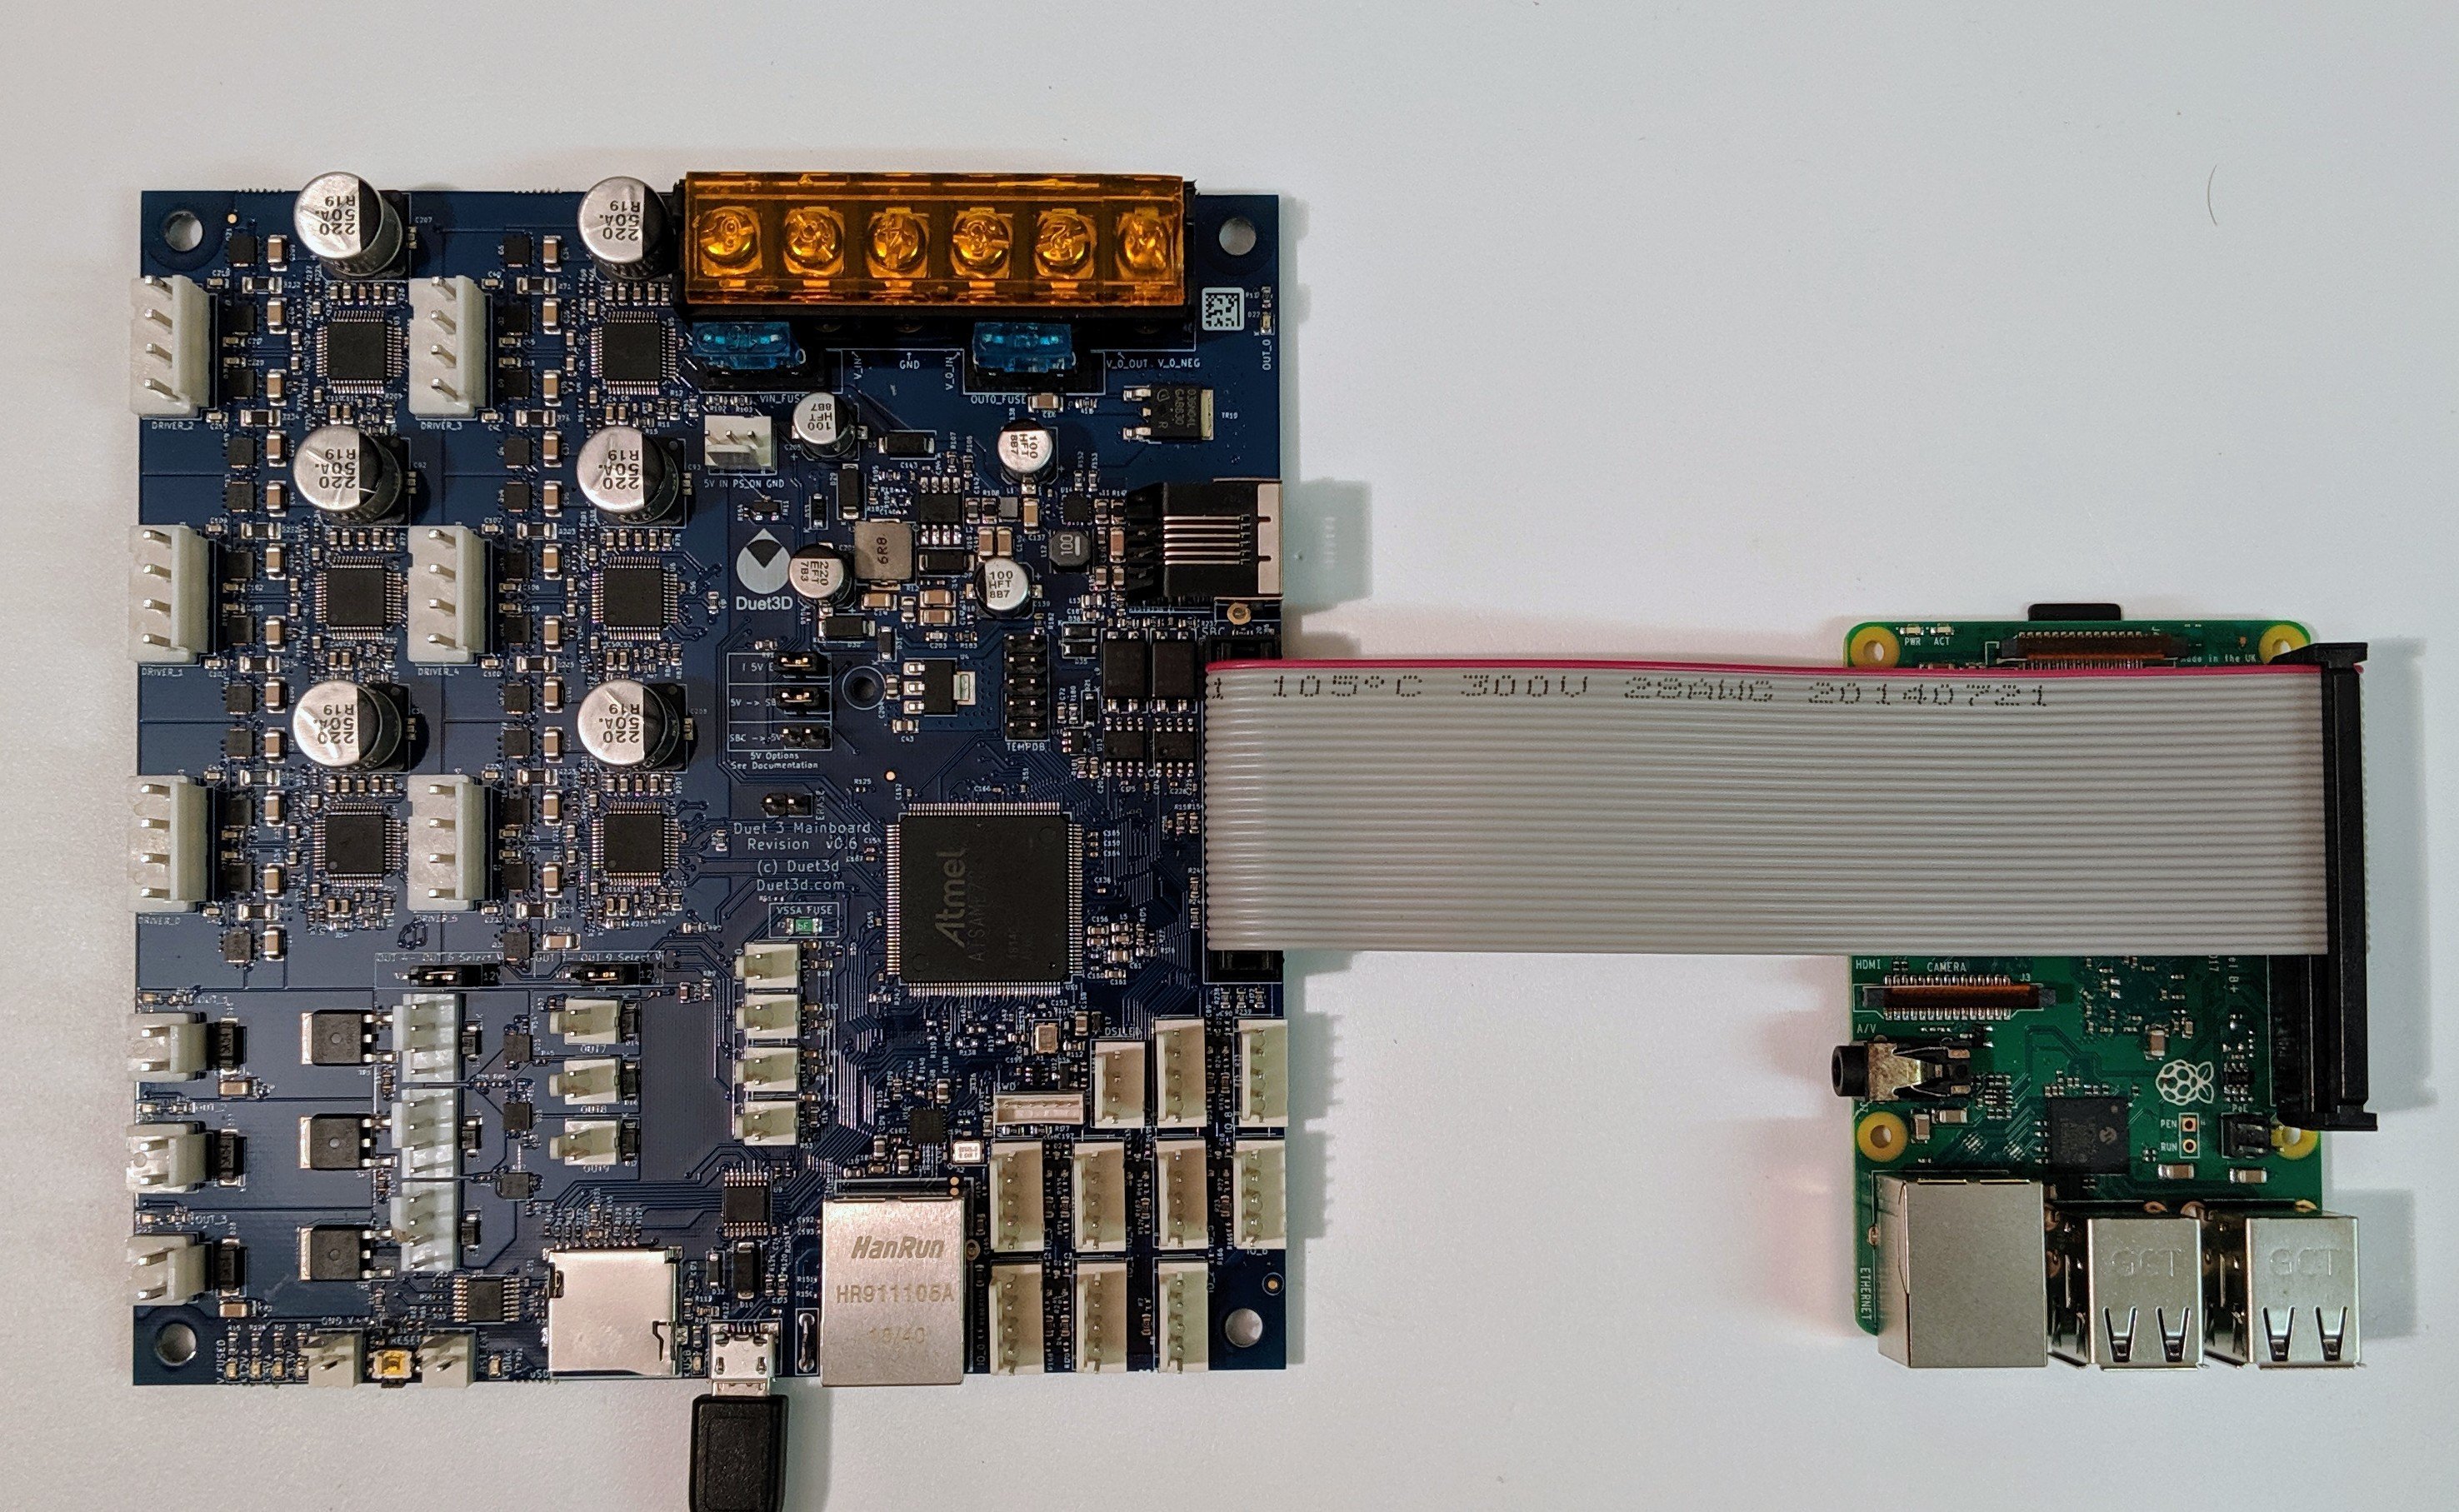
- Connect the ribbon cable to the Duet 3 and SBC. Note the orientation of the red stripe on the ribbon cable indicating pin 1.
- It is acceptable, especially with longer ribbon cables than shown here, to route the cable around the back of the SBC, however pin 1 must connect as shown.
- Connect a USB cable to the Duet 3 for power.
- Ensure there is NO SD card in the Duet itself.
- Ensure the USB supply is sufficient to power the peripherals attached to the Pi, especially screens that do not have a separate power supply. See here for more details on 5v power jumper position selection.
- Using a Pi4 may require a separate power supply for both the Duet and Pi4 due to power draw. The same holds true if using peripherals that draw power via USB.
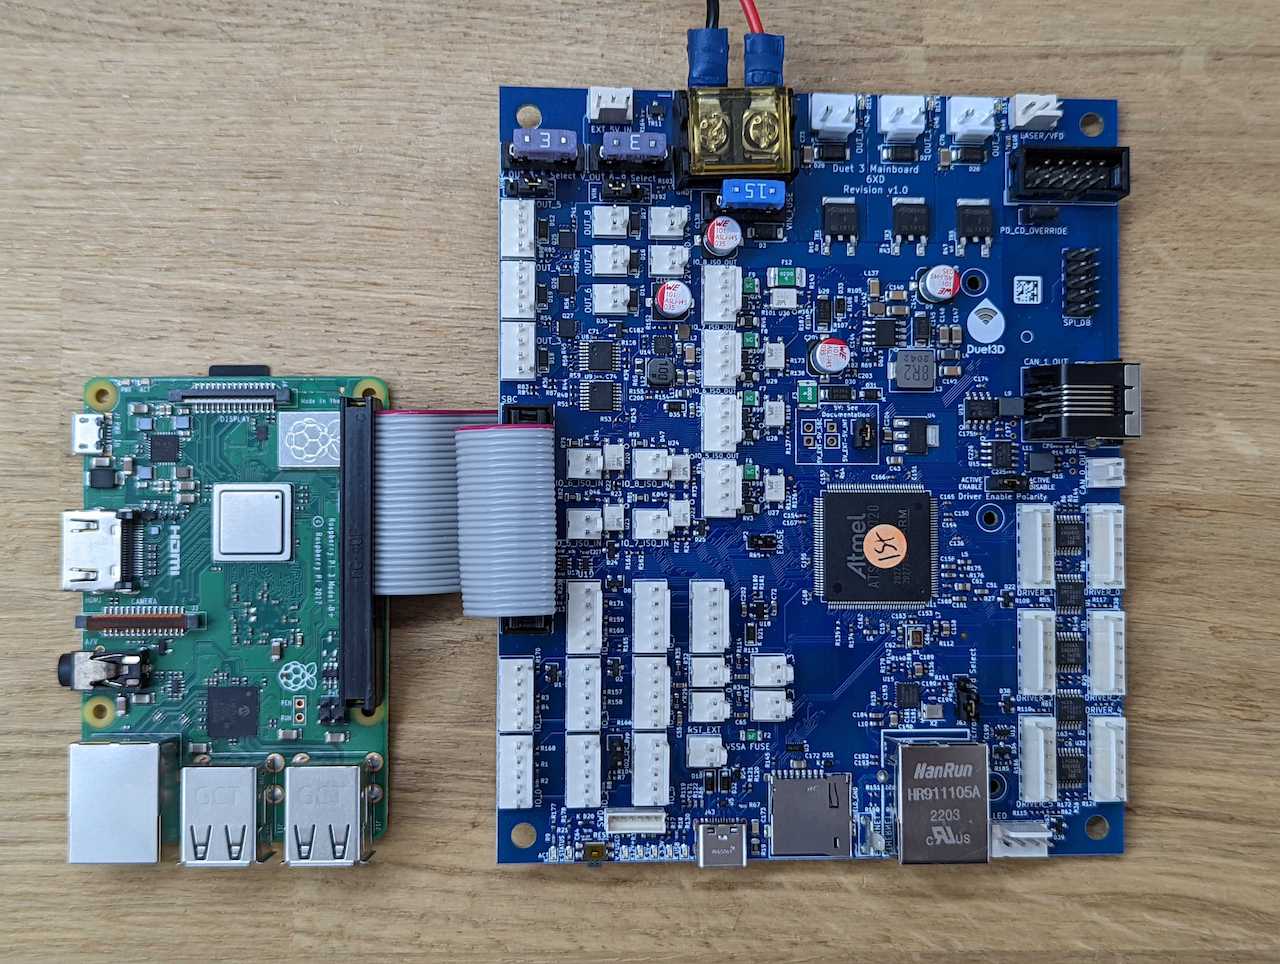
- Put the SD card in the SBC.
- Connect the ribbon cable to the Duet 3 and SBC. Note the orientation of the red stripe on the ribbon cable indicating pin 1.
- Connect a USB cable to the Duet 3 for power.
- Ensure there is NO SD card in the Duet itself.
- Ensure the USB supply is sufficient to power the peripherals attached to the Pi, especially screens that do not have a separate power supply. See here for more details on 5v power jumper position selection.
- Using a Pi4 may require a separate power supply for both the Duet and Pi4 due to power draw. The same holds true if using peripherals that draw power via USB.
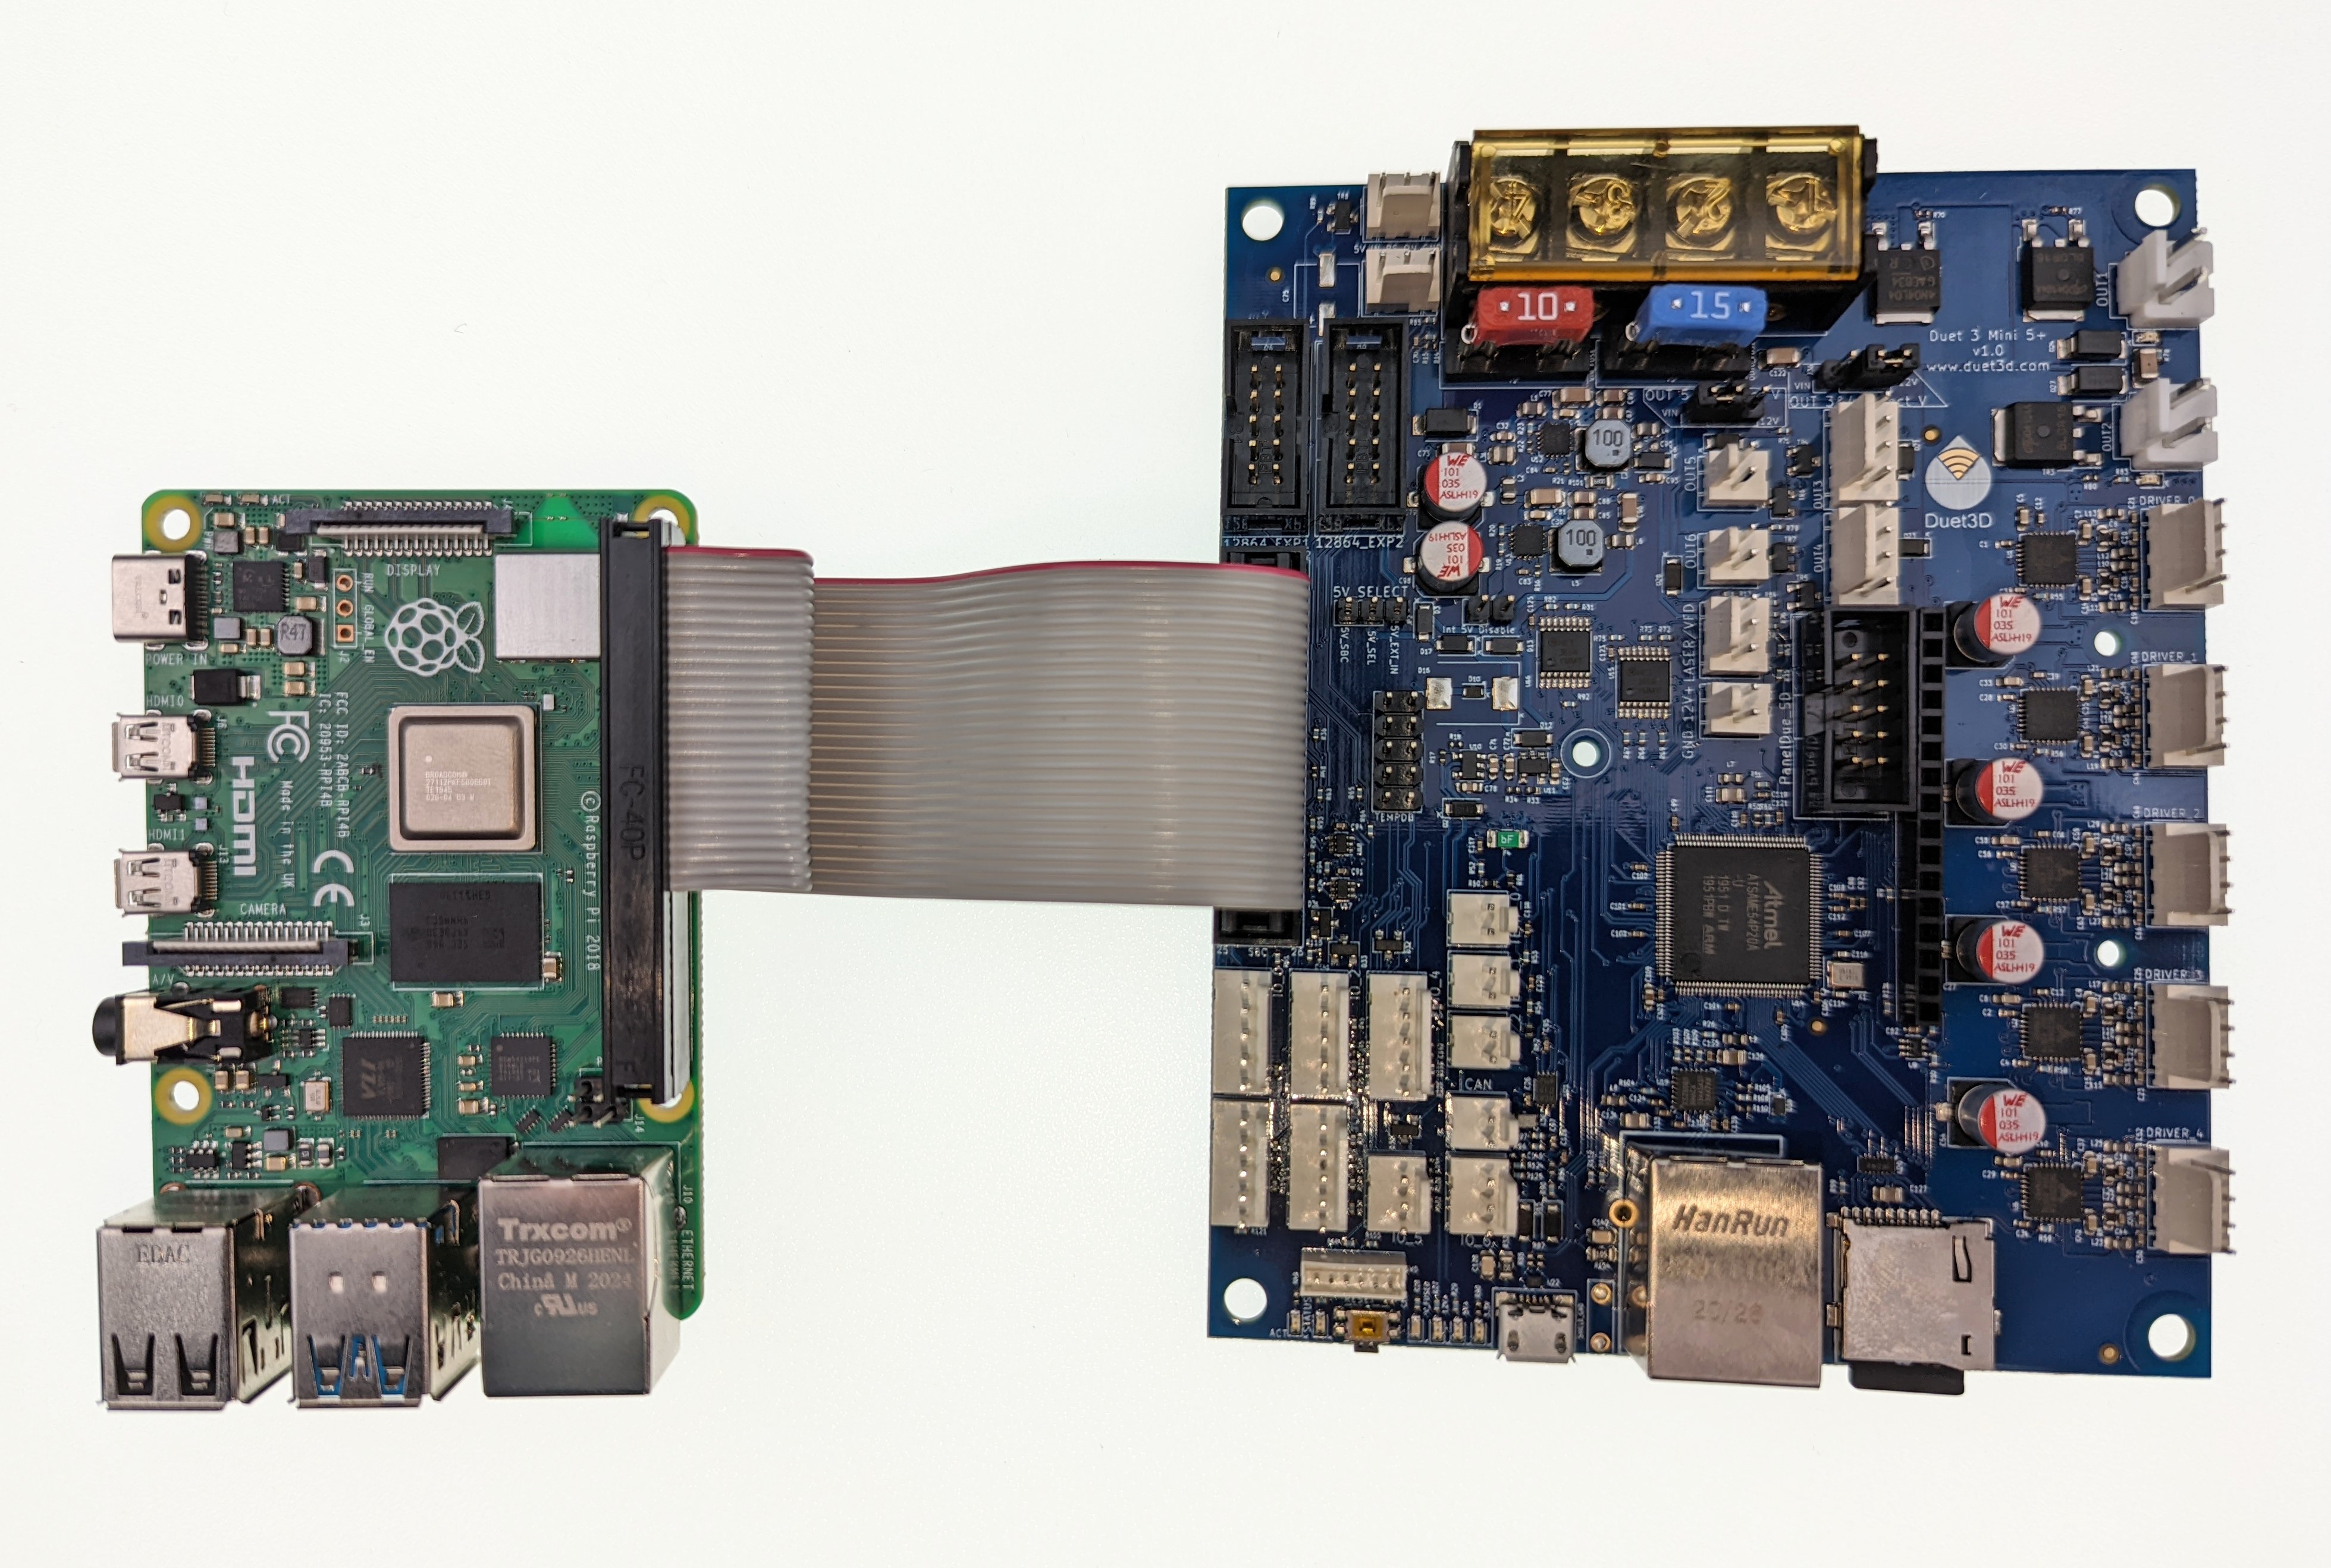
- Put the SD card in the SBC.
- Connect the ribbon cable to the Duet 3 and SBC. Note the orientation of the red stripe on the ribbon cable indicating pin 1.
- Connect a USB cable to the Duet 3 for power.
- Ensure there is NO SD card in the Duet itself. (Unlike in the picture shown!)
- The Duet 3 Mini+ cannot power the Pi. You must power the Pi separately. The Raspberry Pi is sensitive to the input voltage, and many smartphone chargers or other USB power supplies cannot supply sufficient voltage. Therefore, we strongly recommend that you use the official Raspberry Pi PSU, or another PSU specifically designed to power a Raspberry Pi. If the red LED on the Pi is not continuously illuminated, the power supply is insufficient.
¶ 4. First Boot
Note: these steps assume the hostname of your SBC is "duet3".
If you have changed it in the 'OS customisations' then use that hostname, not "duet3".
-
Turn on power to Duet and SBC.
Note the SBC takes about 1 minute to boot for the first time (and reboots two or three times during this time) and about 30 seconds subsequently. -
If you did’t configure your Raspberry Pi via 'OS customisation' settings in the Raspberry Pi Imager, Raspberry Pi OS will ask you for the same information at first boot. You will need to connect a screen and keyboard to see the messages.
- Set the keyboard language.
- Set the username and password
- Setup will exit and give you a command prompt. To setup WiFi and SSH, login with the username and password you just created, then type
sudo raspi-configand press return. - To set up WiFi, select 'System Options > Wireless LAN', select your country, then enter your SSID and WiFi password.
- To set up SSH, select 'Interface Options > SSH' and enable SSH.
- Tab to 'Finish' to exit the configuration tool.
-
If you are using the 'full' version of DuetPi and have a screen attached, when power is applied you will see the SBC boot up. Once bootup is complete the Chromiun browser will launch DuetWebControl in full screen. Press F11 if you want to exit fullscreen and go to the RPi desktop.
-
If you are connecting over the network then go to
http://duet3.local/
¶ 5. Troubleshooting
If http://duet3.local/ does not show Duet Web Control (DWC), or DWC shows but with an error, then follow these trouble shooting steps:
¶ "Could not connect to Duet: Timeout while waiting for transfer ready pin"
- Check that the ribbon cable is correctly orientated on the RPi and Duet.
- Check there is no SD card in the Duet mainboard SD card socket. If there is, remove it and press the Reset button on the Duet, then refresh the DWC page.
- Check there is no jumper on the Duet firmware 'ERASE' pins. If it is, remove it. You will have to flash the firmware, as it will be erased; see below.
- Check the Duet has firmware; the DIAG/STATUS LED should be flashing steadily, about half a second off and half a second on. If it is glowing dimly, or off, the firmware has been erase. You can also check by connecting a USB cable between the Duet and RPi, then send
lsusbfrom the RPi terminal. If there is an entry for "Duet 3 motion system", it has firmware. If there is an entry for "Atmel ... bootloader" the firmware has been erased, and you will have to flash the firmware; see below. - If the Duet is powered via USB cable from the RPi, send
lsusbfrom the RPi terminal. If the Duet is not showing up, it may be a power supply issue. Try powering the Duet and SBC separately and see if the problem is resolved. - Use of RPi cases that extend the GPIO pins or use the pins for external buttons or powering PWM fans will not work with the Duet.
- Test the SBC GPIO capabilities, it's possible that the SPI controller has failed.
- Finally, it's possible that the buffer driver on the Duet has failed, that sets the transfer ready pin high, so the SBC knows it can communicate. Contact Duet3D.
¶ Flashing firmware from the SBC
For 6HC/6XD, the easiest way to do this is to connect a USB cable between the RPi and Duet, open a command prompt (either open a terminal window or connect via SSH) and send bossac -e -w -v -b -R /opt/dsf/sd/firmware/Duet3Firmware_MB6HC.bin (firmware name will be dependent on the hardware you're using, see here for list).
Alternatively, and for Mini 5+, see Installing and updating firmware.
¶ "Warning: Lost connection to Duet (Timeout while waiting for transfer ready pin)" error
This error, reported in the DWC console usually during normal machine operation (i.e. after the RPi and Duet have been connected initially), is often caused by:
- Ribbon cable too long, damaged or poorly connected. Check installation of ribbon cable. Ribbon cable should ideally be not longer than 150mm.
- Other wires running too close to the ribbon cable, creating interference. Heater and motor wires can be particularly noisy, route them as far away as possible.
- Signal reflections have been reported by one user. This may have been caused by a ribbon cable that was too long, or damaged.
¶ WiFi not working at all
You may have mis-configured the WiFi.
- Plug the SBC into your router using an Ethernet cable temporarily to reconfigure Wifi. Then follow 'Accessing the SBC through SSH/VNC' below to get command line/VNC access to your SBC, then you can follow this guide to get wifi running.
- Alternatively, temporarily connecting a screen and keyboard to the SBC, then follow this guide to get wifi running.
- If you are using Ethernet temporarily
¶ Duet 3/SBC not on the network (http://duet3.local does not work)
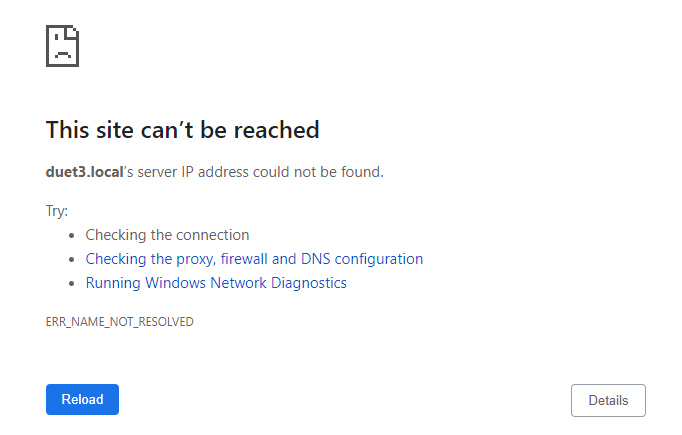 If you do not have a screen/keyboard attached to your SBC and your browser cannot connect over wifi all, you will get a message in your browser similar to the one on the right.
- Log into your router and confirm that the SBC has received an IP address. If it is not shown at all move to the next section: wifi not working at all.
- If an IP address is shown for the SBC, enter that address in the browser e.g. http://192.168.1.123 If this works then it is possible that your network or PC does not like the mDNS service used to provide the http://nnnnnn.local names. The best way around this is to reserve the IP address in your router so the SBC always receives the same address.
¶ DWC does not appear correctly (500 error)
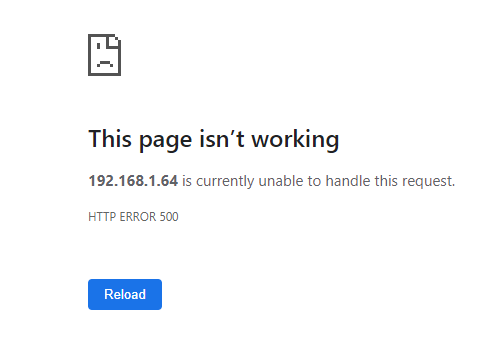 If you get a "HTTP ERROR 500 - This page is not working" response either when going to
 http://duet3.local/ or to the IP address, then the SBC is on the network, but Duet Software Framework (the Duet3 software that runs on the SBC) is not operating correctly.
- The most likely cause of this is that it cannot connect to the Duet 3 Mainboard.
- Check the ribbon cable is installed correctly.
- Check that the mainboard has firmware installed (follow the "Updating Duet 3 mainboard firmware via USB" part of this documentation).
- If none of these steps work see the Troubleshooting - SBC communications documentation.
¶ Gcode commands not being accepted
Ensure there is no SD card in the Duet itself. In order to run in SBC connected mode, the Duet SD card slot must be empty. If an SD card is present in the Duet, it will attempt to start in standalone mode.
¶ 6. Accessing the SBC through SSH/VNC
Note: this step is optional if you have a screen and keyboard attached to the SBC
Note: this step assumes the username of your SBC is "duet3" and password is "raspberry". If you have changed these, use the new ones in place of "duet3" and "raspberry".
In RRF 3.5 and later, most of the required interaction between a user and the Duet 3, including the SBC, can be done through Duet Web Control. In RRF 3.4.x and earlier, it is necessary to have either a ssh command line, or VNC connection, in order to update the Duet Software Framework software that runs on the SBC.
¶ Enable SSH
DuetPi lite (no GUI) has SSH enabled by default, because usually you don't have a display attached to those setups.
DuetPi (with GUI) does not have SSH enabled by default, but you can enable it by:
- putting an empty "ssh" file on the boot partition, or
- connecting to DWC and sending
M586 P2 T1 S1. This makes a persistant change, DO NOT add this line to config.g.
¶ Connect using
Under Windows the easiest way is via “Putty”:
-
Download & Install Putty.
-
Enter duet3.local or your SBC IP address and select ssh.

-
Agree to the security alert - it is Putty Saying it has never connected to this SSH server before.
-
Login with username “pi” and password “raspberry”
Under macOS and Linux the "ssh" program is accessible from the command line. macOS guide here.
- open a Terminal window and send the following ssh command:
ssh pi@duet3.local - You will then be presented with a password prompt; use 'raspberry'.
For all systems, once connected, you will be presented with a command line:
pi@duet3:~ $
To update the Duet Software Framework and other system components type:
sudo apt update
(the sudo password is raspberry)
Then
sudo apt upgrade
If you prefer a desktop environment to a command line then you can use the realVNC client to connect.
-
First follow the steps above in "Connecting via SSH" until you are at a command line on the pi.
-
type
sudo raspi-config -
Navigate to Interfacing Options.
- Scroll down and select VNC > Yes.
- Choose advanced options -> resolution and select the resolution you would like to use (you may find better performance using a medium resolution, not the highest)
- Save and reboot when prompted
-
Install the realVNC client on the machine you want to use to connect. You can use the free version non commercially.
-
Once installed open the realVNC client, go to "file" -> "new connection" and use duet3.local or the IP address of your SBC to connect. the username and password are the same as for ssh.
¶ 7. Configuring system files
By this step you should have Duet Web Control showing when you go to http://duet3.local/ or the IP address of your SBC.

The default SD card image does not come with the system files configured for your printer - there are many different types of machines that are supported so you need to generate a config.g, homing files, and other system macro files that are required.
The online RepRapFirmware configuration tool has been updated to support the generation of config files for RRF3. Though you may still need to manually implement some of the more advanced features.
- If you have a set of files for your printer for Duet 2 use those as the start point for the values used in the config tool.
- If you do not have a set of Duet 2 config files then use the config tool to generate a set with everything as closely matched to your printer as possible, and then carefully commision the printer to verify proper operation.
The changes required to create a set of Duet 3 config files is outside the scope of this guide. Please see the Migrating from RRF2 to RRF3 guide for a list of the gcodes that need changing to get a config.g setup for duet 3.
Once you have a set of system files they can be uploaded via the "system" tab in DWC.
¶ 8. Useful commands
In SBC mode, start the 'DuetPi Management Plugin' in DWC > Settings > Plugins ( > External Plugins in versions prior to RRF 3.6.0) to enable the extra Gcode commands listed below.
For a full list of SBC-related commands, see this page in the DuetPi Management Plugin Github repository.
¶ Shutdown or Reboot SBC
Rather than just yanking the power cord from the SBC, from RRF 3.4, you can command a 'graceful' shutdown or reboot of the SBC from DWC, by sending (requires DuetPi Management Plugin):
M999 B-1 P"OFF" ; Shut down SBC
M999 B-1 ; Reboot SBC
Or connect via SSH, or open a terminal, and send sudo systemctl poweroff to shutdown, or sudo systemctl reboot to reboot.
If you have a keyboard and monitor connected to your SBC, or connect via VNC, you can simply use the Operating system shutdown and reboot menu option.
¶ Update firmware
Once your Raspberry Pi has established an internet connection, it is recommended to install the latest updates. The following commands will install the latest software components and the latest RepRapFirmware version on your Duet 3. You can do this regularly to update the system as new firmware is released.
In RRF 3.5 and later, users running the latest Bookworm-based DuetPi image can use M997 S2 to install the latest DSF and security-related packages on DuetPi (via apt update/unattended-upgrade). This can take a few minutes, so be patient! Note that this M-code only installs security- and Duet-related software updates. (Requires DuetPi Management Plugin.)
In RRF 3.4.x and earlier, or users running on earlier Buster-based DuetPi images, connect via SSH or VNC (see above) to your Raspberry Pi or open a terminal (if you have keyboard and monitor connected) and run:
sudo apt update
sudo apt upgrade
Note that if you are running on RRF 3.4.x or earlier, you will not be able to update to 3.5.x, as 3.5.x runs on the newer Raspberry Pi OS 'Bookworm', rather than the older 'Buster'. To upgrade see Updating SBC from Buster to Bookworm.
¶ Switch between releases
In RRF 3.5 and later, users running the latest Bookworm-based DuetPi image can use M997 S2 with two optional parameters to switch between release versions. (Requires DuetPi Management Plugin.)
F"<feed>"- Set package feed for DSF packages where<feed>can bestable(default),unstable,stable-x.y, orunstable-x.ywhere x.y corresponds to a version. e.g. 3.4 or 3.5.V"<version>"- Install a specific DSF/RRF combination (may not be used together withM997 F). Example:M997 S2 V"3.5.0-rc.2"
For example, M997 S2 F"unstable" switches to the 'unstable' package feed, and M997 S2 V"3.5.0-rc.2" downgrades to the specificied DSF/DWC/RRF version.
In RRF 3.4.x and earlier, to switch between stable/release package feed and unstable/beta package feed, see DSF installation.
¶ Virtual SD card
In SBC mode and RRF v3.4 or newer these commands may be used to mount/unmount block devices or remote endpoints using the mount command. These commands should go in dsf-config.g NOT config.g. (Requires DuetPi Management Plugin.)
M21 Mount device (Initialize SD card)
M22 Unmount device (Release SD card)
¶ Networking
M540 and M550 commands, if needed, should go in dsf-config.g NOT config.g. (Requires DuetPi Management Plugin.)
M540 Set MAC address
M550 Set Name (see 'Changing the SBC hostname' below)
Sending any of the following command makes a persistent change. They do not need to be added to dsf-config.g. They should NOT be included in config.g. (Requires DuetPi Management Plugin.)
M552 Set IP address, enable/disable network interface
M553 Set Netmask
M554 Set Gateway
M586 Configure network protocols
M587 Add WiFi host network to remembered list, or list remembered networks
M588 Forget WiFi host network
M589 Configure access point parameters
¶ Changing the SBC hostname
This is an optional step if you only have a single duet3 on your network. It is required if you have more than one duet 3 as each duet 3 on a network needs a unique host name.
Send M550 to change the hostname, in SBC mode this change is permanent and M550 does not need to be put in config.g unless you wish to use a slightly different name with spaces and/or alternative casing, e.g. to change the displayed hostname ender3pro to Ender 3 Pro, use M550 P"Ender 3 Pro". (Requires DuetPi Management Plugin.)
In order to change the SBC hostname, the DuetPiManagementPlugin must be running.
The name of the printer is its hostname on the network, you will need to connect to the SBC over SSH or VNC (as described above) in order to run the Raspberry Pi configuration utility and change the hostname. Note that you cannot use the gcode command M550 to set your printer hostname
- Connect via ssh or VNC.
- At a command prompt type
sudo raspi-config
- Select “System Options” -> Hostname-> “OK”-> and set the new printername/hostname.
- Note the hostname must conform to certain limitations to be valid.
- Valid characters for hostnames are letters from a to z,
- the digits from 0 to 9,
- the hyphen (-).
- Select “Finish” and reboot.
When you next boot with a screen, or log in with VNC, Chromium may give you the following warning. Select “unlock Profile and Relaunch”.
¶ 9. Troubleshooting
¶ SPI connection reset
This issue may occur when the link between Duet and SBC is interrupted. Possible causes include:
- Poor wiring between the boards (intermittent connections)
- Inproper grounding
- Cable too long
- Cable picking up noise from adjacent electronic components (stepper motor or big heater wires)
If this issue occurs, make sure the ribbon cable has enough space to adjacent stepper motor or large heater wires that could induce interference. If the problem persists, shielding the cable using metal foil may help. Using a multimeter you can also check if all the wires of the ribbon cables have good continuity.
¶ Disable WiFi Power Saving on the Raspberry Pi
In addition to those reasons, there have been been reports that power saving of the integrated Raspberry Pi WiFi adapter may cause problems with the SPI connection (see here and here). To rule this out, you can try to disable WiFi power saving by running the following from a Linux shell (e.g. via SSH or from a terminal in the GUI version):
echo "# Disable power saving of the built-in WiFi adapter to avoid SPI connection problems" | sudo tee -a /etc/network/interfaces
echo "allow-hotplug wlan0" | sudo tee -a /etc/network/interfaces
echo "iface wlan0 inet manual" | sudo tee -a /etc/network/interfaces
echo "post-up iw dev wlan0 set power_save off" | sudo tee -a /etc/network/interfaces
sudo iw dev wlan0 set power_save off
¶ Failed to connect to Duet (DCS not started)
If you get this message, it means that the main service communicating with RepRapFirmware failed to start.
This usually means that the connection between the Duet and SBC has been interrupted.
To acquire further details about this message, access the service logs from this particular unit by running journalctl -u duetcontrolserver -e.
This will output the latest logs and it will - if applicable - report why DCS failed to start.
¶ Timeout while waiting for transfer ready pin
This error message means the service attempted to wait for a signal on the transfer ready pin (pin 22 on the expansion header) but it timed out while doing so. Interference or a bad connection may cause this.
¶ Board is not available (no header)
When DSF gets a signal over the transfer ready pin, it attempts to exchange data over SPI. If the received data is completely empty, this error message is generated.
This error message indicates a problem with the SPI peripheral either on the Duet or on the SBC. Check the continuity between the SPI pins on the Duet and SBC sides.
¶ Trivial checks
If you get communication issues between the Duet and SBC, perform the following steps first:
- Make sure there is no SD card present in the Duet
- Make sure both the Duet and SBC are powered properly
- Confirm that the red "DIAG" LED flashes in regular intervals
- Try reseating the SBC cable between the Duet and SBC
- Disable all third-party plugins (only v3.3 and newer)
In case these steps haven't improved the situation, you can proceed with the following checks.
¶ Measure continuity of the ribbon cable
Disconnect the power source from your SBC and Duet. Then take a multimeter and check if there is continuity between the Duet and SBC of the following pins
| Pin Number | Description |
|---|---|
| 17 | +3.3V |
| 19 | MOSI |
| 20 | GND |
| 21 | MISO |
| 22 | TfrRdy |
| 23 | SCLK |
| 24 | CS0 |
If there is no or bad continuity between any of the pins, consider replacing the cable.
Note that pin 17 is required to turn on the TfrRdy and MISO pins unless you are using a Duet 3 MB6HC v1.0 or older.
¶ Testing GPIO capability of the SBC
This type of check is recommended if you get "Timeout while waiting for transfer ready pin"
Power down the Duet as well as the SBC and disconnect the cable between the Duet and SBC.
When done, take a jumper cable and connect the +3.3V line of your SBC to the TfrRdy pin.
Be careful and do not mix up the +5V pins with the +3.3V pin, else you will damage your SBC!

When you are done, power up the SBC again. When it has finished booting, open a terminal and stop the DCS service via sudo systemctl stop duetcontrolserver first.
Then run gpioget gpiochip0 25. It should output 1 to indicate that the GPIO pin reads the correct signal.
After this, pull off the jumper cable and run the command again. This time it should output 0.
Note that the gpio chip name and the pin number may vary if you are not using a Raspberry Pi.
If the expected results do not match the command outputs, it is likely that the GPIO peripheral of your SBC is damaged.
In this case it is a good idea to replace the affected SBC.
¶ Check SPI data lines in loopback mode
This type of check is recommended if you get "Board is not available"
Power down the Duet as well as the SBC and disconnect the cable between the Duet and SBC.
When done, take a jumper cable and bridge the MOSI and MISO pins (pins 19 and 21 on the Raspberry Pi).

After this power up the SBC again and open a terminal. Then run the following commands:
wget https://raw.githubusercontent.com/raspberrypi/linux/rpi-3.10.y/Documentation/spi/spidev_test.c
gcc -o spidev_test spidev_test.c
./spidev_test -D /dev/spidev0.0
spi mode: 0
bits per word: 8
max speed: 500000 Hz (500 KHz)

FF FF FF FF FF FF
40 00 00 00 00 95
FF FF FF FF FF FF
FF FF FF FF FF FF
FF FF FF FF FF FF
DE AD BE EF BA AD
F0 0D
Note the last section of the output above (FF FF ...) should match.
If you get only 00 or FF there, it is likely that the SPI peripheral of your SBC is broken.
¶ Web interface not updating
If the web interface appears to be frozen but still reacts to incoming commands, it is very likely that you are trying to run an unsupported firmware version.
To resolve this problem, the easiest solution is to send M997 over the web interface or code console.
In case this method does not resolve this problem, open a terminal and run journalctl -u duetcontrolserver -f.
This will show you the log including new messages being written. If you see any kind of exception there, please file a new issue on GitHub and share the console output plus the output of M122.
¶ Increasing log level
To obtain more data for potential debugging it is possible to adjust the log level of the DCS service.
This can be done by changing LogLevel in /opt/dsf/conf/config.json from info to debug.
Once this change has been made, restart the DCS service to apply it (sudo systemctl restart duetcontrolserver).
After that you can follow potential debug messages in a terminal by running journalctl -u duetcontrolserver -f.
If you want to share a log of the events from today, the command journalctl -u duetcontrolserver --no-pager --since today may be useful.
This command dumps the log content directly to the console so it can be easily copied from your terminal and pasted in a text file.
Don't forget to change back the log level from debug to info when you are done, else you may get a lot more IO on your SD card over time.
¶ Further troubleshooting
If none of the described steps helped, please open a new thread on the forum.
Note that support requests on GitHub will be closed immediately.